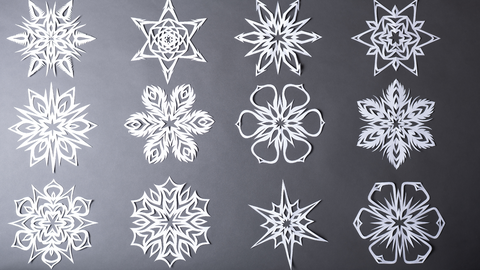
@uab_blazers ❄️While we may not get flurries every year, we're excited to show off the unique paper snowflakes created by UAB Professor Gary Chapman. Each snowflake is cut by hand, creating delicate and intricate snowflakes every time.
♬ Snow, glitter, winter, Christmas(1195969) - Tunagamo
It is snowflake season for artist Gary Chapman — paper snowflakes, that is.
Each winter for the past 15 years, Chapman has pulled out scissors and a ream of paper and started cutting. He has cut around 10,000 snowflakes, according to his estimates.
“I discovered later in life, as an artist, I just have a hard time sitting still,” Chapman said. “And so, cutting snowflakes is just a great way to occupy my hands. People really enjoy it, and it strikes up some good conversations.”
Chapman is professor of painting at the University of Alabama at Birmingham, in the College of Arts and Sciences’ Department of Art and Art History. That is where he first started cutting the flakes during downtime.
“I think what intrigues me about them is the saying that no two snowflakes are exactly alike, and it really is true,” Chapman said. “You are working with just this tiny little triangle of paper, and depending on how you cut it and what angle and whether it is a curve or it is parallel and all that, it just comes out crazy-different.”
Chapman has taught snowflake workshops to all sorts of different audiences, if they can safely cut through the 12 layers of paper, he says. Sometimes he has branched out to try making themed designs, which actually resulted in a number of commissioned designs, he says.
“I like doing it in the moment and trying something different,” he said. “Usually, the details are ones that surprise me like, ‘Oh, wow. I know I have never cut a snowflake like that in 15 years.’”
Of all his snowflakes, he is partial to one kind.
“I love the black. The black is really elegant, and the paper is just slightly heavier, so I get a really sharp line with the black.”
The best paper to use is your standard 20-pound copy paper, but a good pair of scissors is important too.
“You do not want to use a bad pair of scissors, right? They do not have to be extremely expensive, but you need a good pair,” Chapman said.
 Photography: Andrea MabryStart with a square of paper. Fold it in half diagonally, then fold that in half again. Fold one third of it over, then fold the other third over. Cut the top angled ears off. Begin cutting your snowflake. Be sure not to cut all the way through. Unfold to reveal.
Chapman’s tips to cut a paper snowflake:
“Learn how to fold a blank, and when you fold it, be precise about your folds — tight and precise. Your snowflake will be more symmetrical if you keep the paper from shifting; if it is not tightly wound, your cuts get off. So that is the first thing: Learn how to make a really good blank.”
“The first cut you make is the exterior cut, or the outer cut, of your snowflake, and it creates the shape of your snowflake. A lot of people want to be conservative and not do very much there. But in fact, this is where you want to be really dramatic.”
“Do not be afraid to make your cuts really close to each other, because one of my goals is to end up with as little paper as possible in the snowflake. It just makes it more airy and more intricate.”
“The final tip I would tell people is that you might think you want to cut with the tips of your scissors, but you do not. You want to cut way deep on the blades, because that is where your cutting power is.”