Adding the Panorama Office Add-in to Microsoft Word and PowerPoint
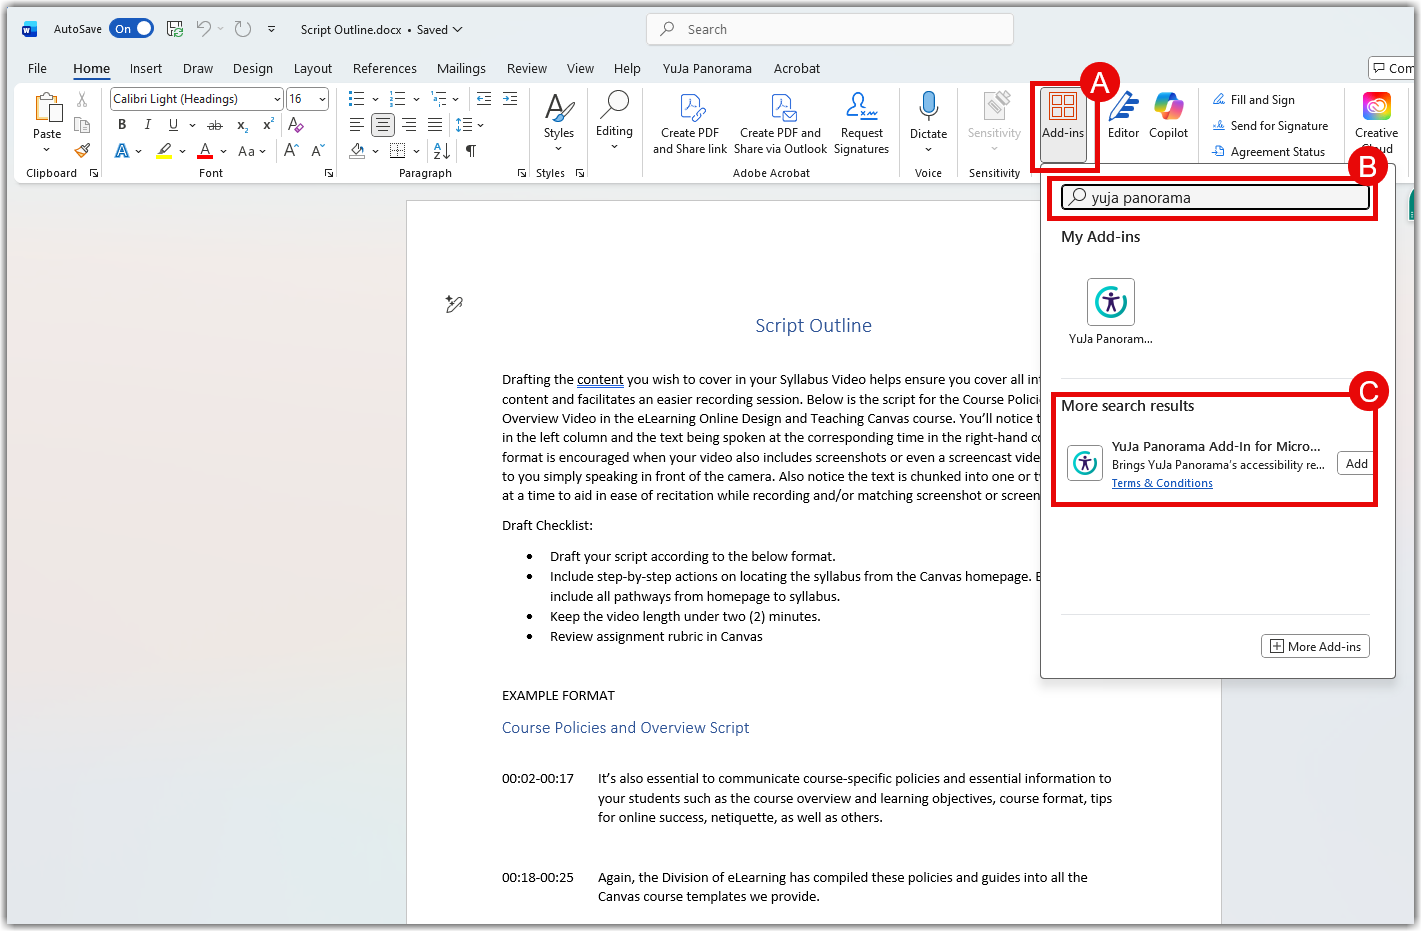
- To install the Panorama Office Add-in in Microsoft Word and PowerPoint, open a Word document and press Add-ins(A) in the ribbon at the top of your screen. In the search box, type "YUJA Panorama"(B) and choose the Panorama Add-in. Press the Add button(C), and the YuJa Panorama Add-in will now be added to the ribbon.
- Open Yuja Panorama(A) in Word. Select Accessibility Report (B). In the Enter Connection String box (C), copy and paste the the Connection string from UAB Box. You will have to login to Box with your with your BlazerID and password to access the code.
Push the Connect button(D) to log in to Panorama.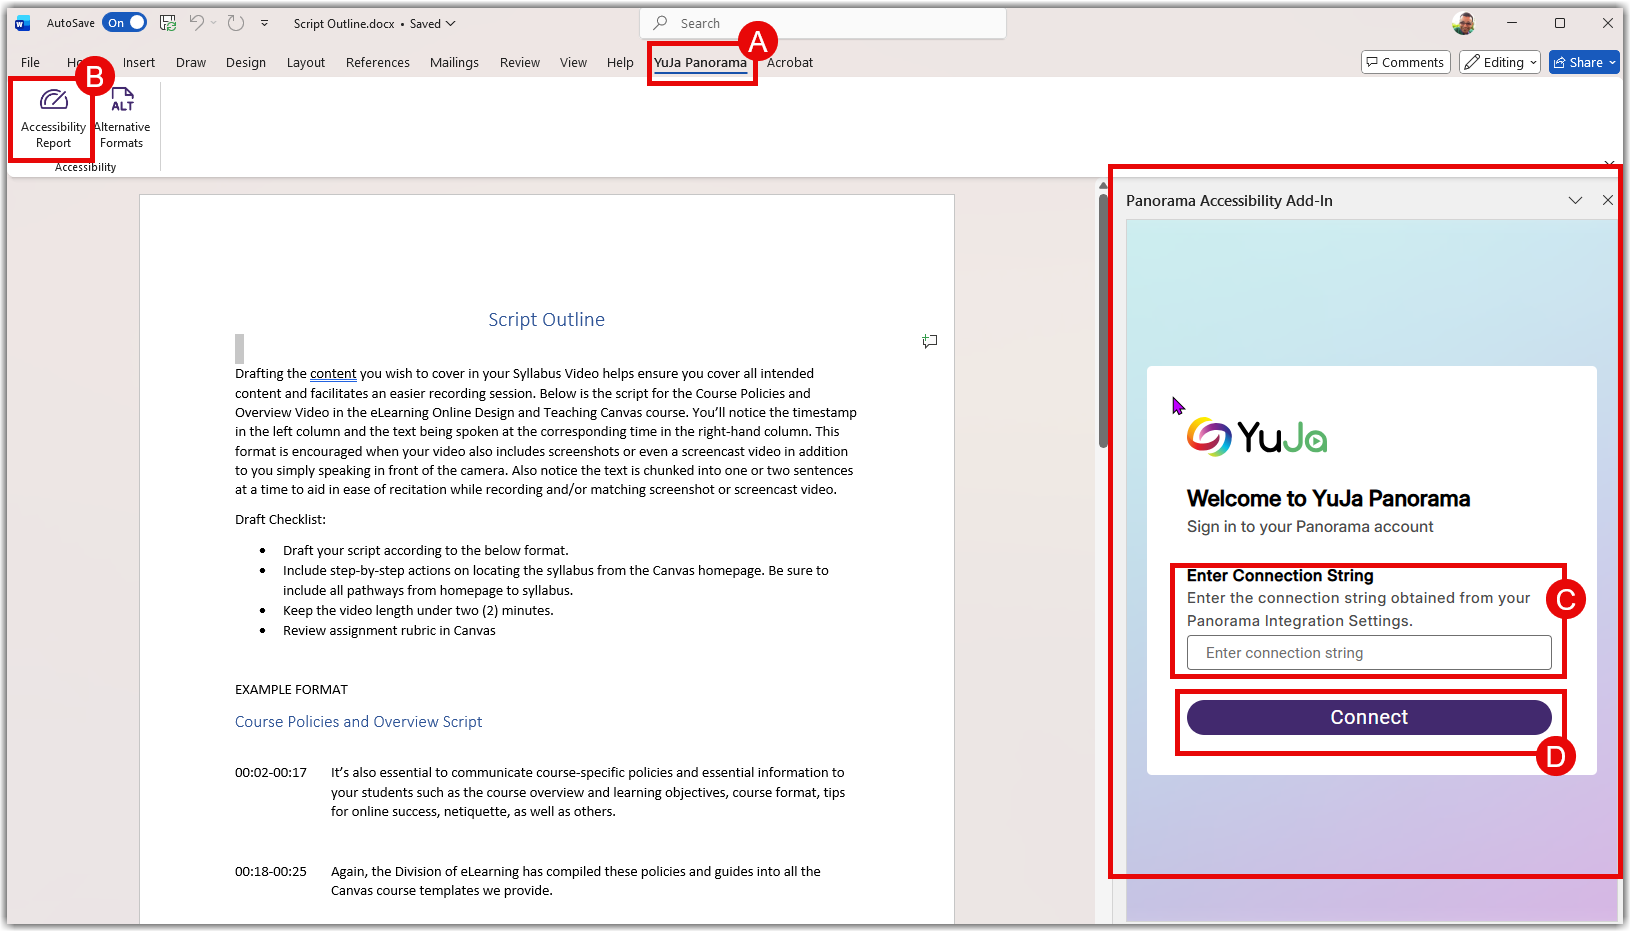
- Once logged into your Panorama account, the Panorama Add-in will be available to enhance the accessibility of your content. Simply open any Word or PowerPoint document, then select Yuja Panorama (A) and explore the Accessibility Report (B). This way, you can easily view and fix any accessibility issues in your document.

What is Accessibility?
Accessibility means designing learning materials so all students can access and understand them, regardless of ability, disability, or learning style. This includes students who benefit from screen readers, audio content, translations, or simplified layouts.
What are ALT Formats?
Alternative formats (Alt Formats) are different ways to access the same course content to better support individual learning needs. These formats may include audio versions, text files, PDFs, immersive or gradient readers, language translations, and braille-ready formats. Alt formats help students who prefer listening, need translation, use assistive technology, or benefit from simplified layouts. By offering multiple format options, alt formats make course materials more flexible, accessible, and easier for all students to use.
How do I get to Alt Formats in Canvas?
In your Canvas course, select the Alt Formats icon (A) next to a file or page to open a list of available formats.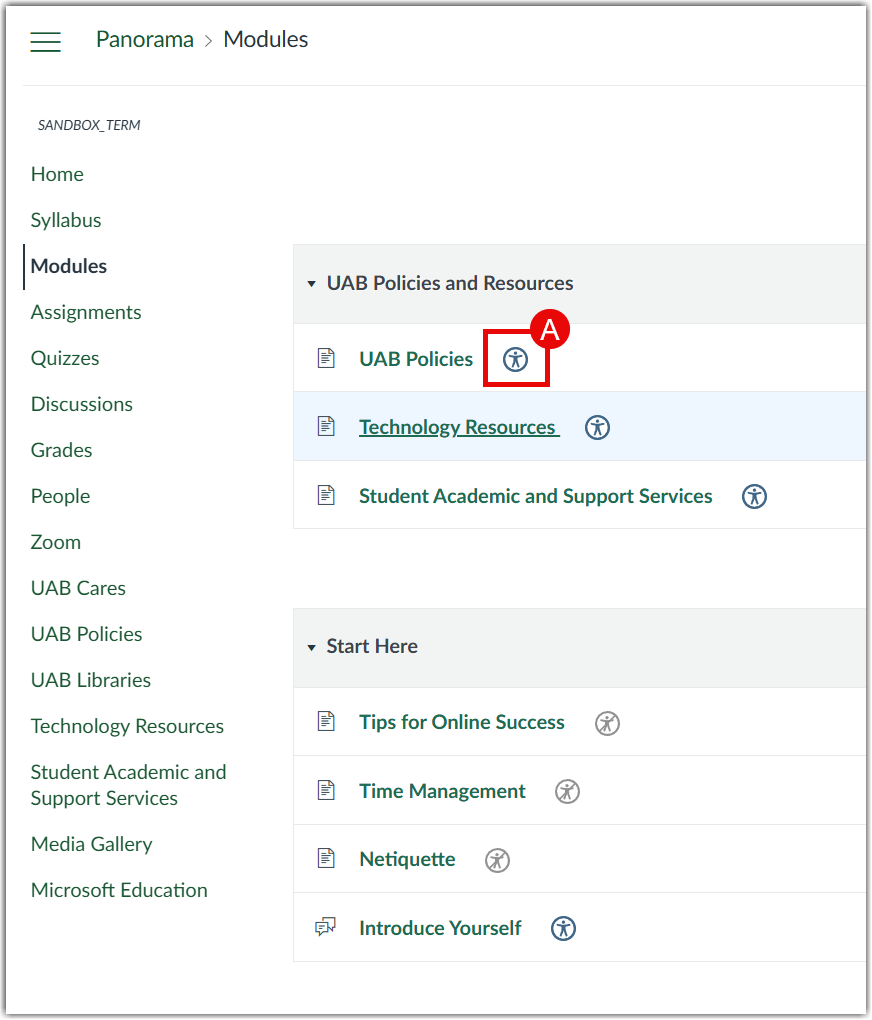
After selecting the icon, choose the Alt Format that best fits your learning needs.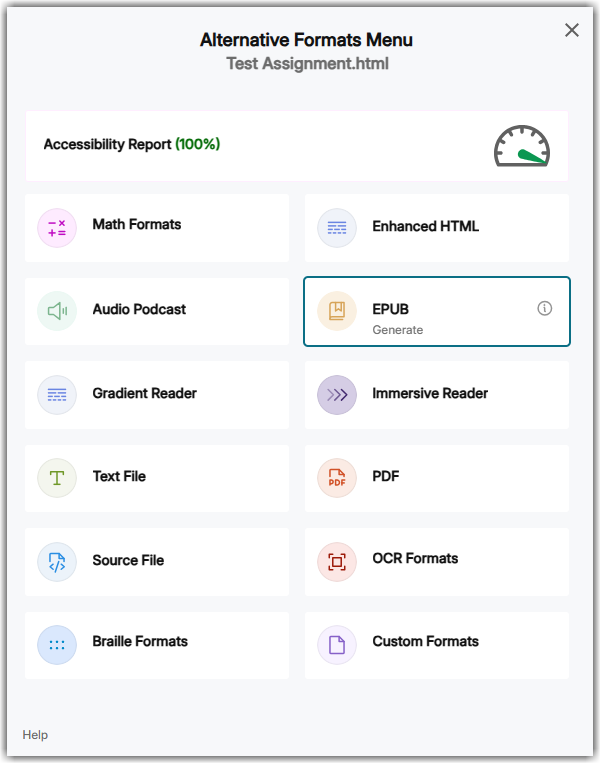
What does each ALT Format provide?
-
Math Formats
Math content is converted into accessible formats, so assistive technologies can read and interpret equations correctly.
- Screen readers can read equations in a meaningful way.
- Students can copy equations cleanly into notes or study tools.
- Helpful for reading complex formulas on small screens.
-
Language Translations
A translated version of the document in a different language is provided in this format.
- Supports multilingual students.
- Helps with understanding complex academic language.
- Useful for quick meaning checks.
Note: Translations may not always be accuarte for technical or legal terms.
-
Enhanced HTML
The document is converted into a web-style format that is easier to navigate than a scanned PDF, making it more accessible, easier to read, and more user-friendly across different devices.
- Resizes well on phones and tablets.
- Improves navigation with headings.
- Works better with screen readers.
-
Audio Podcast
The content is converted into an audio format that supports auditory learning, helps students with dyslexia, ADHD, and vision challenges, and allows learning while multitasking.
-
EPUB
The content is provided in an eBook format that allows students to adjust text size and spacing, making long readings more comfortable and supporting highlighting and note-taking.
-
Gradient Reader
The reading view is designed to improve focus and visual comfort by reducing visual stress, enhancing concentration, and making dense text easier to read.
-
Immersive Reader
Immersive Reader helps students by providing read-aloud support, a line focus feature for better concentration, and improved readability for those with dyslexia.
-
Text File
This format works well with screen readers that are easy to copy and search. Text files offer a distraction-free reading experience. -
PDF
PDFs allow students to easily annotate and print documents while maintaining a stable layout for studying.
-
Source File
Source files provide more customization options and better compatibility with accessibility tools, giving students flexibility in how they access content.
-
OCR Formats
OCR formats make scanned PDFs readable and allow students to search and copy text from them.
-
Braille Formats
Braille formats support braille readers and ensure equal access to content for all students.
![]() UAB faculty, staff and students have access to Microsoft Education to download Microsoft products such as Microsoft Word, Excel, PowerPoint, OneDrive, Teams and OneNote. These applications are also available for use as web applications in the cloud, where each user has 5TB of storage in a OneDrive account. More information can be found on UAB’s IT Microsoft website
UAB faculty, staff and students have access to Microsoft Education to download Microsoft products such as Microsoft Word, Excel, PowerPoint, OneDrive, Teams and OneNote. These applications are also available for use as web applications in the cloud, where each user has 5TB of storage in a OneDrive account. More information can be found on UAB’s IT Microsoft website
.
Microsoft Education in Canvas
Canvas supports integration with Microsoft Education in Course Navigation, Assignments, Collaborations, Modules, Course Navigation, and the Rich Content Editor. This integration replaces the old Office 365, Teams Classes and Teams Meetings Canvas integrations. Microsoft Education allows students and instructors to use, create, share, collaborate, and meet in real time using Microsoft 365 files within Canvas. Users can also view OneDrive files directly in Canvas.
Features
- Choose if the OneDrive, Teams, Teams Meetings, and/or OneNote Class Notebook are available through Microsoft Education on a course-by-course basis. These features are enabled by default unless the course instructor disables them.
- Create & access Microsoft Teams based on the course roster
- Create & access Microsoft Teams meetings inside Canvas
- Access OneDrive files from inside a Canvas course
- Assign a Word, PowerPoint, or Excel file as a cloud assignment
- Allow students to collaborate on documents within Canvas groups
- Students can select files from their OneDrive to submit to online assignments
- Embed OneDrive files anywhere the rich content editor is available
- Add OneDrive files to Modules that are updated automatically
- Grade Microsoft Education submissions via Canvas SpeedGrader
- Create, Share and Edit a OneNote class notebook for the course
How to Access Microsoft Education
Sign In to Microsoft Education
Instructors
Faculty and staff have a Microsoft Education account automatically created by UAB IT. Course instructors should enable the features they would like to use in their Canvas course from the Microsoft Education course navigation link. When choosing to use any Microsoft Education app, add the Microsoft Education link to your Course Navigation menu.
The first time Microsoft Education is accessed by an instructor in a Canvas course, you will be asked to choose if OneDrive, Class Notebook, Teams or Meetings are available in the course. Please view our step-by-step guide for more information.
Students
Licenses for students using Microsoft Education will be automatically granted while you are enrolled at UAB.
To get started, visit mail.uab.edu and sign in with your BlazerID and password to claim your Microsoft Account. Click the matrix in upper left hand corner to view available apps begin using the web applications.
For more information, including how to install the desktop versions of Microsoft Education apps, please visit UAB’s IT Microsoft website.
Guides/Tutorials
FAQ
-
What happened to Office365, Teams Classes and Teams Meetings?
Microsoft has replaced the functionality of several tools with one tool. All previous functionality is available with the new tool accessible from a unified location in Canvas
-
What about existing Office365 embeds in Canvas?
Content embedded in Canvas with prior versions of Microsoft tools will continue to function. We encourage you to use the new Microsoft Education for new embeds.
-
Why are some functionalities of Microsoft Education not available to be enabled in Canvas?
Each functionality of Microsoft Education is individually reviewed for use at UAB to ensure data safety and appropriate AI use. Some tools are still under review and will be made available as they are approved.
-
What are Learning Accelerators and how do I use them?
Learning Accelerators are AI coaching tools that are currently under evaluation for use at UAB. These tools are not currently available for use in UAB Canvas.
Technical Support
Please follow the steps below if you need technical support after reviewing the information, guides, and FAQs above.
-
Check Status Page
Status Page- Check to see if there any know issues before submitting a ticket.
-
Contact UAB IT Microsoft Support
- Submit a Ticket
- (205) 996-5555
-
Ask Learning Technologies
If these support options do not give a satisfactory resolution, please submit a Learning Technologies Support request and include any ticket numbers provided by Microsoft
Privacy & Accessibility
Note for users of screen readers: letters in parentheses in the instructions below refer to corresponding areas on example images. If you have any questions about these instructions, contact Learning Technologies for assistance.
- Log in to Canvas, click Account, then click Qualtrics LTI in the user navigation. Note: If you are a first-time user, please follow the steps below to access your Qualtrics account. If not, please skip to step 13.

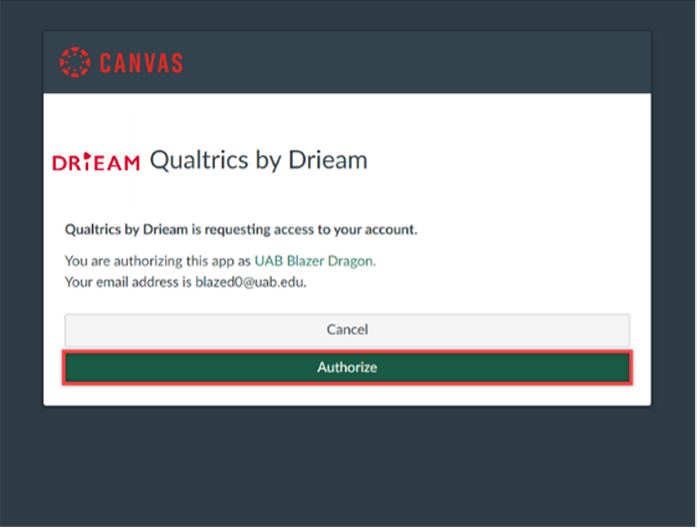
- Click on the Click here to authorize button on the pop-up window.

- Click on the Authorize button.
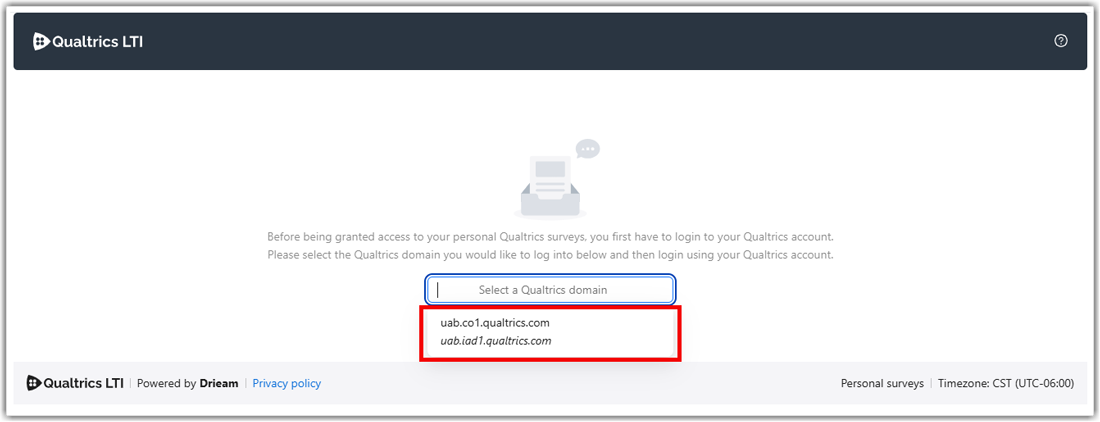
- Click on the dropdown menu to select the UAB Qualtrics domain.
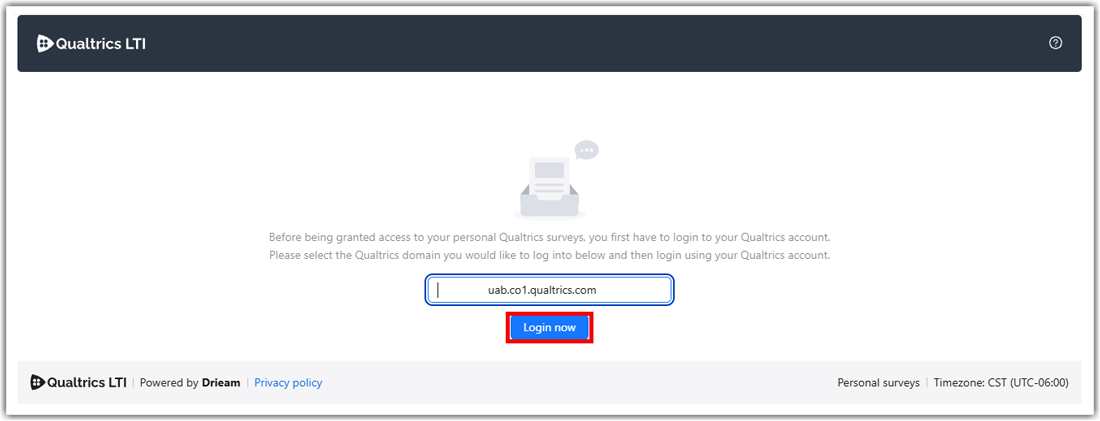
- After selecting the domain, click the Login now button.
- Select Sign in with SSO on the pop-up window.

- Enter UAB in the organization ID textbox.

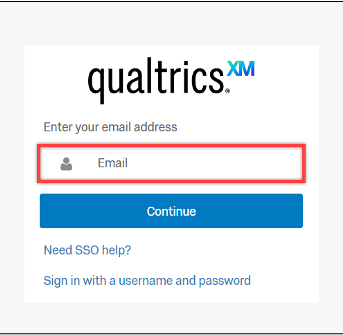
- Enter your UAB email address.
- You will see a page stating that a link was sent to your UAB email address to finish logging in.

- Go to your UAB email and locate the email sent by Qualtrics (the email subject is Login to Qualtrics). Click on the Sign In link in the email.

- Click on the Approve button on the pop-up window.

- You will see a page with a message stating that you are now logged in.

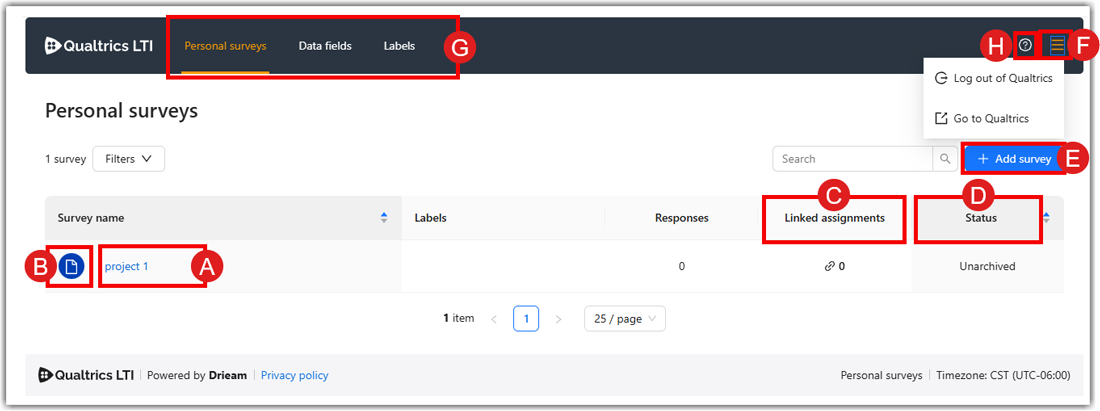
- Now you have access to your Qualtrics survey overview page in Canvas. On this page, you can find the following information:
- Survey name (A). These surveys have already been added to Canvas. You can click on the survey name to go to the details screen of a survey.
- Survey type (B). Hovering over the icon reveals the name of the type. The “Standard Canvas assignment” type is the type most commonly used. The ‘in-class survey’ type can be used to gather student input/feedback during a live event (such as a lecture). Find more information about in-class surveys
- Linked assignments (C). Here you can see how many assignments contain the survey. If you — for example — create a small evaluation survey and use that same survey in multiple courses, this number indicates how often the survey is used.
- Status (D). If the status is 'Unarchived' the survey can be added to any assignment within Canvas. When 'Archived', the survey will remain inside the integration, but you won’t be able to add it to any assignment. This can — for example — be practical when you have a survey that you use for experimenting but don’t want to accidentally add to an assignment.
- Add survey (E). Click on this button if you want to add a survey to the integration. After clicking on this button, you will be asked to select the survey type (Standard Canvas assignment or In-class survey (QR code)). Then you will see a list with all your Qualtrics surveys where you can select the survey you want to use. If you do not see the list of your surveys and see an error message stating that you do not have API access, submit an Ask Learning Technologies ticket. This may occur with older Qualtrics accounts.
- Menu (F). From here you can navigate to other parts of the tool.
- Go to Qualtrics: Open your Qualtrics environment in a new tab.
- Log out of Qualtrics: Click here to log out of your Qualtrics account.
- Menu bar (G). From here you can check out other parts of the tool.
- Personal Surveys: You can find all the surveys that you have created in Qualtrics.
- Data fields: If you want to use Canvas data in your survey you can check here.
- Labels: If you want to create labels to tag your surveys with you can manage those here.
- Help (H).
- I need help: Here you can send an email to your organization’s support or find documentation about the tool.