![]() Badgr is a digital badge issuing and tracking platform that awards badges based on achievements earned at UAB. Badges can be awarded in a variety of educational contexts across UAB that are informal and formal learning. They can serve as progressive achievements in and out of a course on a learning pathway. Badge achievements can be rewarded by school/college, department, and course level of all kinds, such as:
Badgr is a digital badge issuing and tracking platform that awards badges based on achievements earned at UAB. Badges can be awarded in a variety of educational contexts across UAB that are informal and formal learning. They can serve as progressive achievements in and out of a course on a learning pathway. Badge achievements can be rewarded by school/college, department, and course level of all kinds, such as:
- interest and engagement
- participation or attendance
- membership
- knowledge or dispositions
- formal certification (degrees, certificates)
- proficiency, competency, or skill
Digital Badging Information
-
What is a digital badge?
Digital badges offer a way to display web-enabled acknowledgements of achievements, course completions, or learning outcomes mastery. With a single click, digital badges will display detailed information on skills and qualifications achieved, including all activities that were completed to earn the achievement. The skills acquired to obtain a digital badge can be verified online in real-time. This will allow achievers to quickly demonstrate and validate accomplishments.
-
What do they do?
Digital badges help achievers easily manage, share, and authenticate a wide set of skills and achievements.
- They can create a complete representation of an individuals learning path, skills, achievements, competencies, interest, and qualities.
- Digital badges provide a way for students to communicate valuable skills and achievements that otherwise could be difficult to show on a traditional transcript.
- Students can validate valuable skills and share achievements that can impact future opportunities with potential employers and even academic programs.
-
Why do we need them?
Digital badges can be more dynamic in today’s world where learning happens anywhere and everywhere. This will create a formal recognition for valuable skills and share achievements with just a single click. Digital badges can represent the same experiences and skills presented on a resume, but in a richer level of detail. Once a digital badge is earned, it can be shared on resumes, in courses, and social networks. This will allow others to see rich details of learning outcomes and achievements that can be verified authentically as credentials.
-
What type of badges does UAB offer?
UAB offers four types of badges based on the criteria and purpose. Descriptions of each badge type are listed below.
Single/Course Program Department School/College A single badge or course badge related to a single criteria completion. Typically reserved for completing a single skill or module requirement in a course. A badge awarded by a specific program based on a set of achievements. In relation to a program, this type of badge would be awarded after a set of courses is completed. A badge awarded by a department based on total achievements from a single or program level badge. An example of this would be a badge awarded after a student has completed all required courses in a particular major/minor. A badge reserved for the highest award given by a School/College. Typically, these badges are reserved for students who completed a total of achievements during their entire tenure at UAB. -
What is a digital badge pathway?
Along with an individual badge award, digital badges can be stacked together into a pathway. Pathways allow you setup multiple layers of requirements or micro credentials that equal one larger overall badge. An example of this would be stacking or bundling a set of single and program level badges into an overall department or school/college badge.
Access
Instructors/Faculty/Staff
To get started with issuing digital badges, follow the steps below:
- Fill out the Badgr/digital badge request form. A member of the eLearning team will be in touch regarding next steps.
- Start working on the digital badge information sheet (downloadbale worksheet template). This will provide the eLearning team with the information needed to setup the badge.
- Meet with the UAB eLearning team and discuss the badge proposal.
- Test and implement the digital badge into your course/program.
- Fully deploy the badge and start awarding.
Students
To access Badgr through Canvas as a student, navigate to the Global Menu Navigation is Canvas and select Badges.
From the Badges menu in Canvas, students may see one or two tabs:
- Progress: To view the badges that are earned in the course, along with the badges that have not yet earned. Students can click on a badge they've earned to download and/or share with social media
- Leaderboard (optional): students can see their badge earning in comparison to others in the course (*Please not the leaderboard has to be enabled in the course)
- Users interested in gaining issuers access can contact eLearning
Badgr Guides/Tutorials/Resources
Instructors
Badgr FAQ
-
How are student’s awarded digital badges in the course?
Module completion is how Badgr is signaled to award badges. Students earn badges in a course by setting module completion requirements in Canvas. Module completion requirements can be set based on a combination of assignment grades, quiz scores, submission, content viewed, and module prerequisites. More information on learning how to set Canvas module completion requirements to customize how students earn on their badges can be found on the Setting Module completion requirements guide.
-
Can I select specific digital badges for Canvas Modules?
Yes, badges can be selected by previously defined badges in Badgr, you can select a badge that was created by your issuer, or you can request a have a badge created by contacting UAB eLearning. More information on selecting badges can be found on the Select Badges for Modules guide section.
-
Can I share digital badges?
Yes, badges can be shared from within Canvas and on the Badgr website. For information on sharing badges, visit the Sharing Badges within Canvas guide and the Sharing Badges on the Badgr website guide.
-
What is Issuer Locking?
Issuer locking only allows access to a single issuer on a specified course or subaccount. Instructors will not be able to change issuers once the issuer is locked in a course or subaccount in Canvas. For more information on your school/college or department issuer, please contact eLearning.
-
Why can't my students see their awarded digital badges?
If students have completed the module and have not yet received their badge, you may need to trigger a badge check.
Badges can be triggered in three ways:
- By accessing the Progress tab from the badges menu and paging through the student list of names. This sends each page (35 students), one at a time to the Badgr server to check for new awards.
- Requesting the CSV download Report from the Progress tab to trigger awards for all students in a single request.
- Students can trigger a check for their own badges by selecting the Badges menu within their course or by viewing a badge placed in a module. To learn how to trigger a badge, visit the Triggering badge awards in Canvas courses guide.
-
What are Badgr Pathways?
Badgr Pathways connect badges from any platform into meaningful pathways users can follow. Users can track their own progress and look ahead to plan the next steps in their learning journey. Desired steps give structure to the badged learning stepping stones and serve for implementing pathway rules. A step may have zero, one, or many badges associated with it. For more information on creating pathways, contact your department issuer. To view a sample of a pathway, visit the Pathway sample page.
-
How do I create a Pathway for my curriculum?
A pathway and its completion badge must be created and edited by your department issuer. Contact your department issuer for more information.
-
What happens to my digital badges when I graduate?
Students can add a personal email to their Badgr account so that they can access after they are no longer a student.
Badgr Instructor Training
Group, one-on-one, or virtual training sessions are available to faculty.
Badgr Technical Support
Please follow the steps below if you need technical support after reviewing the information, guides, and FAQ's above.
- Troubleshooting Tips Page - Check to see if you can troubleshoot your issue before submitting a ticket
- Contact Badgr Support - Badgr support is available for instructors and students Monday–Friday 9 a.m.–5 p.m. PT.
- Ask eLearning - Users who still need help after reviewing the resources on this page and contacting Badgr Technical support can request support from UAB eLearning using the link below. Request Academic Technology Support
Privacy and Accessibility
![]() UAB faculty, staff, and students have access to Microsoft Teams as a part of Microsoft Education. With Microsoft Teams students and instructors can chat, meet, call, and collaborate all in one place. Microsoft Teams integrates with OneDrive and Canvas. More information can be found on UAB's IT Teams Website.
UAB faculty, staff, and students have access to Microsoft Teams as a part of Microsoft Education. With Microsoft Teams students and instructors can chat, meet, call, and collaborate all in one place. Microsoft Teams integrates with OneDrive and Canvas. More information can be found on UAB's IT Teams Website.
Microsoft Teams In Canvas
Teams is available in Canvas through Microsoft Education, which allows instructors to create a Microsoft Teams group, called Teams, containing all participants in a Canvas course with the click of a button, creating a space to chat, meet, call and collaborate with OneDrive documents in real time. Meetings allow virtual Meetings to be scheduled & launched from the Canvas Course Navigation Menu.
How to Access Microsoft Teams
The Microsoft Education (A) Course Navigation in Canvas provides access to both Teams (B)and Meetings (C).These links must be enabled and set up by the course instructor.
Microsoft Teams Classes

Microsoft Teams Meetings

Downloads
Faculty and students can access Microsoft Teams through Canvas, or through an app for mobile, web and desktop.
Guides/Tutorials
Instructors
General Microsoft Teams Guides
FAQ
-
Microsoft Teams Classes or Microsoft Teams Meetings are not in my Course’s Navigation. How do I fix this?
The integration is not enabled by default. Each integration must be enabled individually in the Course Settings. Follow the instructions in our set-up guides for Class Teams and/or Teams Meetings.
-
What about cross-listed courses? (multiple courses under one section)
All students will be in the main course’s Microsoft Teams class. Private channels can be manually created in this Class Team for each section if desired.
Technical Support
Please follow the steps below if you need technical support after reviewing the information, guides, and FAQs above.
-
Contact Teams Support
-
Ask Learning Technologies
If these support options do not give a satisfactory resolution, please submit a Learning Technologies Support request and include any ticket numbers provided by Teams.
Privacy & Accessibility
Microsoft Education First Time Setup
Microsoft Education is a Canvas LTI tool that allows instructors to access all Microsoft features in Canvas from one location. Instructors don't have to add multiple course navigation links to use several different Microsoft features in Canvas. Adding Microsoft Education in your Canvas course facilitates embedding of Microsoft OneDrive files, assigning OneDrive files to students for assignments, creating a Teams group matching the course roster, scheduling Teams meetings, allows students to submit OneDrive files to assignments, and collaborate using OneDrive files or a OneNote notebook.
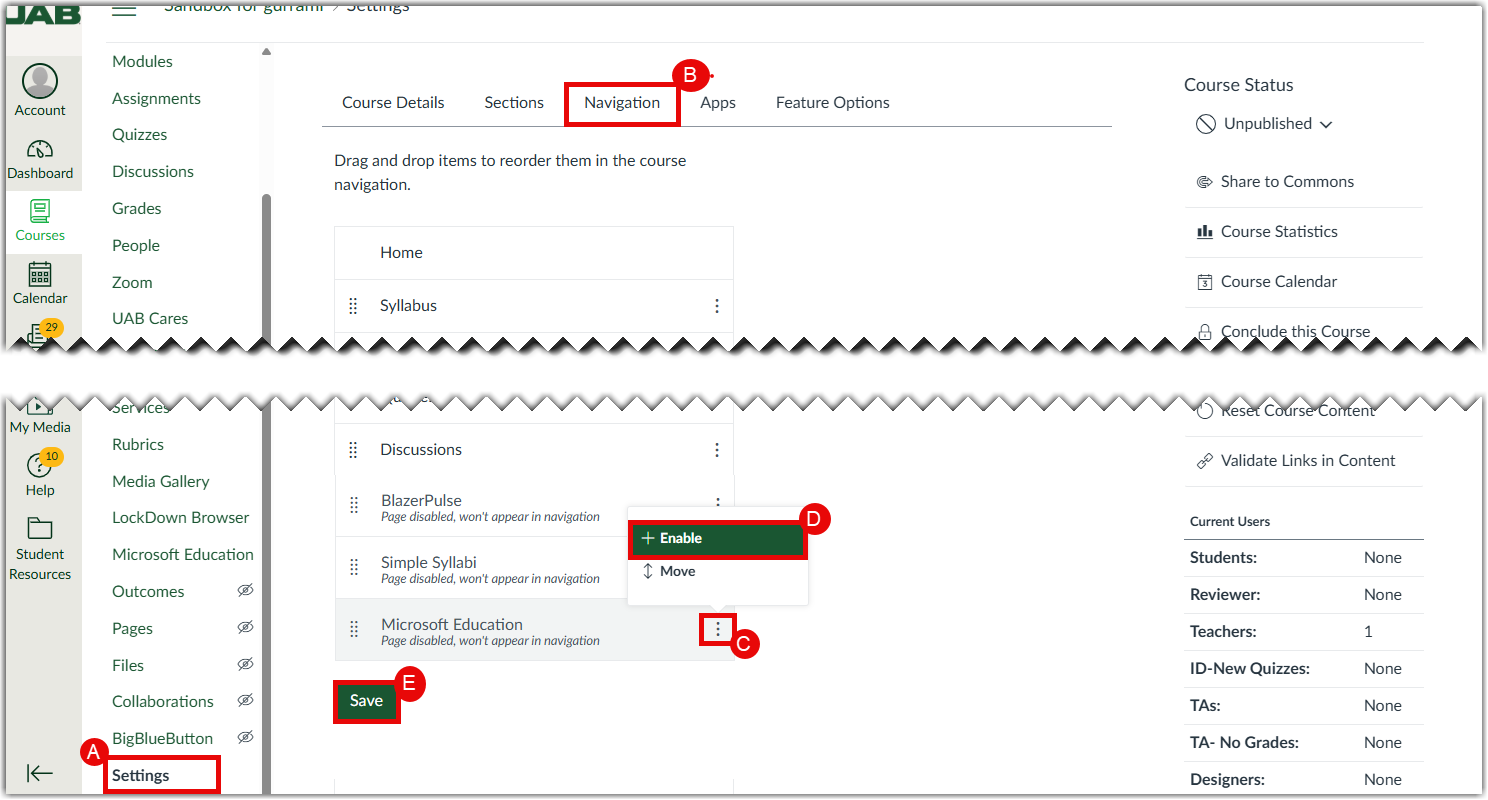
- In your Canvas course then open Settings (A). Select Navigation. Active items appear on the top list while disabled items appear on the bottom list. Scroll down to find Microsoft Education then click the vetical three dots (C) next to it and select + Enable. Click Save.
- Find and select Microsoft Education in course navigation. if it is not present, reload the browser page. Choose Continue Setup.

- All available features are set to Show by default. Hide the tools not needed for the course.
- OneDrive (A) allows OneDrive features, such as cloud assignments, collaborations, or OneDrive uploads to file submission assignments to be used in your course. Toggle this off if not desired. Office of Learning Technologies recommends leaving this on.
- Class Notebook (B) allows creation of a OneNote Class notebook for your course. Toggle this to hide if not desired.
- Meetings (C) allows scheduling and launching Teams virtual meetings from Canvas. Toggle this to hide if not desired.
- Teams (D) shows the link to access your Class Team from Microsoft Education. To add a Microsoft Teams team that will dynamically update to match your course roster, toggle Add Microsoft Teams (E).
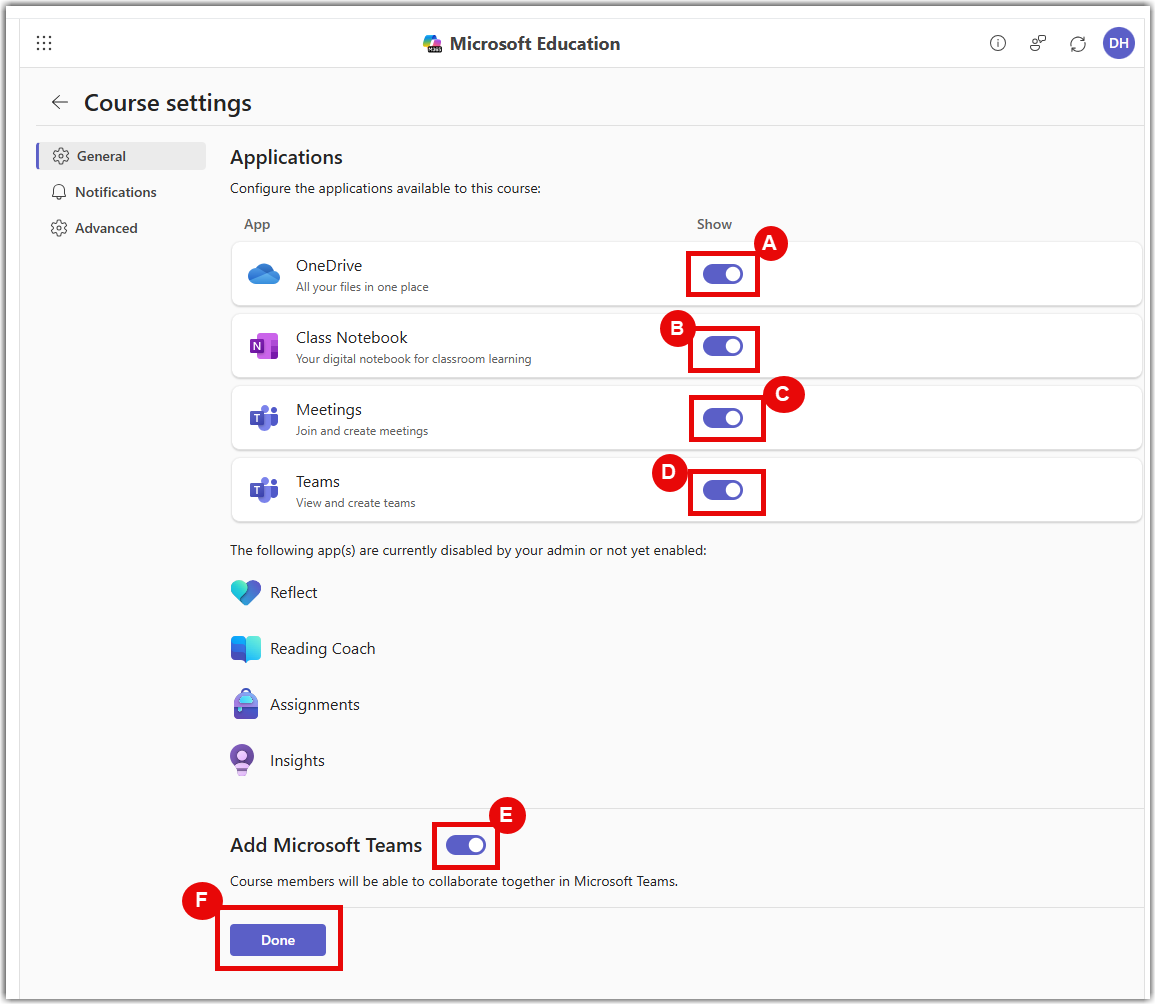
- Done (F) to save your settings.
- Microsoft Education (A) will now be a gateway to multiple tools. To access OneDrive files, click on the large OneDrive (A) located on the dashboard. Once logged in, your OneDrive folder library will be available inside Canvas. You can view OneDrive documents, submit assignments, or start collaborations from this page and other locations in the course. To learn more about OneDrive visit the OneDrive page. Class Notebook (B) can be accessed just by selecting the Class Notebook (B) on the Microsoft Education dashboard. Meetings (C) allows you to create, record and share virtual class meetings. Teams (D) is a link to the Teams group for the course. To learn more about these features, visit the Microsoft Teams page.

- If you wish to enable or disable any of the above features at a later time, you can do so by clicking on your name icon in the top-right corner of your dashboard and selecting Course Settings. This will take you to the feature enable/disable page, where you can modify your current settings.
![]()
UAB classrooms are equipped with recording technology, including cameras, microphones, and computers. Instructors may choose to record all classroom sessions during a semester or to record individual class sessions or portions of a class. Classrooms will not be recorded unless selected for recording by the instructor of record.
- To record all sessions during a semester, follow these instructions to opt-in to automatic recordings.
- To record an individual class session, use Kaltura Classroom, Zoom following the guides below or follow the instructions on the classroom’s teacher podium.
Once captured, recordings are available for instructors to publish or embed in Canvas courses for students to view. Unpublished recordings will remain available until the end of the semester unless otherwise requested.
How to Access Classroom Lecture Capture Equipment
Classroom Lecture Capture equipment is installed in rooms with a capacity of 22 or greater and are designated as classroom for primary use in space management. Other room types such as assembly, conference, laboratory or offices are not designated for lecture capture.
-
Search the Classroom Technology Table to find your classroom’s specific information and guides
Category Building Room # Large Standard BEVILL BIOMEDICAL RESEARCH BUILDING BBRB170A Large Standard CAMPBELL HALL CH301 Large Standard CAMPBELL HALL CH405 Large Standard CHEMISTRY BUILDING CHEM101 Large Standard CUDWORTH BUILDING CEC102A Large Standard HANSELL/HULSEY CENTER HC108 Large Standard HERITAGE HALL BUILDING HHB102 Large Standard HERITAGE HALL BUILDING HHB104 Large Standard HERITAGE HALL BUILDING HHB106 Large Standard HUMANITIES BUILDING HB105 Large Standard LEARNING RESOURCE CENTER LRC210 Large Standard LEARNING RESOURCE CENTER LRC235 Large Standard LEARNING RESOURCE CENTER LRC249 Large Standard ROTC BUILDING ROTC121 Large Standard RYALS PUBLIC HEALTH BUILDING RPHB407 Large Standard SPENCER HONORS HOUSE HOHHOH Large Standard UNIVERSITY BOULEVARD OFFICE BLDG UBOB108 Large Standard UNIVERSITY HALL UH2100 Large Standard VOLKER HALL VH1L103D Large Standard VOLKER HALL VH1L104C Large Standard VOLKER HALL VH1L105B Medium Standard CAMPBELL HALL CH158 Medium Standard CAMPBELL HALL CH443 Medium Standard EDUCATION & ENGINEERING EEC105 Medium Standard EDUCATION & ENGINEERING EEC109 Medium Standard EDUCATION & ENGINEERING EEC155 Medium Standard EDUCATION & ENGINEERING EEC355 Medium Standard HERITAGE HALL BUILDING HHB121 Medium Standard RYALS PUBLIC HEALTH BUILDING RPHB107 Medium Standard SCHOOL OF DENTISTRY SDB220 Medium Standard SCHOOL OF DENTISTRY SDB222 Medium Standard SCHOOL OF DENTISTRY SDB301A Medium Standard SCHOOL OF DENTISTRY SDB501 Medium Standard SCHOOL OF HEALTH PROFESSIONS SHPB224 Medium Standard SCHOOL OF HEALTH PROFESSIONS SHPB640 Medium Standard UNIVERSITY HALL UH1005 Small Standard CAMPBELL HALL CH145 Small Standard CAMPBELL HALL CH157 Small Standard CAMPBELL HALL CH204 Small Standard CAMPBELL HALL CH205 Small Standard CAMPBELL HALL CH396 Small Standard CAMPBELL HALL CH435 Small Standard CHEMISTRY BUILDING CHEM320 Small Standard EDUCATION & ENGINEERING EEC108 Small Standard EDUCATION & ENGINEERING EEC114 Small Standard EDUCATION & ENGINEERING EEC116 Small Standard EDUCATION & ENGINEERING EEC118 Small Standard EDUCATION & ENGINEERING EEC154 Small Standard EDUCATION & ENGINEERING EEC158 Small Standard EDUCATION & ENGINEERING EEC267 Small Standard EDUCATION & ENGINEERING EEC315 Small Standard EDUCATION & ENGINEERING EEC354 Small Standard HANSELL/HULSEY CENTER HC307 Small Standard HENRY PETERS BLD HPB202 Small Standard HENRY PETERS BLD HPB203 Small Standard HENRY PETERS BLD HPB204 Small Standard HENRY PETERS BLD HPB301 Small Standard HENRY PETERS BLD HPB303 Small Standard HERITAGE HALL BUILDING HHB124 Small Standard HERITAGE HALL BUILDING HHB125 Small Standard HERITAGE HALL BUILDING HHB126 Small Standard HERITAGE HALL BUILDING HHB221 Small Standard HERITAGE HALL BUILDING HHB225 Small Standard HERITAGE HALL BUILDING HHB226 Small Standard HERITAGE HALL BUILDING HHB227 Small Standard HERITAGE HALL BUILDING HHB342 Small Standard HERITAGE HALL BUILDING HHB420 Small Standard HERITAGE HALL BUILDING HHB422 Small Standard HERITAGE HALL BUILDING HHB432 Small Standard HERITAGE HALL BUILDING HHB524 Small Standard HERITAGE HALL BUILDING HHB549 Small Standard HOEHN ENGINEERING BUILDING HOEN120 Small Standard HOEHN ENGINEERING BUILDING HOEN152 Small Standard HOEHN ENGINEERING BUILDING HOEN260 Small Standard HONORS COLLEGE UABHH102 Small Standard HONORS COLLEGE UABHH133 Small Standard HONORS COLLEGE UABHH225 Small Standard LEARNING RESOURCE CENTER LRC210A Small Standard LEARNING RESOURCE CENTER LRC215 Small Standard LEARNING RESOURCE CENTER LRC219 Small Standard LISTER HILL LIBRARY LISTERCHAOS Small Standard ROTC BUILDING ROTC120 Small Standard ROTC BUILDING ROTC122 Small Standard RYALS PUBLIC HEALTH BUILDING RPHB121 Small Standard RYALS PUBLIC HEALTH BUILDING RPHB125 Small Standard RYALS PUBLIC HEALTH BUILDING RPHB417 Small Standard RYALS PUBLIC HEALTH BUILDING RPHB433 Small Standard RYALS PUBLIC HEALTH BUILDING RPHB507 Small Standard SCHOOL OF DENTISTRY SDB309 Small Standard SCHOOL OF DENTISTRY SDB401B Small Standard SCHOOL OF HEALTH PROFESSIONS SHPB124 Small Standard SCHOOL OF HEALTH PROFESSIONS SHPB125 Small Standard SCHOOL OF HEALTH PROFESSIONS SHPB226 Small Standard SCHOOL OF HEALTH PROFESSIONS SHPB421 Small Standard SCHOOL OF HEALTH PROFESSIONS SHPB541 Small Standard SCHOOL OF HEALTH PROFESSIONS SHPB641A Small Standard STERNE LIBRARY STERNE163 Small Standard STERNE LIBRARY STERNE174 Small Standard STERNE LIBRARY STERNE203 Small Standard STERNE LIBRARY STERNE207 Small Standard STERNE LIBRARY STERNE211 Small Standard STERNE LIBRARY STERNE219 Small Standard STERNE LIBRARY STERNE227 Small Standard UNIVERSITY BOULEVARD OFFICE BLDG UBOB208 Small Standard UNIVERSITY BOULEVARD OFFICE BLDG UBOB222 Small Standard UNIVERSITY HALL UH1007 Small Standard UNIVERSITY HALL UH1008 Small Standard UNIVERSITY HALL UH1009 Small Standard UNIVERSITY HALL UH1011 Small Standard UNIVERSITY HALL UH2005 Small Standard UNIVERSITY HALL UH2007 Small Standard UNIVERSITY HALL UH2009 Small Standard UNIVERSITY HALL UH2010 Small Standard UNIVERSITY HALL UH2011 Small Standard UNIVERSITY HALL UH2012 Small Standard UNIVERSITY HALL UH2013 Small Standard UNIVERSITY HALL UH3002 Small Standard UNIVERSITY HALL UH3005 Small Standard UNIVERSITY HALL UH3007 Small Standard UNIVERSITY HALL UH3009 Small Standard UNIVERSITY HALL UH3010 Small Standard UNIVERSITY HALL UH3011 Small Standard UNIVERSITY HALL UH3012 Small Standard UNIVERSITY HALL UH3013 Small Standard UNIVERSITY HALL UH4002 Small Standard UNIVERSITY HALL UH4004 Small Standard UNIVERSITY HALL UH5105 Small Standard WEBB BUILDING WEBB535 Small Standard WEBB BUILDING WEBB551 Small, Medium, Large CSOB COLLAT SCHOOL OF BUSINESS CSBL10 Small, Medium, Large CSOB COLLAT SCHOOL OF BUSINESS CSBL03 Small, Medium, Large CSOB COLLAT SCHOOL OF BUSINESS CSB101 Small, Medium, Large CSOB COLLAT SCHOOL OF BUSINESS CSB102 Small, Medium, Large CSOB COLLAT SCHOOL OF BUSINESS CSB103 Small, Medium, Large CSOB COLLAT SCHOOL OF BUSINESS CSB202 Small, Medium, Large CSOB COLLAT SCHOOL OF BUSINESS CSB203 Small, Medium, Large CSOB COLLAT SCHOOL OF BUSINESS CSB301 Small, Medium, Large CSOB COLLAT SCHOOL OF BUSINESS CSB302 Small, Medium, Large CSOB COLLAT SCHOOL OF BUSINESS CSB303 Small, Medium, Large CSOB COLLAT SCHOOL OF BUSINESS CSB305 Small, Medium, Large CSOB COLLAT SCHOOL OF BUSINESS CSB392 Small, Medium, Large CSOB COLLAT SCHOOL OF BUSINESS CSBL04A Small, Medium, Large CSOB COLLAT SCHOOL OF BUSINESS CSBL04B HuddleCam ABROMS-ENGEL INSTITUTE AEIVA240 HuddleCam ABROMS-ENGEL INSTITUTE AEIVA250A HuddleCam ALUMNI HOUSE ALUM103 HuddleCam ALYS ROBINSON STEPHENS CENTER ASC273 HuddleCam COLLAT SCHOOL OF BUSINESS CSB109 HuddleCam COLLAT SCHOOL OF BUSINESS CSB201 HuddleCam COLLAT SCHOOL OF BUSINESS CSBL02A HuddleCam HERITAGE HALL BUILDING HHB210
Guides/Tutorials
Instructors
Classroom Lecture Capture Guides
- Large Standard Room Classroom Lecture Capture Guide
- Medium/Small Standard Room Classroom Lecture Capture Guide
- CSOB Classroom Classroom Lecture Capture Guide
- Huddle Cam Classroom Lecture Capture Guide
General Guides
FAQ
-
Why are my lectures being recorded?
Research in higher education shows that all students benefit from being able to listen to lectures more than once, whether they were live originally or not. When a recording is available to a student in their Canvas course, the student can replay it at different speeds, search the machine transcript for key terms, add close captioning, optimize visual layout of the classroom and projection screen (PowerPoint, etc.) feeds, etc.
Another major advantage of the new classroom recording technology is the ability to better serve students with accommodations from UAB’s Office of Disability Support Services (DSS). DSS has discontinued the COVID-related temporary academic adjustment request process but this technology may be used to provide an accommodation for students with disabilities and it will be taken into consideration as part of the normal DSS process. As a result, beginning in Fall 2021, DSS may offer use of recorded lectures as a “reasonable accommodation” when a student requests that they not attend class due to a confirmed disability.
-
What about Privacy?
Signs are posted in every Lecture Capture classroom alerting students and instructors that the recordings are scheduled and can take place even when a class in not in session.
All recordings are private to the instructor and are not available to the students unless the instructor takes action to publish/embed the video(s) in the Canvas course.
Instructor Training
On-site Appointments
UAB IT Classroom Technology is available for on-site classroom technology training appointments once the semester begins. Please contact the AskIT help desk at (205) 996-9999 (6-9999 on campus) or enter a ticket at uab.edu/techhelp.
Technical Support
Please follow the steps below if you need technical support after reviewing the information, guides, and FAQs above.
-
Check Status Page
Status Page - Check to see if there any know issues before submitting a ticket.
-
Contact Classroom Lecture Capture Support
- Contact Local IT Support (if applicable). NOTE: If you have local support for your classroom (CSOB, DENT, OPT, etc.), contact them first.
- Contact AskIT Helpdesk for equipment issues in the classroom:
- (205) 996-9999 (6-9999 on campus)
- Submit a Ticket
Ask Learning Technologies
If these support options do not give a satisfactory resolution, please submit a Learning Technologies Support request and include any ticket numbers provided by Classroom Lecture Capture.
Privacy & Accessibility
A Kaltura channel is a collection of videos and other media that can be public or restricted in terms of who can view and contribute media to the channel. Channels are useful for aggregating a large number of videos on the same topic or theme, or for sharing a collection of similar or diverse videos with a specific audience.
See an example of a Kaltura Channel
Any faculty, staff, or student can request a Kaltura Channel by using the form below.