The grading window opens one month prior to the grade submission deadline for each term. During this window, faculty can pull their grades directly into the Banner Student Information System (SIS) from the Canvas Gradebook or manually enter grades in Banner. Click the buttons below to navigate this guide. Skip to instructions on manual entry.
Note for users of screen readers: letters in parentheses in the instructions below refer to corresponding areas on example images. If you have any questions about these instructions, contact Learning Technologies for assistance.
Set up Canvas Gradebook
Canvas courses must first have a grading scheme set up so that the total numerical grade is assigned a letter grade. Follow the directions below to enable and setup a grading scheme inside of Canvas.
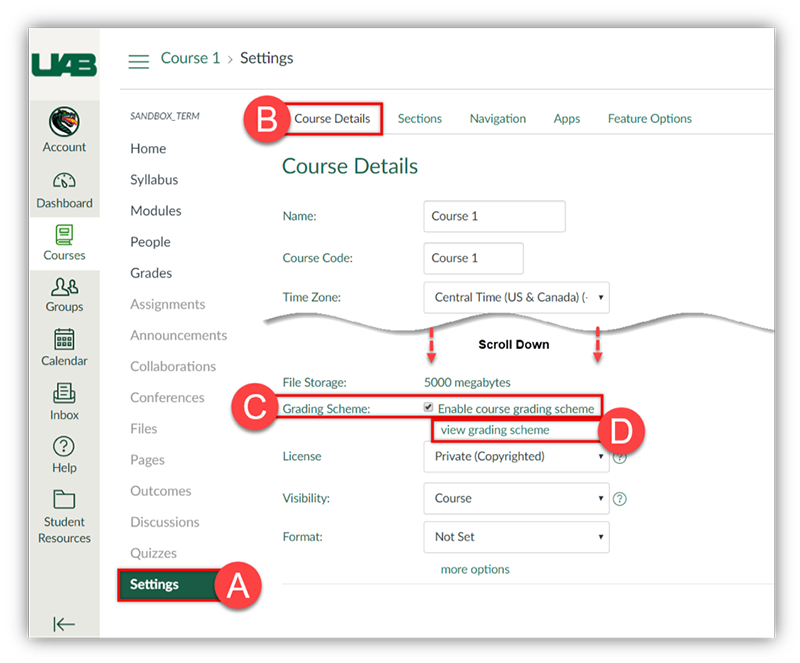
- Login to Canvas at uab.instructure.com, select the desired course, and click Settings (A) at the bottom of the course navigation on the left.
- Click the Course Details (B) tab at the top of the settings page.
- Scroll down and check the box beside Enable course grading scheme (C).
- Click Set grading scheme/View grading scheme (D) to pull up the Canvas default grading scheme.
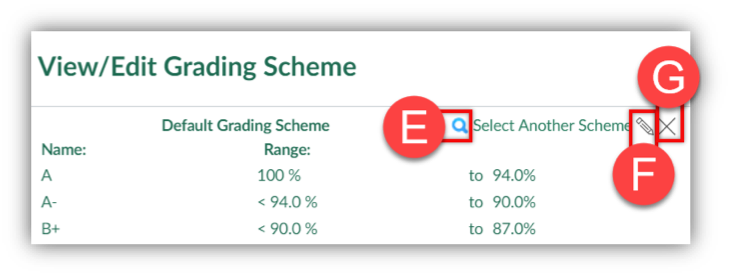
- Click the Pencil (E) icon at the top right to edit the currently selected grading scheme or click Select Another Scheme (F) to choose a grading scheme created at the account or course level. Click the X (G) to unlink from the current grading scheme and start over with the Canvas default.
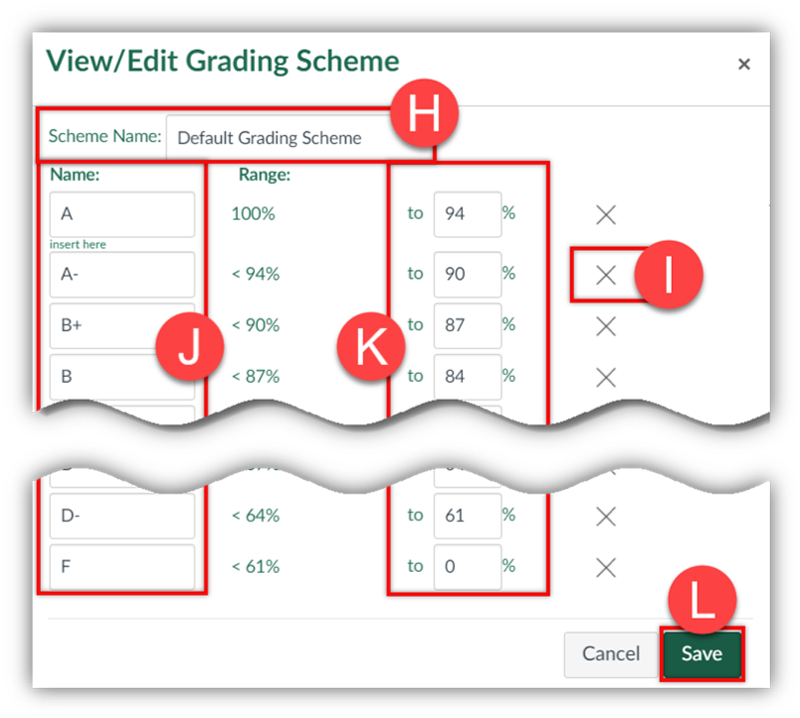
- Choose the desired Name (H) for the grading scheme.
- Click the X (I) beside rows to delete them.
NOTE: Rows with "-" or "+" (e.g. A-, B+) should be deleted as Banner does not accept these values.
- Edit the Letters (J) in the left column to match your course or program grading scheme. This should be the same as the grading scheme in your course syllabus.
- Edit the Numbers (K) in the right column to adjust the range for each letter. This value is the beginning value of that range and will auto-adjust to be the ending value of the next row. This value can have 2 decimal places.
- Click Save (L) to finish editing and save this grading scheme for this course. This process has to be repeated for each Canvas course.
Pre-Publish Gradebook Checklist
Before using the Canvas to Banner grade publishing tool, it is recommended that you go through the following checklist to ensure the grades will be pulled over successfully. This checklist can also be used for troubleshooting. Click the links in each step for helpful instructions on completing the task.
Grading Scheme is Enabled and Accurate
- A grading scheme must be enabled inside the Canvas course settings in order to pull grades from Canvas to Banner. Grading schemes are not enabled by default.
- Canvas course grading scheme is accurate and does NOT contain “-“or “+” (e.g. A-, B+ — Banner does not accept these values).
All Published Assignments are Graded and Released
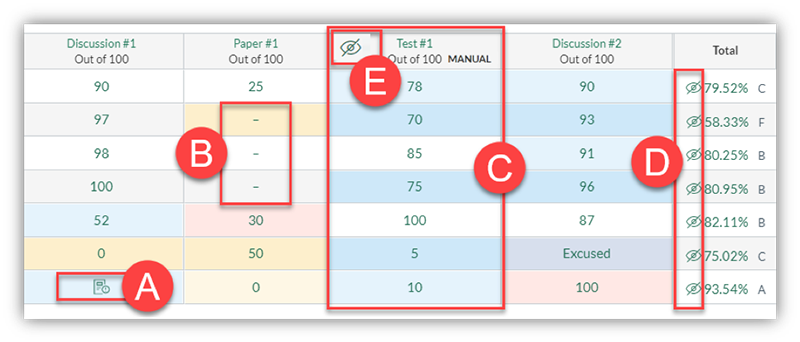
- All Submissions (A) have been graded.
- All Dashes (B) are either replaced with a grade or excused.
- Any Hidden (C) assignments have been Posted (released).
NOTE: An Eye with a Cancel line (D) through it will display in the total column if there are any grades that have not been posted. An Eye with a Cancel line (E) icon will also display at the top column of any assignments that have grades that need to be posted. Use this guide to post grades.
Grade Export is Correct
- Export Gradebook and see that the Current Score (F) column matches the Final Score (G) column. If these columns do not match refer back to step 2 to see if there are any muted assignments, ungraded assignments, or dashes.
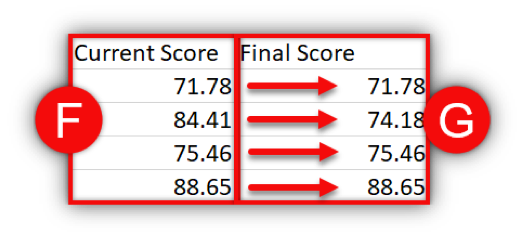
TIP: Delete or Hide the column between current score and final score in the gradebook export to line up the columns for comparison.
Publishing Grades in Banner
When the grading window is open, the instructor of record will have access to pull and post their grades from Canvas to Banner. Follow the directions below to publish grades in Banner.
Access BlazerNet and Pull Canvas Grades to Banner
- Login to BlazerNet at uab.edu/blazernet.
- Click BlazerNET Home (A) at the top right, if not already on the faculty profile page.
- Click on the Canvas Grades (B) icon beside the desired course to pull grades from that Canvas course.
Note: The Canvas icon is only visible during the grading window (3o days before grade submission deadline). If the icon is not visible during this window, contact UAB IT. If you have a cross-listed Canvas course, clicking this icon for the primary course will pull grades of all sections into the proper gradebook in BlazerNET.
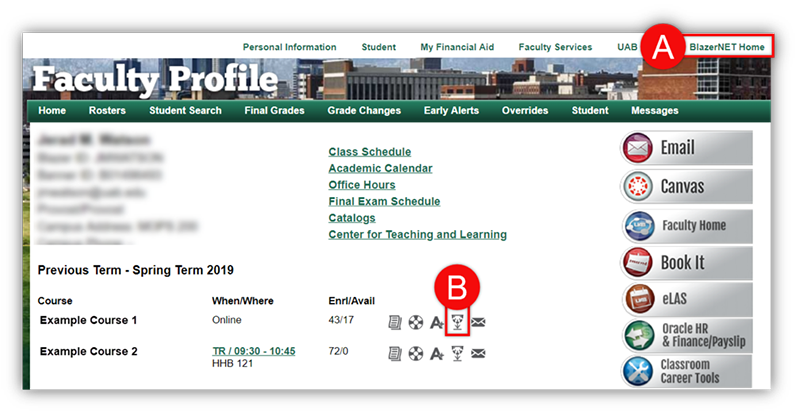
NOTE: The Canvas grades button can be clicked as many times as needed during the grading window. Faculty can make revisions to the Canvas Gradebook and then use this button to resend the most up-to-date grades to Banner.
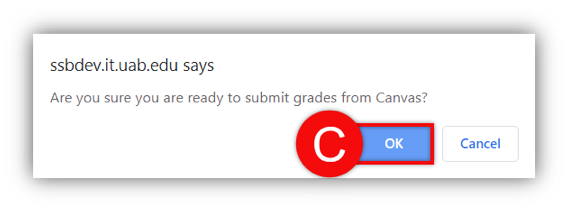
- Click OK (C) in the dialog box that pops up. This just pulls grades from Canvas to Banner. You will be able to verify and revise grades before actually submitting grades.
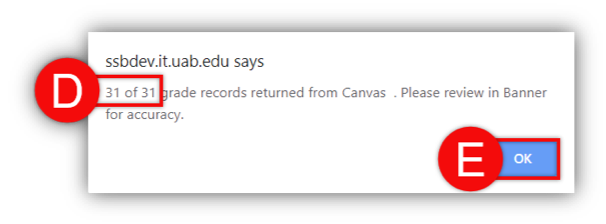
- After the request has processed, another dialog box will pop up and display how many records were received. The number of records returned (D) is important. If all records were received, move on to the next step. If all records were not received, it means that the data did not meet the qualifications. You can either manually fix these submissions in the next step or use the Gradebook Checklist to find and resolve any errors in your Canvas Gradebook and then re-start with step 3. Click OK (E).
Review, Revise, and Publish Final Grades
Now that grades have been pulled from Canvas to Banner, faculty should review the grades and make any necessary revisions before publishing. This is also where grades can be manually entered.
- Click the Final Grades (A) icon beside the desired course.

- Records that were pulled successfully from the Canvas will display in the Grade (B) column. Grades can be entered manually/revised by clicking the drop down menu and making the desired selection.
Note: Any F grades assigned will require the Last attend date and Attend Hours fields to be completed before continuing to see other pages. F Grades will also require faculty to supply a reason for the grade. Click the “F” icon next to the envelope on the BlazerNET Home page and choose failure reason.
- If grades were synced from Canvas, the Last Attend Date (C) is also pulled from Canvas for each student. This date can be entered/revised by clicking the date field and typing in a date.
- Be sure to Review/Revise every Page (D) then click Submit (E) to submit final grades to Banner.
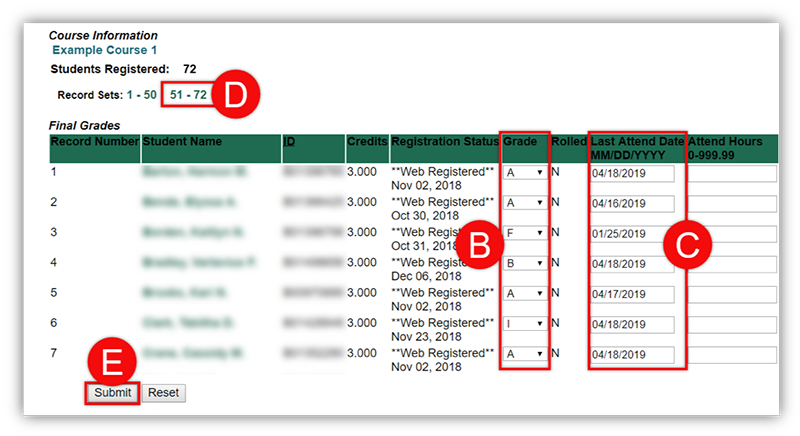
- Click the Final Grades (A) icon beside the desired course.
Notes
-
- Students receiving an Incomplete will need to be manually marked with an “I.“
- Any F grades assigned will require faculty to supply a reason for the grade. Click the “F” icon next to the envelope on the BlazerNET Home page and choose failure reason.
- Faculty can submit as many times as needed before the grade submission deadline.
FAQ
-
How do I know if I successfully submitted my grades in BlazerNet?
Instructors will receive an automated email from the University Registrar within 6 hours confirming the submission of grades. Alternatively, instructors can look for the check mark beside their course when viewing the Faculty Profile page (BlazerNet Home).
-
What if my course if Pass/Fail?
Faculty can either set their Canvas Grading Scheme (see Set up Canvas Gradebook for Banner Sync tab) to only have the letter P for Pass and F for Fail, or these values can be entered manually in BlazerNet.
-
Why can I not see the Canvas Grade icon in BlazerNet?
The Canvas to Banner grade publishing tool is only available during the grading window. The grading window opens one month prior to the grade submission deadline.
If you are within the grading window and do not see the Canvas to Banner Grade publishing icon, please submit a ticket with Learning Technologies. Instructors can also manually enter grades in Banner. -
How do I give a student an Incomplete in BlazerNet?
When publishing grades in Banner, click the drop down for the grade and select "I". Because courses close at the end of the term, please submit an Incomplete Request so that the student can have access to the needed coursework.
Request an Incomplete though our Canvas Request forms.
Once the student(s) have finished their coursework, you will need to return to BlazerNet to submit a grade change request. See UAB IT Guide on how to request a Grade Change Request.
-
How can I exempt a student’s grades in Canvas?
Canvas calls exempted grades "excused." Excused assignments are not factored into the student's total grade. You can excuse a grade by selecting the specific student's cell in the gradebook and typing "EX." Alternatively, you can follow the steps in this Canvas guide to change the status of an assignment to excused.
Note: Leaving a dash (e.g. - ) does not excuse that assignment.
-
Can I manually create columns in the Gradebook?
Canvas only creates columns in the Gradebook for assignments.If you need to create a column for manual grading (e.g. paper exam, lab participation), you can create a "No Submission" or "On Paper" assignment.
-
What if it is after the deadline?
Please use the instructions found in the UAB Service Now Portal to submit a Grade Change Request.
-
Where do I get help?
Canvas Issues
If there is an issue regarding Canvas, please contact Canvas Technical Support.Banner Issues
If there is an issue regarding Banner/BlazerNet, please contact UAB AskIT.Training & Support Requests
If you would like to receive training or assistance from Learning Technologies, please schedule a session with Learning Technologies or submit an Ask eLearning ticket.
