 Top Hat is an engagement platform that empowers educators to incorporate active learning into every area of their course. Instructors use Top Hat during class to drive discussions, take live polls, and give students real-time feedback on how well they understand course concepts. Outside of class, Top Hat enables instructors to adopt and personalize interactive content, assignments, and assessments. Top Hat also offers services such as group training, individual consultation, and instructional design support to help faculty achieve their desired course outcomes.
How to Access Top Hat
Top Hat can be accessed from Canvas after the course instructor adds the Course Navigation link to their course.Students must purchase a license to use Top Hat in Canvas courses. Pricing is listed on the Top Hat website.
Instructors
Instructors can Log in to Top Hat here.
Students
Guides/Tutorials
Instructors
- Educator: Getting Started with Top Hat
- Create Your Account and Create Your Course(s)
- Upload and Edit Slides
- Create Interactive Questions and Create Discussions
- Enroll Your Students
- Present Your Content
- Take Attendance
- Create Pages Content
Videos
If you have 5 minutes…
If you have 30 minutes…
Using Top Hat integrated with Canvas
Follow these steps to integrate your Top Hat course with Canvas:
Instructor Training
Live demonstrations of Top Hat are available to instructors on request. If you are interested, please email Connor OʼKane, Top Hatʼs Learning Solutions Consultant for UAB, or book a meeting with Connor directly.
Technical Support
Please follow the steps below if you need technical support after reviewing the information, guides, and FAQs above.
-
Check Status Page
Top Hat Status Page - Check to see if there any know issues before submitting a ticket.
-
Contact TopHat Support
-
Ask Learning Technologies
If these support options do not give a satisfactory resolution, please submit a Learning Technologies Support request and include any ticket numbers provided by TopHat.
Privacy & Accessibility
 Adobe Creative Cloud is a collection of 20+ desktop, mobile apps and services for photography, design, video, web, UX, and more. Learn more about Adobe on UAB IT’s Adobe webpage.
How to Access Adobe Creative Cloud
Sign In to Adobe Creative Cloud
Instructors
A limited number of licenses are available for faculty and staff for academic or business use only.
Request a Faculty/Staff License
Once you have an account, sign in using the following instructions:
- Visit adobe.com and click Sign In.
- Use your blazerID@uab.edu (do not use an alias) and password.
- Select Company or School Account. Then you will be taken to UAB’s Single Sign On page.
Students
Licenses for students using Creative Cloud will be automatically granted while you are enrolled at UAB.
- To get started, visit adobe.com and click Sign In.
- Use your blazerID@uab.edu (do not use an alias) and password.
- Select Company or School Account. Then you will be taken to UAB’s Single Sign On page.
- In the right hand corner, you can see your available apps and begin to set up the desktop apps on your machine.
App Highlights
-
Adobe ePortfolio
Build a beautiful website in minutes, free with Creative Cloud. See examples of portfolios created with Adobe.
- No coding required. Our customizable themes are easy to configure without knowing HTML or CSS.
- Custom domain. Using your own domain name on your website gives your site a professional edge and helps people discover your work.
- Responsive design. Each of our themes is natively responsive, resizing your content and images to fit any device or screen width.
Access Adobe ePortfolio in your Creative Cloud Account under Web apps tab.
-
Adobe Acrobat Pro
PDF Creation allows users to view, comment, sign, create, edit, and share PDF documents.
- Convert creative files and images to PDF. Turn Adobe Photoshop, Illustrator, or InDesign files into PDFs.
- Create protected PDFs. Prevent others from copying or editing sensitive information.
- Export PDFs to Office. Convert PDFs to Word, Excel, or PowerPoint formats and keep the formatting.
UAB provides Adobe Acrobat Pro that allows creating/editing PDFs to UAB Campus Faculty, staff and students at no cost.
- Visit your Creative Cloud Account and click “Sign in with an Enterprise ID."
- Use your assigned @uab.edu email address and password.
Note: Be sure to use the email based on your actual BlazerID, not an alias; for example, BlazerID@uab.edu.
Guides/Tutorials
FAQ
-
Do I have to request an account if I just want to create/edit PDFs?
No, UAB provides Adobe Acrobat Pro that allows creating/editing PDFs to UAB Campus Faculty, staff and students at no cost.
- Visit creativecloud.adobe.com and click “Sign in with an Enterprise ID."
- Use your assigned @uab.edu email address and password.
Note: Be sure to use the email based on your actual BlazerID, not an alias; for example, BlazerID@uab.edu.
-
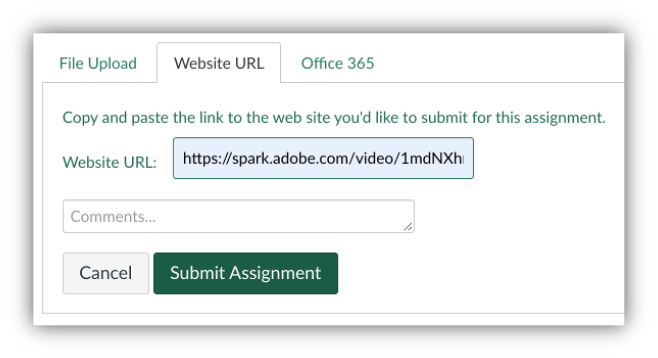
How can students submit work from other Adobe apps?
Instructors can create an online Canvas assignment and enable URL as a submission option.
Students can then publish their adobe project publicly and submit the URL to the Canvas assignment.
-
How do I access web or mobile apps instead of desktop?
Some Adobe apps are available through a web browsers or mobile devises instead of downloading an application to your computer. Log in to adobe, then click the different tabs labeled Mobile and Web. Find more information about accessing Adobe apps on the Adobe Support webpage.
-
Who do I contact if I need help?
Adobe is a UAB IT-supported technology. Choose "submit a ticket" below in the technical support section.
Technical Support
Please follow the steps below if you need technical support after reviewing the information, guides, and FAQs above.
-
Check Status Page
Adobe Status Page- Check to see if there any know issues before submitting a ticket.
-
Contact Adobe Support
- Submit a Ticket
- (205) 996-5555
-
Ask Learning Technologies
If these support options do not give a satisfactory resolution, please submit a Learning Technologies Support request and include any ticket numbers provided by Adobe.
Privacy & Accessibility
![]() SimNet is a cloud-based simulation platform designed for education and training, particularly in fields like healthcare, engineering, and business. It provides realistic virtual environments for users to practice skills and scenarios, enhancing learning through immersive experiences.
SimNet is a cloud-based simulation platform designed for education and training, particularly in fields like healthcare, engineering, and business. It provides realistic virtual environments for users to practice skills and scenarios, enhancing learning through immersive experiences.
How to Access SimNet
Guides/Tutorials
Instructor Training
Technical Support
Please follow the steps below if you need technical support after reviewing the information, guides, and FAQs above.
-
Check Status Page
SimNet Status Page - Check to see if there any know issues before submitting a ticket.
-
Contact SimNet Support
-
Email Support & Live Chat
Sunday: 11 AM to 11 PM CST
Monday - Thursday: 24 hours CST
Friday: 11 PM to 8 PM CST
Saturday: 9 AM to 7 PM CST -
Phone: (800) 331 5094
Sunday: 11 AM to 12 AM CST
Monday - Thursday: 7 AM to 12 AM CST
Friday: 7 AM to 8 PM CST
Saturday: 9 AM to 7 PM CST
-
-
Ask Learning Technologies
If these support options do not give a satisfactory resolution, please submit a Learning Technologies Support request and include any ticket numbers provided by SimNet.
Privacy & Accessibility
All documents must be UNEXPIRED. Students may present one (1) selection from the list below.
Please note: This list of identification options are approved for both ProctorU and Respondus LockDown Browser & Monitor.
- U.S. Passport or U.S. Passport Card.
- Permanent Resident Card or Alien Registration Receipt Card (Form I-551).
- Driver's license or ID card issued by a State or outlying possession of the United States, provided it contains a photograph or information such as name, date of birth, gender, height, eye color, and address.
- ID card issued by federal, state, or local government agencies or entities, provided it contains a photograph or information such as name, date of birth, gender, height, eye color, and address.
- Military dependent's ID card.
- Native American tribal document.
- U.S. Coast Guard Merchant Mariner Card.
- Driver's license issued by a Canadian government authority.
- School ID/Employer ID card with a recent photograph.
 What is Macmillan Learning/Achieve?
Macmillan is a high-quality publisher of textbooks and learning resources for university level students. Macmillan Learning is an Canvas integration that allows access to Macmillan Learning and Achieve content that develops relevant and impactful course content that serves the needs of educators and supports the success of today’s students.
How to Access Macmillan Learning/Achieve
Instructors
Macmillan Learning offers deep content integration between its Learning/Achieve products and Canvas. This robust integration creates direct links from a Canvas course into the Macmillan Learning environment. Faculty can add Macmillan Learning to their Canvas course by adding the link to course navigation. Once installed, instructors will have the option to add links to Macmillan content from various points in their Canvas course.
Students
Before you can use Macmillan Learning/Achieve, you will first need to purchase a Macmillan Achieve access code, then your Canvas account with the Macmillan Learning application. For detailed instructions, see the Student guides listed below.
Macmillan Guides and Tutorials
Instructors
Guides/Tutorials
Students
Guides/Tutorials
Macmillan Instructor Training
Macmillan provides training sessions to prepare instructors to use Macmillan courseware in their Canvas courses. View and sign up at the website below:
Macmillan FAQ
-
How do I get access to Macmillan Learning?
- Request free instructor Achieve/Launchpad course access.
- On the LaunchPad Homepage of the Macmillan catalog, click Instructors – Find Your Course.
- Search for your title by entering your author’s last name or your products title.
- Click “Go to product”.
- At the bottom of the screen, enter your email address and click Get Access.
-
How do I find my course ID or course URL?
Every course that you create has a unique course ID. This holds true whether you create a course from scratch, copy a course from another course, or branch a course from a master. When you direct your students to enroll in your course, you should give them the entire course URL, which contains the ID as a string of numbers at the end. Doing so will ensure your students enroll in their correct course so that you can track their work.
- Go to your instructor dashboard.
- Select Switch/Create Courses from the top right under your name.
- Locate the course name under My Courses.
- The URL is located directly under the course title and the ID is located under the URL.
-
How can I get a print exam copy or an e-textbook?
If you’re a verified instructor, you can request a print or digital sample of any of our textbooks to consider for use in your courses. Only registered and verified instructors can receive free print samples, and they should not be sold to bookstores or book resellers. If you don't yet have an existing account with Macmillan Learning, it can take up to two business days to verify your status as an instructor. You can request a sample from the product page on our online catalog or by contacting your rep. Learn more.Learn more.
Macmillan Technical Support
Please follow the steps below if you need technical support after reviewing the information, guides, and FAQs above.
Macmillan support is available for Instructors and Students:
Monday - Thursday: 7am - 2am CST
Friday: 7am – 11pm CST
Saturday: 11am - 8pm CST
Sunday: 11am - 2am CST
-
Contact Macmillan Learning Support
-
Ask Learning Technologies
If these support options do not give a satisfactory resolution, please submit a Learning Technologies Support request and include any ticket numbers provided by Macmillan Learning.