All videos uploaded into Kaltura (My Media/Media Gallery) after January 3, 2022 are automatically captioned with english auto-generated captions. If you have media content that was uploaded to Kaltura before this date, you can order auto-generated captions yourself using the instructions below. These instructions can also be used if captions for a source language other than english is needed.
Request Auto-Generated Captions
Users can order automatic auto-generated captioning for a single video or for multiple videos in My Media. These captions are around 90-95% accurate and can be edited by the user after the caption process is complete. Once the request is completed (usually 1-24 hours), the captions will automatically be present on the requested media.
- Access My Media, click the checkboxes of the desired Media (A). More than one can be selected.
- Click Actions (B), then click + Caption & Enrich (C).

- Click the Source Language (D) dropdown menu and choose the language spoken in the media recording.
- Click Submit (E). The captions will be added to the video(s) automatically (1-24 hours).
Note: We highly advise these captions be edited for accuracy. See the Edit Captions guide to learn how to edit captions once they are completed.
Users can edit their captions for accuracy. Click the buttons below to learn how to edit captions or request professional caption editing on behalf of a student with an accomodation.
Note for users of screen readers: letters in parentheses in the instructions below refer to corresponding areas on example images. If you have any questions about these instructions, contact eLearning for assistance.
How to Edit Captions
Captions can be added, edited, or deleted from media. Follow the directions below.
- Access My Media and click edit to see the edit menu options for a desired video.
- Click the Captions (A) tab to edit, add, or delete captions for the media.
- Click Upload captions file (B) to upload your own captions file (SRT or DFXP file). Multiple files can be added to give other language options.
- Choose which caption file is default, edit the file, delete the file, or download file by clicking the corresponding icon under Actions (C). Hover over icons to see descriptions.
- Click Edit Captions (D) to open the web-based captions editor.

Captions Editor
Once Edit Captions has been clicked, a web-based captions editor will appear.
- Click the Captions (E) dropdown menu to choose which file to edit.
- Type a word in the Search (F) box to search the captions file.
- Type a word in the Replace (G) box and click Replace to replace every instance of the word in the search box with the word in the replace with box.
- Type a name in the Speaker (H) box, select desired check boxes (I), and click Add to identify the speaker of the caption text.
- Click anywhere in the text to make the desired Manual Edits (J).
- After each change, Revert or Save (K) can be clicked. Revert takes away all changes since the last save. Save will save all changes that have been made.
- Click Back (L) to go back to the media page to see the saved changes.

Professional Caption Editing
Professional captioning is more accurate and can be requested via the UAB Disability Support Services (DSS) request form. Caption requests on behalf of students requiring accommodations should be done through this method. DSS recommends all captioning requests be submitted one to two weeks in advance to allow adequate time to complete each request. If your media is in Kaltura, the captions will appear in the requested media once the process is complete.
If your media is in Kaltura, follow the instructions below to request professional captions.
- Open the request form by clicking DSS Captioning and Transcript Request Form on the DSS webpage.
- Click Login to request this service (A) and provide your BlazerID and Strong Password.

- Choose Closed Captions (B) or Caption File + Transcript from the Services Requested drop down menu.
- Type in the Canvas course (C) the media is placed in.
- Answer Yes/No (D) to indicate if the request is directly for a student needing accommodations currently enrolled in the course.
- Answer Yes (E) if the media is in Canvas and provide the title of the media as it shows in My Media (Kaltura).
- Click Submit (F). You will receive an email confirmation ticket and update to the progress of the request.
Note: For information on how to get your video into Kaltura, see the Adding Media to My Media Guide.

Use this page to find resources related to managing captions on your videos in Canvas and Media Space.
Automatic Captioning
All videos uploaded into Kaltura (My Media/Media Gallery) after January 3, 2022 are automatically captioned with auto-generated captions. Learn more about Auto-generated captions and professional captions below.Auto-Generated Captions
When videos are uploaded to Kaltura(My Media), captions are auto-generated. This is done using automatic speech recognition which scans the audio track for spoken English.
Auto-Generated captions are considered drafts as they are up to 80-90% accurate but may contain spelling or grammatical errors. It is important to proofread auto-generated captions and edit for accuracy.
These captions do not meet all accessibility standards. If you have students requiring captions as part of an accommodation, Professional Captions should be requested.
Professional Captions
Users can request captions be professionally edited which means the auto-generated captions are edited by a professional human.
These captions are 99-100% accurate and meet accessibility standards. Professional captions can be ordered in the following scenarios.
- If you have students requiring captions as part of an accommodation (These take priority over all other scenarios)
- Video content is utilized for a large audience (campus wide videos)
- Video content is utilized for long-term viewership (designed to be used in an online course for several semesters/years)
Captioning FAQ
Requirements & Best Practices
-
What are the legal requirements for captioning?
The University is legally obligated to caption or provide a transcript of the following materials:
- Audio/video content that is mandatory for all students (Example: orientation videos)
- Online/hybrid courses or educational programs when a student who uses captioning as a reasonable accommodation is registered in the course. This scenario requires professional captioning.
- Audio/video content that is shown as part of a face-to-face or live course or educational program, unless an interpreter or CART writer is present, when a student who uses captioning as a reasonable accommodation is registered in the course
- Audio/video content that is mandatory for all employees, such as employee training videos (Example: UAB HR Open Enrollment video)
- Audio/video content that is job-related to UAB employees who use captioning as a reasonable accommodation
- Audio/video content that is accessed by the public and which is hosted on or embedded in an official UAB website or must have synchronized captions
- Audio/video material requested to be accessible by a disabled individual as a reasonable accommodation
-
What are the best practices for editing captions?
5 Elements of Quality Captioning
- Accurate - Errorless captions are the goal for each production.
- Consistent - Uniformity in style and presentation of all captioning features is crucial for viewer understanding.
- Clear - complete textual representation of the audio, including speaker identification and non-speech information, provides clarity.
- Readable - Captions are displayed with enough time to be read completely, are in synchronization with the audio, and are not obscured by (nor do they obscure) the visual content.
- Equal - Equal access requires that the meaning and intention of the material is completely preserved.
The above guidelines provided by (DCMP-Described and Captioned Media Program) are consistent with the 2014 mandates by the Federal Communications Commission (FCC).
A comprehensive list of captioning guidelines with screenshots and video examples can be found on the DCMP website.
Captioning Process
-
How long does it take for the auto-generated captions to appear?
Captions generally appear within 1-2 hours after being fully transcoded into the system.
Please note: Captioning When a video or audio entry is first uploaded to Kaltura, it is transcoded into the system (which can take 1-2 hours) then the captioning process begins.
-
Do I have to re-publish/re-embed once the captions are completed or edited?
No action is needed from the media owner for auto-generated captions to appear. The auto-generated captions appear on the media automatically
If you edit these captions or order professional captions, the edited captions will replace the current captions available by clicking the CC button on the player.
-
When should I request professional captions?
If you have students requiring captions as part of an accommodation, Professional Captions should be requested through UAB’s Disability Support Services (DSS) professional captioning request form.
-
How do I get auto-generated captions on my older content
Content uploaded to Kaltura after December 2021 is automatically captioned with auto-generated captions. If you have media that was uploaded before this data, you can request it be captioned by following the instructions in our Order Captions Guide.
-
Are Zoom and Kaltura captions different?
Yes, Zoom’s captions are not imported along with the video. Kaltura captions are more accurate and will appear automatically once the video has processed, and the captioning process is completed.
Editing Captions
-
How do edit my captions myself?
Owners of videos in Kaltura have the ability to edit the auto-generated captions using Kaltura’s web editor. Go to the video in My Media, click Actions, then Edit. Once on the edit screen, click the Caption tab, then the Edit Captions button. See the Kaltura Caption editing guide for step-by-step instructions on how to access and edit captions.
-
How do I give a TA or someone else permissions to edit my captions?
By default, only the owner of the video has the permissions to edit the video and its captions. Owners of a video can add others as a collaborator so that they have the permissions to see the video in their My Media and edit the captions. Follow this guide to add someone as a collaborator with the specific permission: Co-edit.
Custom Captions
-
My spoken audio is not in English, can my video be captioned in the spoken language?
Auto-generated captions are automatically ordered for the source language English. If you would like to order captions in a different language, follow this guide to order Auto-generated captions and choose the source language that is being spoken.
Please note: The source language must be selected properly as it will not translate to another language.
-
How do I remove the auto-generated captions from my video?
Owners of media with captions can remove auto-generated captions by following these directions:
- Go to Media entry in your My Media.
- Click Actions, then Edit.
- Click the Captions tab (A).
- Click the X (B) if you wish to completely delete the file or click the “show on player” (C) icon to remove the captions from displaying on the video.

-
How do I upload a caption file?
Users can add their own caption file produced elsewhere for videos in Kaltura by following these directions:
- Go to Media entry in your My Media.
- Click Actions, then Edit.
- Click the Captions tab (A).
- Click “Upload captions file” (B) button.
Please note: This file should be a specific file type (SRT, DFXP, or VTT) made for captions that contain the spoken words and the timestamps. Transcripts cannot be uploaded here.

Student Specific Questions
-
Are student uploads also captioned with auto-generated captions?
Yes, all videos that have an audio track are automatically captioned with auto-generated captions regardless of their role. Faculty, staff, and students all have the same level of access and receive the captions on videos upload.
-
How do I view captions?
Students and other viewers can turn on the captions by clicking the CC icon in the video player. If there is not a CC icon at the bottom right of the player, that video does not have captions. You can contact the owner of the video to request they get it captioned.

Support
-
Where do I get help regarding captions in Kaltura?
Users can reach out to UAB eLearning via the following options:
Phone: 205-934-7217
Support Ticket: Ask eLearning
Training: Request a Training Meeting -
Who can consult with me about captioning?
UAB Disability Support Services is available to consult with faculty, staff, and students regarding accommodations, captions, and transcripts.
Phone: (205) 934-4205
Email: dss@uab.edu
Videos stored in your Kaltura My Media can be made available to students in a Canvas course by either embedding them or publishing them to the course Media Gallery. Click the buttons below to learn more about each option.
Note for users of screen readers: letters in parentheses in the instructions below refer to corresponding areas on example images. If you have any questions about these instructions, contact eLearning for assistance.
Embed Kaltura Media in Canvas
Embedding Media in Canvas allows instructors to place media content in places like Canvas Pages, Assignments, Discussions, Quizzes, and Announcements. This allows the media content to be more than a watch-only experience. Students can watch a video and have access to other information such as text, files, reflection questions, etc. Also, embedding media allows instructors to organize the media in the desired place in the course. Access can be restricted to keep students from seeing the video until a certain date/time or until certain tasks have been completed. Embedding can also allow students to download videos if instructors choose that option.
- Login to Canvas, click courses, choose a desired course, navigate to where you want to embed the media, and click edit to access the Rich Content Editor box. Options include Pages, Assignments, Discussions, Quizzes, Announcements, etc.
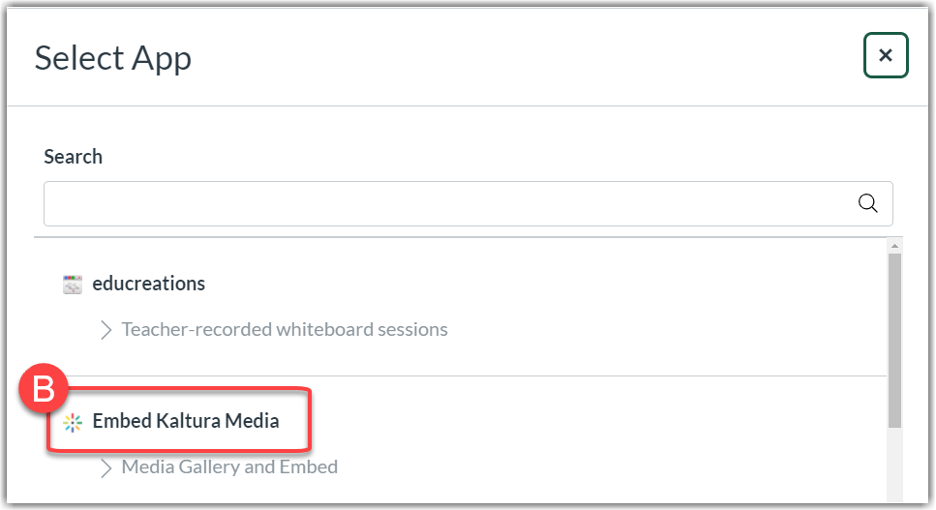
- Move the insertion point to the desired location in the text box. Click on the Apps (A) plug-in icon to open a new window. Click the Embed Kaltura Media (B) logo.
Note: Depending on the resolution of your screen, you may have to click the vertical 3 dots at the far right of the toolbar in order to see the apps icon.
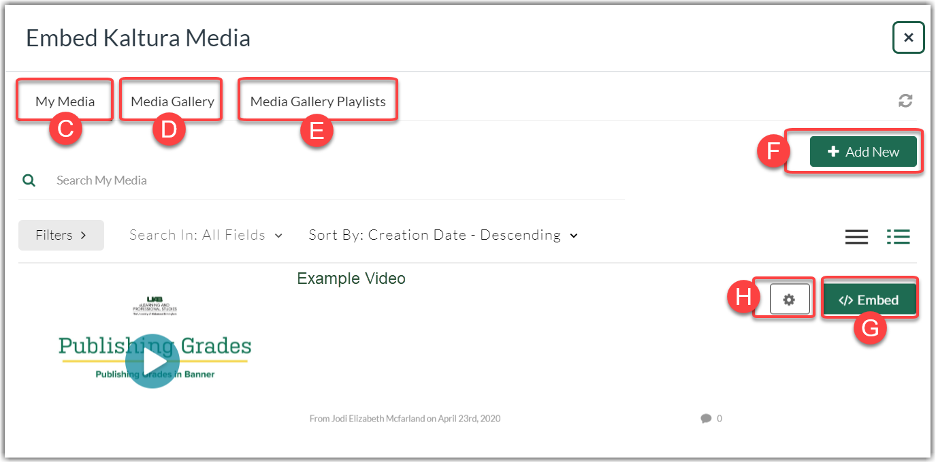
- A window will appear giving you access to the content in My Media (C), the course Media Gallery (D) and any Media Gallery Playlists (E) you have created. Locate the media you want to embed or click + Add New (F). Click Embed (G) to embed the selected video with the default settings or click the Embed Settings (H) gear to choose embed options (Scroll down to see Embed options).
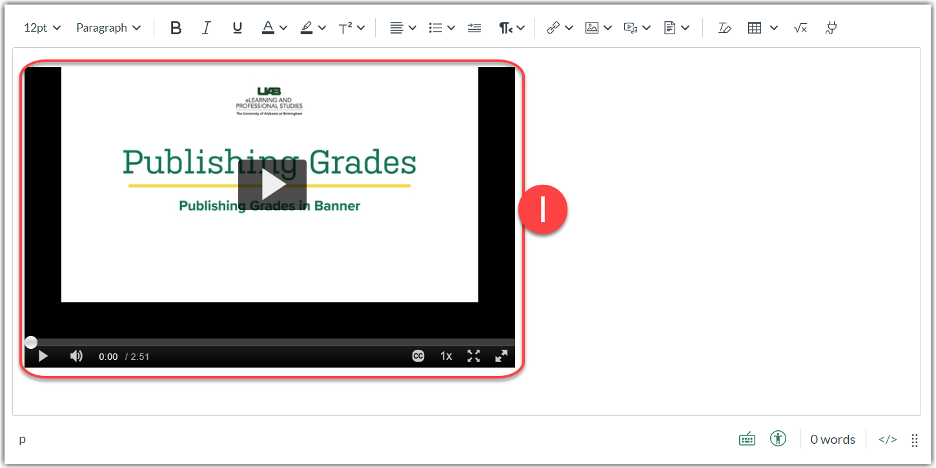
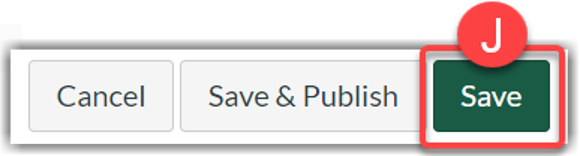
- The window will disappear and bring you back to the Rich Content Editor text box. You will now have the media embedded (I) inside the text box. Other items such as text, images, and files can be added to the text area. When all items and details have been filled out, click Save (J) at the bottom.
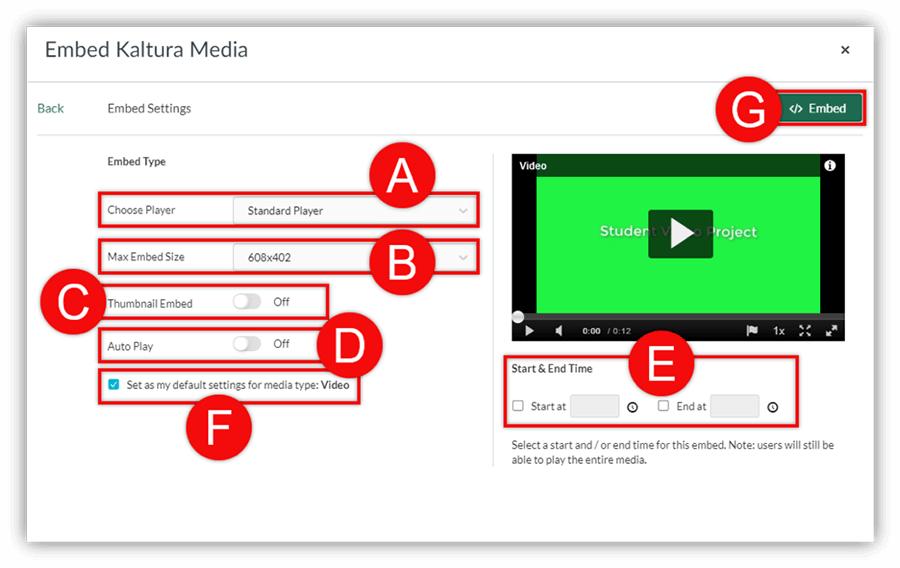
Embed Options
Users can customize a few options when embedding videos in Canvas.
- Follow the directions above to pull up embed options.
- Click the Choose Player (A) dropdown menu and choose desired player.
- Options include Standard Player and Player with Download Option, and Player with Transcript widget.
- Click the Max Embed Size (B) dropdown menu to choose size of the media.
- Options include 608x402 (large), 400x285 (medium), and 304x231 (small).
- Turn either Thumbnail Embed (C) or Auto Play (D) On/Off.
- Thumbnail Embed – Instead of loading the player, load a thumbnail that will load faster. After clicking on the thumbnail, the player will automatically start playing as the auto play is on by default. This option is very useful for pages where there are many Kaltura players, and you want to shorten the loading time.
- Auto Play – Set this to start playing the video automatically when the page is visited.
- Set the Start & End Time (E) if desired.
- Users playing the video, will start and end watching the video according to the time you set.
Note: Users will be able to watch the rest of the video. For a more restrictive playback, create a clip of the video. - Click the Set as Default Settings (F) checkbox if desired. Use this check box to make these settings your new default. Once set for a media type, you will not need to enter the embed settings again for this type of media. You can simply click embed.
- Click Embed (G) and Save.
Publishing Media to Media Gallery
Publishing Media to the course’s Media Gallery allows instructors to place all course media in one place. Students can search, filter, and sort through the media to find the desired content. Instructors can even publish multiple videos to a course in one quick process.
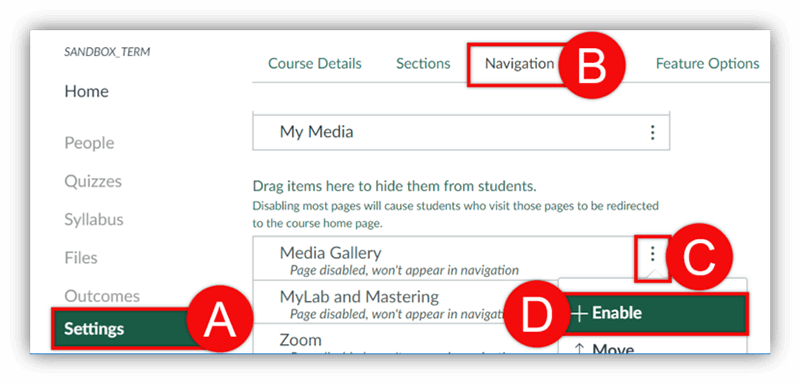
Enable Media Gallery
If the Media Gallery link isn’t already enabled (visible) in the course navigation (on the left), click Settings (A) in the course navigation, then click the Navigation (B) tab at the top of the page. Click the vertical ellipsis (C) to the right of Media Gallery and choose Enable (D). Finally click Save at the bottom of the page.
Publish to Course Media Gallery
- Login to Canvas, click Courses (A), choose a desired course, and click Media Gallery (B) in the course navigation.
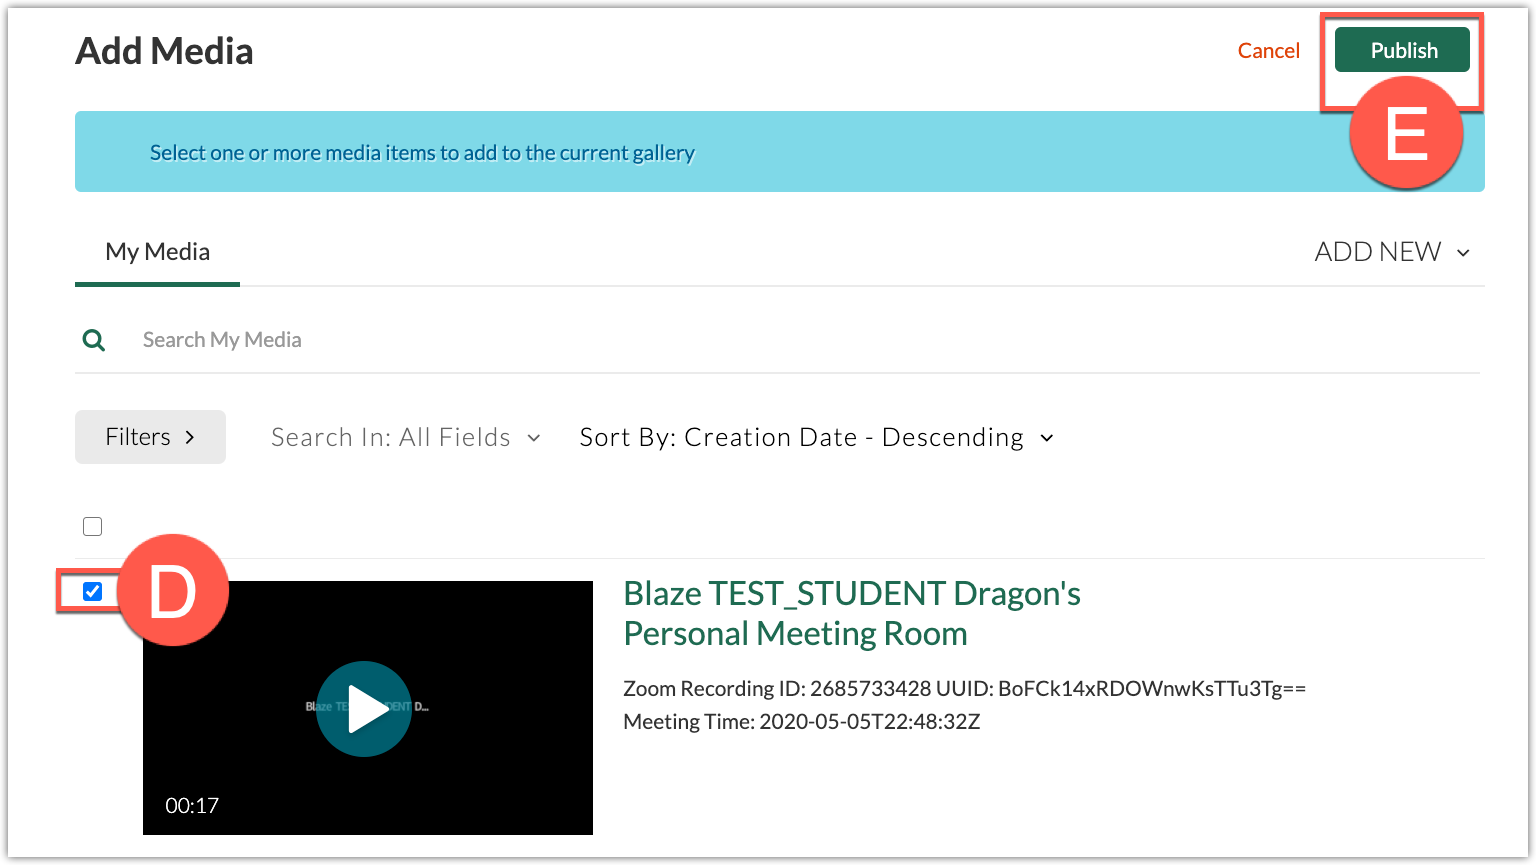
- Click + Add Media (C).
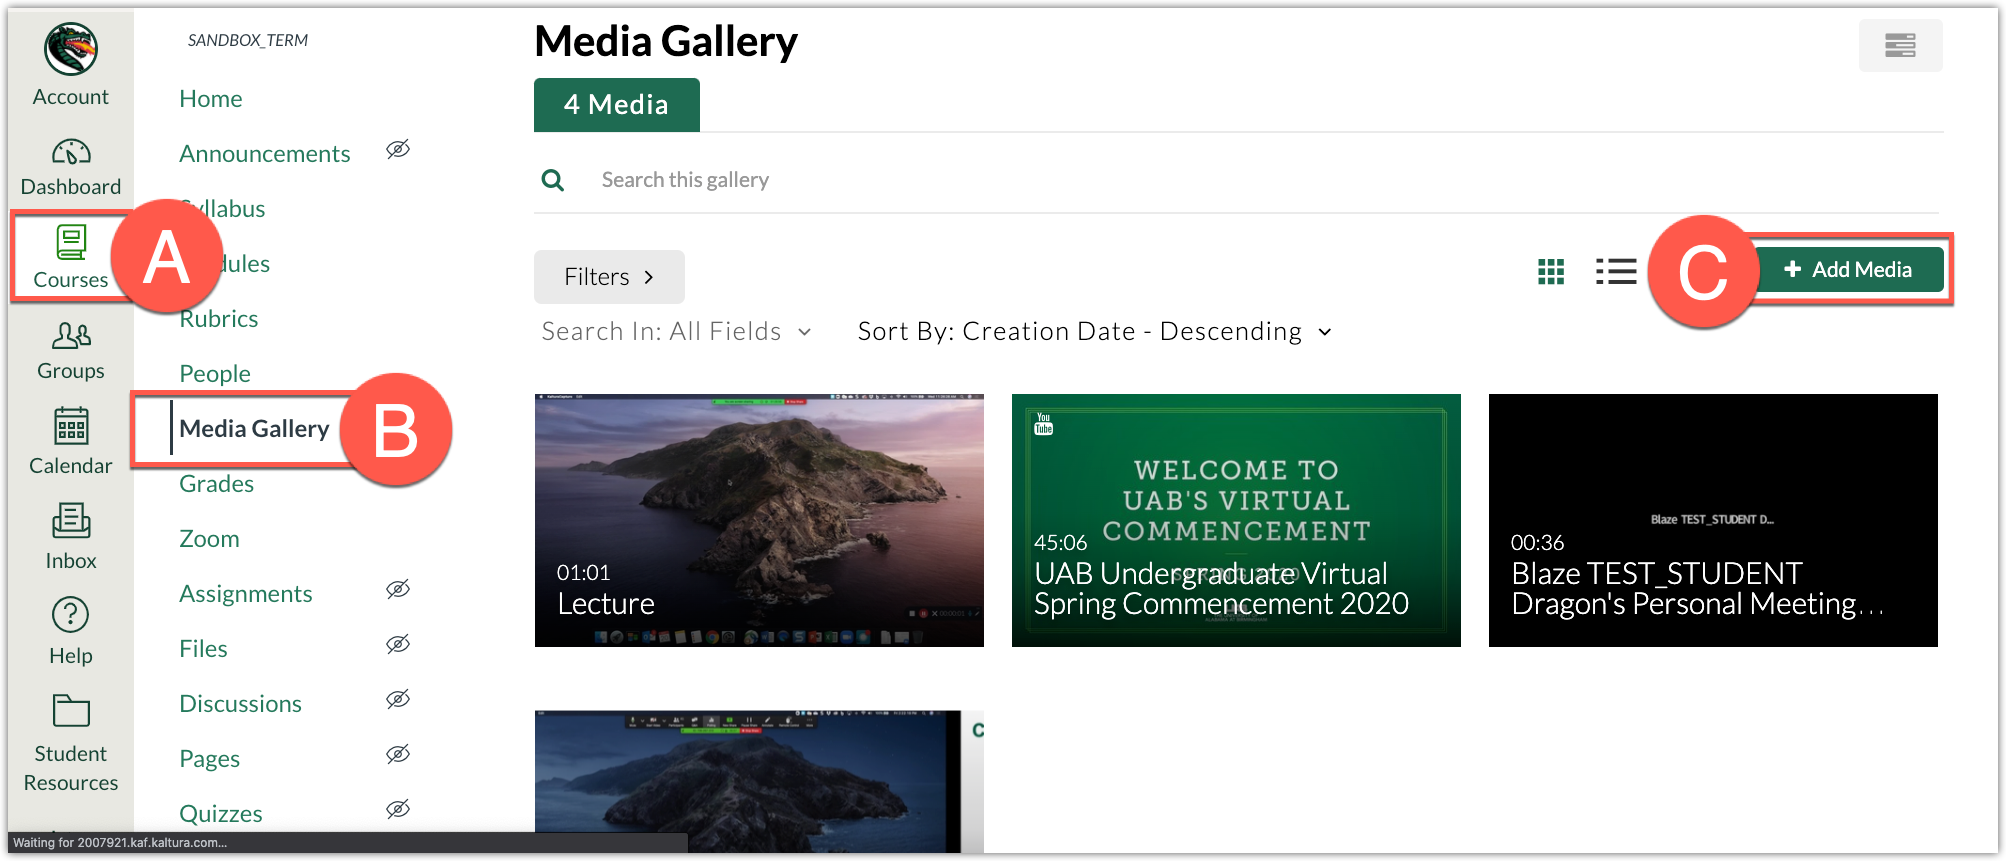
- Check the box(es) (D) to the left of the video(s) you would like to publish and then click Publish (E) at the top right.
- Media can be accessed by all users in the course by clicking Media Gallery in the course navigation of the course you published the video to.
Edit Media Gallery Settings
Course Instructors and/or Designers have access to edit the Media Gallery settings. Watch the tutorial video or follow the instructions below.
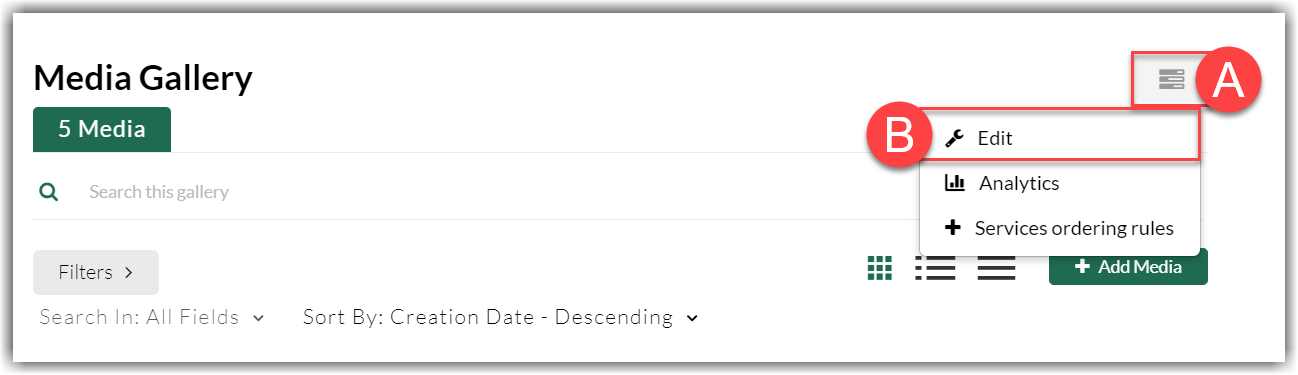
- From the course Media Gallery, click the Channel Actions (A) button at the top right, then select Edit (B).
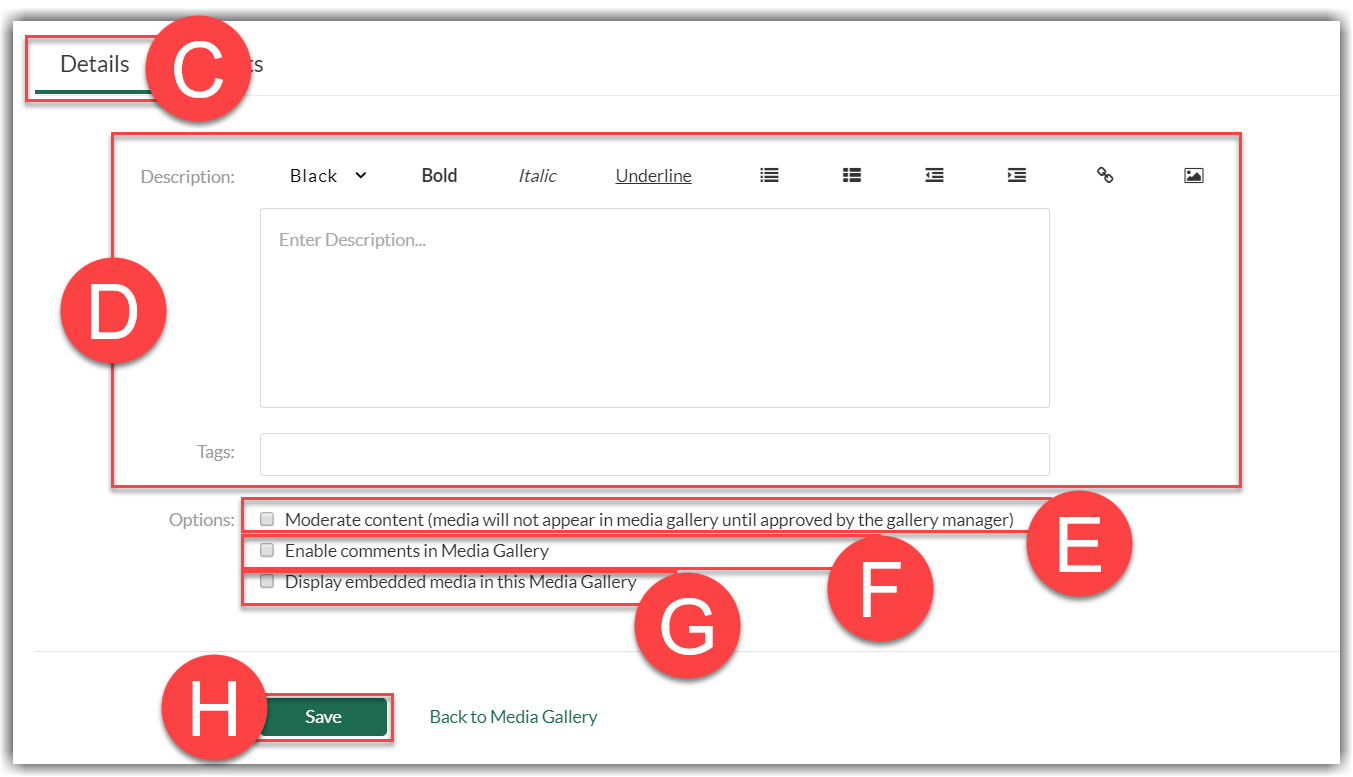
- Click the Details tab (C) to access the Media Gallery settings.
- Descriptions and Tags (D) can be edited or inserted for searching purposes.
- Check the Moderate Content checkbox (E) to keep students from publishing media into this gallery without your approval.
- Check the Enable Comments checkbox (F) to allow commenting below media.
- Check the Display Embedded Media checkbox (G) to have Kaltura automatically post media to the media gallery once you embed it somewhere in the course.
- Click Save (H) to save any changes made.
Creating a Playlist
Instructors wanting to control the order of media in the Media Gallery can create one or more playlists and organize the media as desired. Follow the directions below to create a playlist.
- Access Media Gallery in a Canvas course, click Actions (A) at the top right of the screen, then click Edit (B).
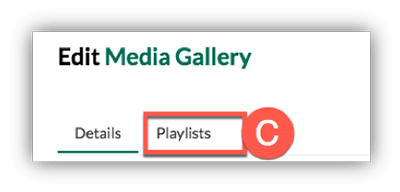
- Click the Playlist tab (C) at the top of the screen.
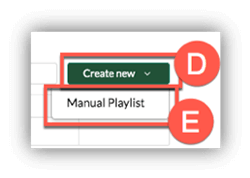
- Click Create New (D) at the top right, then choose Manual Playlist (E).
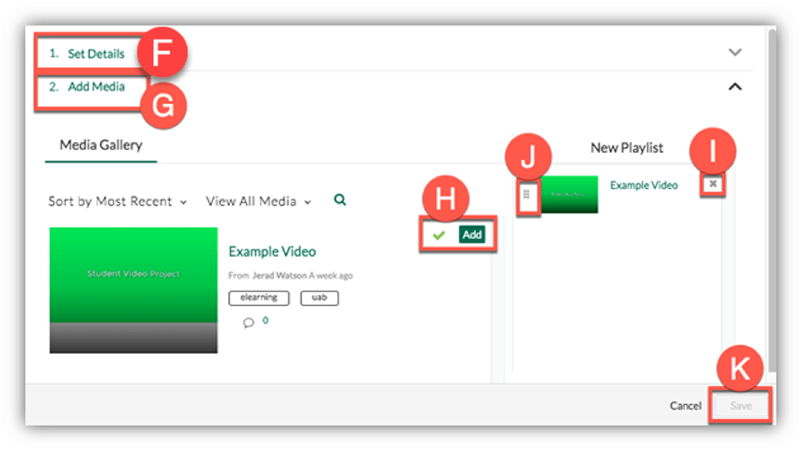
- Enter details such as name and tags by clicking Set Details (F). Then click Add Media (G).
- Add media to the playlist by clicking Add (H). It will then appear in the playlist on the right.
- Remove media from a playlist be clicking Remove (I) or re-order the media by clicking the Re-Order arrows (J) and dragging the media to the desired location. Click Save (K) when finished.
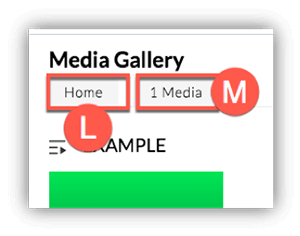
- The Home page (L) of the Media Gallery will display the playlist you created. Students can click the tab with # Media (M) to show all media in the Media Gallery.
This guide explores several options for modifying media once it is in the user’s My Media. Users can edit details such as the media name, description, and tags to help identify and organize media. Media can be edited to show a different image as the thumbnail and chapters/slides can be added. Finally, users can trim, chop, and splice the media using the video editor. Click the buttons below to navigate this guide.
Note for users of screen readers: letters in parentheses in the instructions below refer to corresponding areas on example images. If you have any questions about these instructions, contact eLearning for assistance.
Search & Select My Media
Search, Filter, and Sort
Users have the ability to search, filter, and sort through media in My Media.
- Use the Search (A) bar to search media by title, meta-data, captions, and more.
- Click Filters (B) to filter by type, status, ownership, caption status, duration, and/or date.
- Click the Sort (C) drop down menu to sort by date, alphabetical, plays, or comment counts.
- Click the View (D) tabs to toggle between collapsed view and detailed view.

Select Media to Edit
Once you find the desired media to edit, enter the edit menu by clicking edit. There are two locations that users can access the edit button for media in My Media.
- From the My Media screen, click the Pencil icon (A) on the right side of the desired media.

- From the Media page where the user can watch the video, click Actions (B), then click Edit (C).

Edit Menu
Once the edit menu is opened users have access to edit the details, media options, thumbnail, timeline, and even replace the video entirely. Watch the tutorial video or click a topic and follow the instructions below.
-
Edit Details
- Click the Details (A) tab to access and edit the details of media.
- The Name (B) can be edited. This field is required.
- The Description (C) can be edited using the rich text editor to include formatted words, hyperlinks, and pictures.
- Tags (D) can be removed or added to make searching for the media easier.
- Once edits have been made, click Save (E) to save the changes.
- Click Go to Media (F) to go the media page and see changes made.

-
Edit Options
- Click the Options (A) tab to edit the comment and clipping options of the media.
- Choose to Disable comments (B) to remove the comment window under media in Media Gallery.
- Choose to Close discussion (C) to let past comments remain but deny further commenting.
- Choose if users can Create a clip (D) of the media in their own My Media. For instructions on how to create a clip, see the Split, Delete, and Fade In/Out section of the Video Editor instructions below.
- Once options have been chosen, click Save (E) to save the changes.
- Click Go to Media (F) to go the media page and see changes made.

-
Edit/Add Collaborators
Users can give other Kaltura Media Space users permission to collaborate on media in My Media. Permission levels include co-view, co-publish, and co-editor.
- Click the Collaboration (A) tab to edit or add collaborators to media.
- Click + Add Collaborator (B) to give a user or users permissions to your media.
- Current Collaborators (C) and their permissions to that media will be listed including their BlazerID.
- Click the Filter (D) dropdown menu to filter the list by permission level.
- Edit collaborator permissions (E) or remove collaborator using the pencil or “X.”

Add a Collaborator
Once you click + Add Collaborator (B) mentioned above, a dialog box will appear. Follow the directions below.
- Click the User (F) textbox and type in either the BlazerID or name of desired user(s) to be added.
- Check the box(es) of desired Permissions (G) for the selected collaborator. Multiple selections can be made.Notes:
Co-Editor allows collaborators to edit the original media content. (Be careful)
Co-Publisher allows collaborators to publish your media in their courses but cannot edit it.
Co-Viewer allows collaborators to view the video but cannot publish or edit the media. - Click Add (H) to save the changes made.

-
Edit Thumbnail Image
A thumbnail is the image that users see before the video is played. The default thumbnail image selected for media is the first frame of the video. This image can be changed by using one of the methods below.
Upload Thumbnail
Users can upload their own image to be the thumbnail image.
- Click the Thumbnail (A) tab to edit the thumbnail of the media.
- Click Upload Thumbnail (B), select the desired image file, and choose upload. The image will load and become the default thumbnail for the media.

Capture Thumbnail
Users can choose a particular second of the video and capture it as a still image to be used at the thumbnail.
- Click and drag the white Circle (C) on the playback timeline to the desired time in the video.
- Click Capture (D). The image displayed in the player at that moment will become the thumbnail image.

Auto Generate Thumbnail
Users can choose a thumbnail image from a selection that is auto-generated by Kaltura.
- Click Auto-Generate (E). A dialog box will appear with several images that are created from your media. Choose the desired image and it will become the thumbnail image for the media.
- Download the current thumbnail image used in Kaltura by clicking Download (F).

-
Edit Timeline
Users can edit the timeline of the media which includes chapters and slides. More information is below.
- Click the Timeline (A) tab to edit chapters and/or slides for media.
- Current Chapters (B) are shown on the timeline with a bookmark icon. Click this icon to edit that chapter.
- Current Slides (C) are shown on the timeline with a page icon. Click this icon to edit that slide.
- Click the Add Chapter (D) icon to add a new chapter at the current place in the timeline.
- Click the Add Slide (E) icon to add a new slide at the current place in the timeline.

Edit/Insert Chapters
Chapters allow users watching the video to navigate through the video by clicking the provided chapter links. Chapter information and tags are also searchable in the media player. Once you have clicked Add Chapter, follow the directions below.
- Choose the chapter Thumbnail (F) by either uploading a file or keeping the auto image from the media.
- Type in the Title and Description (G) of chapter that will display and be searchable in the player.
- Choose the time on the Time and Tags (H). Time will be the start of the chapter and tags will be searchable.
- Click Save (I) to save your changes or Delete (G) to delete the chapter.

Edit/Insert Slides
Users can record a video of someone presenting and then add slides afterwards. Follow the directions below.
- Click the Add Slide drop down menu and either select Upload Full Deck (K) which allows full PowerPoint presentations or PDFs to be uploaded and then moved to the desired locations or select Upload Single Slide (L) to insert one slide at that point in the timeline.
- Click the Upload (M) symbol to choose the individual slide. PPT, PPTX, or PDF is accepted.
- Enter or edit the Title and Description (N) that is searchable.
- Enter or edit the Time and Tags (O). Time is where the slide will be placed and tags are searchable.
- Click Save (P) to save your changes or Delete (Q) to delete the slide.

-
Replace Video
Users can upload a video to replace a current video in My Media. The newly uploaded video replaces the original media in My Media and would be published everywhere the original video is published.
Note: Beware that this action will remove the previous video permanently.- Click the Replace Video (A) tab.
- Click + Choose a file (B) to upload a new video.

Video Editor
Kaltura provides a media editor that allows users to trim, split, delete and fade in/out. Changes can be made to the original or can be applied to a copy of the original media. Watch the tutorial video or follow the directions below to access the media editor and make edits.
- YouTube videos cannot be edited in the Kaltura editor to protect the content copyright.
Caution box
Launch Video Editor
- From the media page, click the Actions (A) dropdown menu and click Launch Editor (B).
- When editing other details of media, the Launch Editor (C) button is at far right of the screen.


Video Editor Window Layout
- The Left Navigation (D) bar has options to access editor/quizmaker/hotspots, get help, and exit editor.
- The left pane displays media details and can be collapsed by clicking the open/close left pane (E) button.
- Save (F) options are on the top right.
- The Media Player (G) and playback buttons are used to preview timeline modifications.
- The Timeline (H) is at the bottom and provides options to modify media.

Trim Media
Users can use the trimming tool to trim the start and/or end of their media.
- Click and Drag the left Yellow Handlebar (A) to the desired starting place of the video.
- Click and drag the right Yellow Handlebar (B) to the desired ending place of the video.
- Alternatively, click the desire location on the timeline or move the blue timeline marker to the desired location on the timeline and click the Set in (C) icon to delete everything to the left and the Set out (D) icon to delete everything to the right.
- Click Save (E) to make these changes to the original media or click Save a Copy (F) to save the changes to a copy of the media with the original media left unchanged.

Split, Delete, and Fade In/Out
Users can split or cut the timeline into sections and delete desired sections from the timeline. Users can then add fade in/out effects to transition from one section on the timeline to another. Follow the directions below.
- Move the blue Timeline Marker (G) to the starting location of the piece of video you want to remove and click the Split (H) icon to cut the timeline at that point. Repeat for the end of section of video.
- Click the section that is to be removed to select it and click the Delete (I) icon.
- The Gray Area (J) will automatically be skipped. Do NOT attempt to drag the sections together.
- Select a section of the remaining video and click the Fade in/out (K) icon.
- Input the desired amount of seconds of fade in/out (L) in the dialog box. Fade icons will appear to show which sections have fade in/out applied.
- Click Save (M) to make these changes to the original media or click Save a Copy (N) to save the changes to a copy of the media with the original media left unchanged.
