 McGraw-Hill is an online learning assignment and assessment solution that extends the learning experience beyond the classroom. McGraw-Hill offers various products that can integrate into Canvas such as McGraw-Hill Connect and McGraw Hill Campus.
How to Access McGraw-Hill
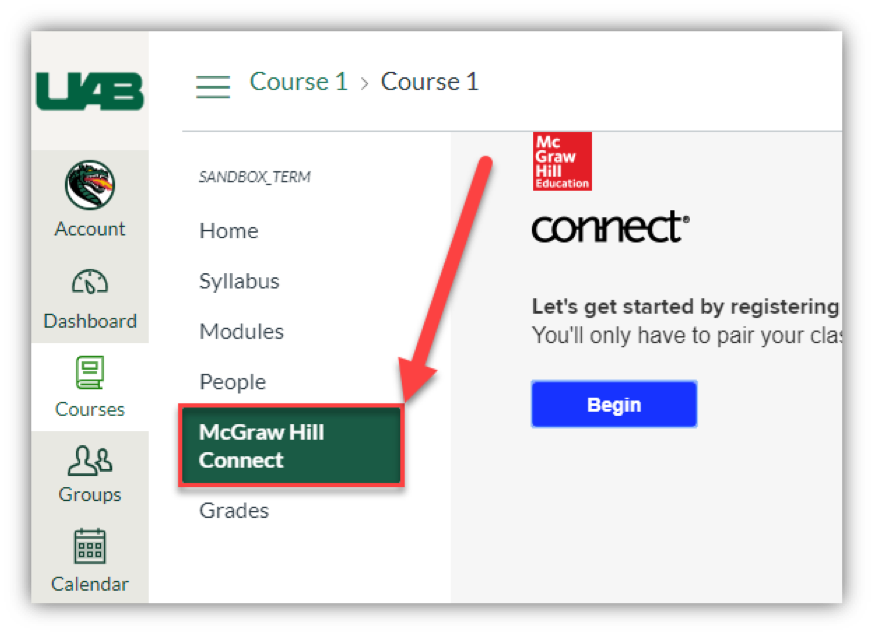
Faculty and Students can access McGraw-Hill by clicking the link in the Canvas course navigation. Note: Faculty must enable this link first.
Guides/Tutorials
Faculty
Guides:
Instructor Training
Technical Support
Please follow the steps below if you need technical support after reviewing the information, guides, and FAQs above.
-
Contact McGraw-Hill Support
-
Ask Learning Technologies
If these support options do not give a satisfactory resolution, please submit a Learning Technologies Support request and include any ticket numbers provided by McGraw-Hill.
Privacy & Accessibility
Notice
We are saddened to announce that NBC Learn is shutting down operations and service June 2020. See below for details.
 NBC Learn Higher Ed is a collection of more than 21,000 videos, documents, and images that can be incorporated into classroom lectures and online teaching materials. The stories on NBC Learn Higher Ed are two-to-six minutes in length and designed so that faculty can provide students access to digital content that is engaging, inspiring, and relevant to their daily lives. In addition to its rich collection of primary-source newscasts from the NBC archive, NBC Learn Higher Ed is updated daily with the latest and current events videos from NBC News and its portfolio. The resources enable faculty to use real-world case studies and keep students up-to-date on the latest developments in their fields. NBC Learn is integrated with the Canvas Learning Management System (LMS) to allow easy embedding of media anywhere the rich text editor is available in Canvas.
NBC Learn — End of Service
We have recently learned that NBC Learn is shutting down and will no longer offer their video library as a service.
When will this happen?
- NBC Learn is shutting down effective June 2020
- UAB eLearning removed the application on May 4th, 2020, to prevent users from using the technology in the future.
- All information regarding NBC Learn on the UAB eLearning website will be removed at the end of June 2020.
How does this impact you?
- Any videos embedded into Canvas or other resources from NBC Learn will no longer work.
- Faculty and students can no longer access the NBC Learn library in or out of Canvas.
What should you do to prepare?
- Instructors should review their course content and remove any NBC Learn videos. These videos will not work and will show an error code if left in the course content.
- Locate other videos to replace the videos you were showing through NBC Learn. UAB Libraries has created a webpage about the video resources available at UAB.
 A customizable, electronic portfolio application that allows assessment management and performance-based instructional features. TaskStream is a product of Watermark.
How to Access TaskStream
Access to TaskStream is dependent on the College/School or program you are in. Please choose the appropriate link below.
Guides/Tutorials
Instructor Training
Technical Support
Please follow the steps below if you need technical support after reviewing the information, guides, and FAQs above.
-
Check Status Page
TaskStream Status Page - Check to see if there any know issues before submitting a ticket.
-
Contact Support
- Submit a Ticket
- Phone:(800) 311-5656
-
Ask Learning Technology
If these support options do not give a satisfactory resolution, please submit a Learning Technologies Support request and include any ticket numbers provided by TaskStream.
Privacy & Accessibility
 Pearson is a platform that offers interactive resources, mobile eText, assignment management, and immediate student feedback. Pearson offers a large variety of products for almost every discipline.
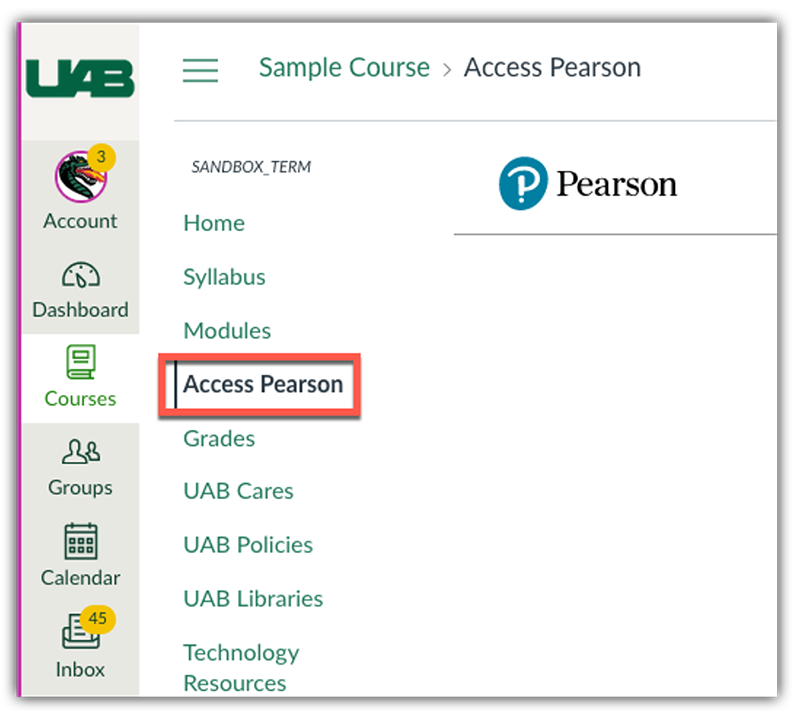
How to Access Pearson MyLab
Instructors
Faculty can access Pearson by adding the link to their Canvas course navigation.
Students
Students can access Pearson through the Course navigation link inside their Canvas course.
Guides/Tutorials
Instructors
FAQ
-
What happened to the Canvas MyLab and Mastery link?
The Pearson MyLab and Mastery link has been replaced with Access Pearson link to incorporate technology improvements in the LTI 1.3 protocol. Your MyLab and Mastery content will be available from the Access Pearson on the course navigation menu in Canvas.
-
How can I get assistance with migrating my existing course content from MyLab and Mastery to Access Pearson?
Pearson has reached out via email to current MyLab and Mastery users offering assistance with migrating to Access Pearson. If you cannot locate this email, please select your product on this list for assistance.
Instructor Training
Pearson Training and Support Page
Technical Support
Please follow the steps below if you need technical support after reviewing the information, guides, and FAQs above.
-
Contact Pearson Support
Submit a Ticket -
Ask Learning Technologies
If these support options do not give a satisfactory resolution, please submit a Learning Technologies Support request and include any ticket numbers provided by Access Pearson
Privacy & Accessibility
 ProctorU is an online proctoring service available and accessible through Canvas. See comparison of proctoring services available at UAB.
Features:
- 24/7 Live Scheduling Platform
- Multi-Factor Identity Verification
- Guided Live Exam Launch Process
- Environment Security Scans
- Live Monitoring and Intervention
- End-to-end Recordings
- Incident Reporting with 24 hours
- Time-stamped Video Events
Student Premium fees still apply if students schedule/reschedule within 72 hours of test beginning. Learn more about Premium fees on ProctorU's website.
How to Access ProctorU
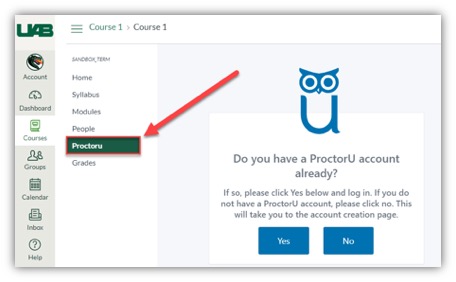
Faculty and students can create their ProctorU account by using their UAB email address to register. This can also be done by clicking the ProctorU course navigation link from within a Canvas course.
Instructor Timeline
The following timeline is highly recommended to ensure a smooth experience for you and your students. We understand that under special circumstances, following this timeline may not be possible. However, the sooner you familiarize yourself with the product, reach out for training, and prepare your students, the better it is for everyone.
Before term starts
Schedule one-on-one training by creating an instructor account. ProctorU will reach out to first time users to assist you in scheduling your first exam.
Beginning of Term
Have students use the Test your Equipment webpage and get ProctorU to pull a report students who completed the test.
(Recommended) Instructors can also schedule up to 3 practice exams per semester so that students can go through the entire process of taking an exam proctored by ProctorU. Import the ProctorU module from Canvas Commons into your course. This includes educational materials for students, a quiz on ProctorU, and a practice proctored test. To import the module, go to Canvas Commons in the Canvas menu. Click on the ProctorU Module course. On the far right, select Import/Download. Check the boxes beside the courses where you want the module to be added. Then select Import Into Course at the bottom of the screen.
> Three weeks before Exam
Schedule your ProctorU exam within three weeks prior to your actual exam date. See the Faculty ProctorU Training for instructions on how to schedule your exams.
Note: You are not required to have your exam materials ready at the time that you schedule your exams with ProctorU.
> 72 hours before Exam
After submitting the exam, you will receive an email from ProctorU within 24 hours confirming approval.
Once approved, share the ![]() ProctorU Student Guide, Student Resource Center, and encourage students to schedule their exam sessions early to avoid late scheduling fees.
ProctorU Student Guide, Student Resource Center, and encourage students to schedule their exam sessions early to avoid late scheduling fees.
< 72 hours before Exam
Any students scheduling within 72 hours will incur late scheduling fees.
Exam day
Students access exam at scheduled time and connect to ProctorU to take exam.
Students should contact ProctorU technical support if they experience any issues.
Downloads
You must download the ProctorU Guardian browser in order to take your exams with ProctorU. If you do not have this downloaded prior to your test-taking session, you will be prompted to download it.
During the check-in process, you will also be prompted to download and run LogMeInRescue so that the proctor will be able to enter the exam access code.
Guides/Tutorials
Instructor
Guides:
- Instructor Onboarding Guides
- Instructor Resource Center
- Syllabus Language
- Scheduling an Exam
- Submit an accommodation request
- Post Exam Reporting
Tutorials:
Students
Guides:
Tutorials:
FAQ
-
Can I use a Chromebook to take a ProctorU proctored exam? What are the system requirements for students' computers?
No, Chromebooks cannot be used to take a ProctorU proctored exam at this time. Visit ProctorU's' Equipment Requirements for the full list of system requirements.
-
Do proctors take a picture of the ID? If so, how long are those kept?
If a photo is taken of the IDs they are purged after 10 days.
-
How long are videos kept?
Recordings are kept for one year past inactivity and up to seven years. Both screen and video recordings are made available with 24 hours of the session ending. Videos are stores on our U.S. based servers.
-
Does ProctorU cover more time in a test if DSS accommodations are needed?
Yes. ProctorU is
 ADA compliant and will accommodate any students who have an accommodation due to a disability. All you will need to do is ensure the time accommodation is set in Canvas for that student and notify ProctorU. You can notify ProctorU by entering an accommodation request.
-
Do students need to have a full length mirror to take a test?
No, but they may need something else with a reflective surface. If the student is using a computer that has a built-in webcam, they will need to have something with a reflective surface, for example a cell phone (put out of reach before testing begins). This will allow the proctor to view the outer frame of the computer to check for sticky notes or similar items.
-
What can I put in my syllabus to prepare students?
Navigate to the link below to copy and paste the most up-to-date information that can be pasted into your syllabus or Canvas Module/page.
Instructor Training
Archived Workshops
Whether you are new faculty or would just like a refresher to learn about our latest features, you can click on the link below to sign up for a day and time that fits your schedule.
Watch a Recorded Training Session
- Do you have an immediate need?
- ProctorU offers 24/7 Faculty and Student Support. For urgent matters, please utilize the LiveChat within your account.
- Do you have a general question?
- ProctorU has multiple resources available to assist with the utilization of our services. Please visit the Instructor Support Page to search within our help articles or our Instructor Onboarding Page for Syllabus Information, Exam Day expectations, and Best Practices. You can also connect via phone 855-772-8678 or support@proctoru.com.
- Do you require further assistance?
- Please reach out to UAB's ProctorU Senior Customer Success Specialist
- Raven Jones
- Email: rajones@meazurelearning.com
- Please reach out to UAB's ProctorU Senior Customer Success Specialist
Technical Support
Please follow the steps below if you need technical support after reviewing the information, guides, and FAQs above.
-
Test your equipment and view system requirements
Test Your Equipment - Check to see if your device meets the system requirements.
-
Do It Yourself (DIY) Troubleshooting
Having Technical difficulties? Below are a few initial steps you can take prior to reaching out for assistance:
- Clear cache/cookies on your browser.
- Restart computer.
- Restart or update browser.
- Remove or disable any additional browser extensions that may be interfering with the ProctorU platform.
- Ensure no other video streaming services are being used by other individuals connected to the same network.
- Ensure browser settings allow pop-ups, microphone, and web camera access for ProctorU.
- Attempt an alternative browser (Firefox or Chrome).
- Attempt to test in a different location.
- Attempt on an alternative approved device.
-
Contact ProctorU Support
- Submit a Request
- Live Chat (click the speech bubble at the bottom)
- (855) 772-8678
- Meazure Learning Support
-
Ask Learning Technologies
If these support options do not give a satisfactory resolution, please submit a Learning Technologies Support request and include any ticket numbers provided by ProctorU.
-
Privacy & Accessibility