Hosts/co-hosts with a licensed Zoom account can record their meetings to the cloud or locally to their computer. Users with a basic Zoom account can only record meetings locally. Click the buttons below to navigate this guide.
- Cloud Recording: When meetings are recorded to the cloud, the recording is processed and made available through Zoom (uab.zoom.us) and Kaltura (My Media).
- Local Recording: When a meeting is recorded locally, the recording will be saved on the computer/device you host the meeting on. Note: Local recording is not supported on iOS and Android)
Note for users of screen readers: letters in parentheses in the instructions below refer to corresponding areas on example images. If you have any questions about these instructions, contact eLearning for assistance.
Set Scheduled Meeting to Record Automatically to the Cloud
Users can set meetings to record automatically or manually start/stop recordings when in the meeting. See below for the three options to record your meeting to the cloud.
- Option 1: Set Scheduled Meeting to Record Automatically to the Cloud
- Option 2: Manually Record to Cloud During Zoom Meeting
- Option 3: Set all Future Meetings to be Recorded Automatically
Option 1: Set Scheduled Meeting to Record Automatically to the Cloud
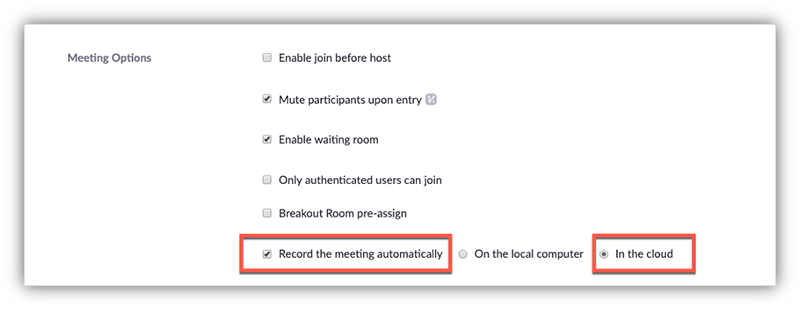
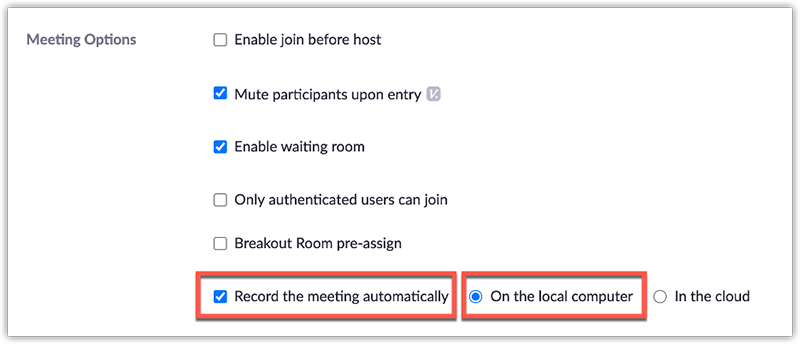
When scheduling a Zoom meeting, check the box for Record the meeting automatically, then select In the cloud. When the meeting starts the recording will automatically start and when the meeting ends, it will automatically end.
Option 2: Manually Record to the Cloud during Zoom Meeting
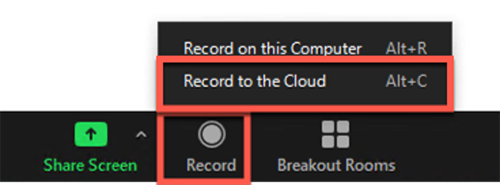
Once the meeting has begun, click Record on the Zoom toolbar, then click Record to the Cloud. The meeting will be recorded until either the meeting ends or the user manually stops the recording.
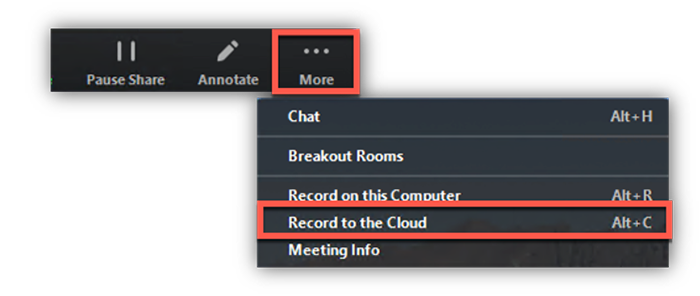
Note: Users must click More to see the option to record to the cloud if they are sharing their screen or have smaller screen resolution.
Option 3: Set all Future Meetings to be Recorded to the Cloud Automatically
Users can change their account settings so that all meetings will be recorded automatically.
- Login to Zoom at uab.zoom.us.
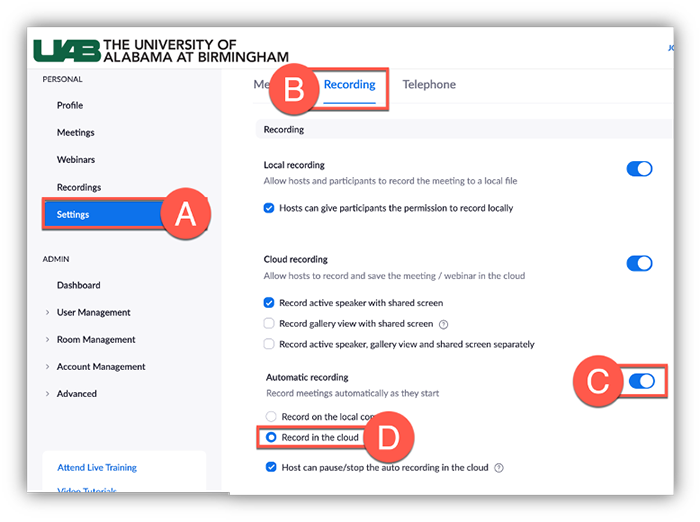
- Click Settings (A) on the left hand side.
- Click Recording (B)at the top.
- Scroll down and click the toggle to turn on Automatic Recording (C) for all meetings.
- Choose Record in Cloud (D).
Also on this page are other cloud recording settings that can be changed such as what format is to be recorded. See Zoom’s Support page for more details.
Share Cloud Recordings in Canvas
If a Zoom meeting was recorded to the cloud, it will be available after processing via Zoom and Kaltura. Videos are deleted from Zoom’s website after 30 days because of limited space on Zoom’s servers, but a copy of the video is also sent to Kaltura (My Media/Media Gallery) which allows unlimited storage of media. Users can access Kaltura in or out of Canvas to see their videos.
Option 1: Kaltura (My Media/Media Gallery)
Instructors wanting to share Zoom Cloud Recordings with students and other users in Canvas can either publish the media to the course Media Gallery or embed the media somewhere in context (Canvas page, assignment, discussion, etc.) Visit the guides on using Kaltura to share videos below.
Note: Please contact eLearning if Zoom meetings recorded to the cloud do not display in your My Media account (Kaltura).
Option 2: Zoom Tab in Canvas
With this method, instructors can publish Zoom meetings for students to view within the Zoom tab in Canvas. Cloud recordings will only display here if the meeting was scheduled in this course.
Note: Zoom Recordings in the Cloud are deleted after 30 days. If you desire to have access to videos longer than 30 days, users must either download the video or use the Kaltura method of sharing Zoom videos shown above.
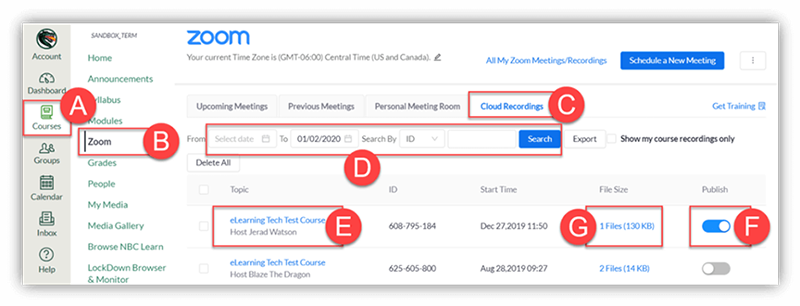
- To access Zoom in Canvas, click the desired Canvas Course (A), then click the Zoom (B) link in the course navigation.
- Click the Cloud Recordings tab (C) at the top.
- Recordings can be Searched (D) and filtered by date.
- Click the desired Meeting Topic (E) to watch the Meeting Recording.
- Click Publish (F) to make this recording available to students in the Zoom tab in Canvas.
- Click the File (G) link to download files associated with that recording. Available files to download include: Video, Audio, Chat text file (if enabled), and Transcript (if enabled).
Share Cloud Recordings Outside of Canvas
If you would like to share a recording with users outside of Canvas you can publish it to a Kaltura Channel or share a link from Kaltura or Zoom. See the options below.
Option 1: Zoom Recording Link
Meetings recorded to the cloud are available (for 30 days) on Zoom servers and can be shared with anyone. Once the video has processed, Zoom sends an email to the host containing a shareable link. The host can also find this link and other recordings at uab.zoom.us.
- Login to Zoom at uab.zoom.us.
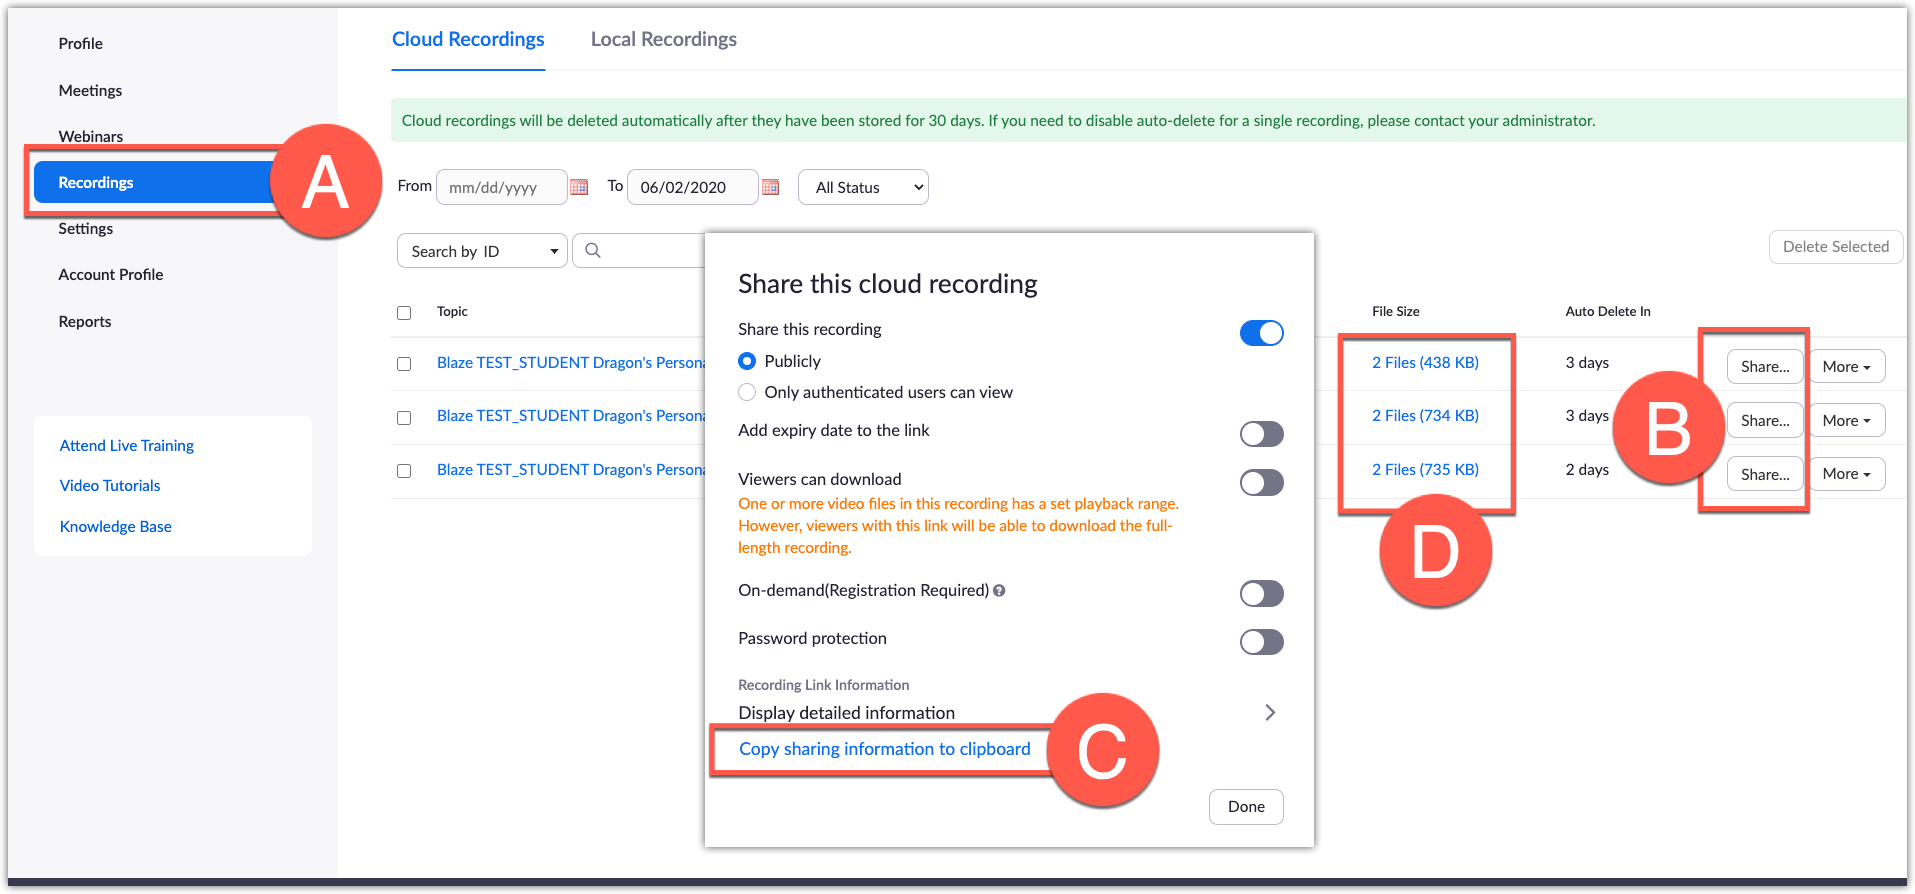
- Click Recordings (A) on the left hand side to view all recordings for your account.
- Click the title of the meeting if you want to preview it. Click Share (B) beside the desired meeting to set any settings such as password or download availability.
- Click Copy Sharing information to clipboard (C) and paste into desired location.
- Optionally, users can download the Video/Audio files (D) by clicking the blue links.
See additional Guides from Zoom on sharing cloud recordings:
Option 2: Publish in Kaltura
You can publish one or more videos to a Kaltura Channel which is similar to a YouTube channel except that it is private to UAB. You can set it so that anyone with a BlazerID can access the media or only those you identify.
- Access your Kaltura account by going to mediaspace.uab.edu, clicking the profile logo (A) at the top right and clicking My Media (B).

- Click the box(es) (C) beside the desired video(s) and click Actions (D), then Publish (E).

- Choose type of access to video:
- Choose Unlisted (F) if you want the video to be visible to anyone with a link.
- Choose Published (G) if you would like to publish the video to a category or channel which are private to UAB and require users to authenticate with BlazerID and Password in order to view.
- Click Save (H) when finished.

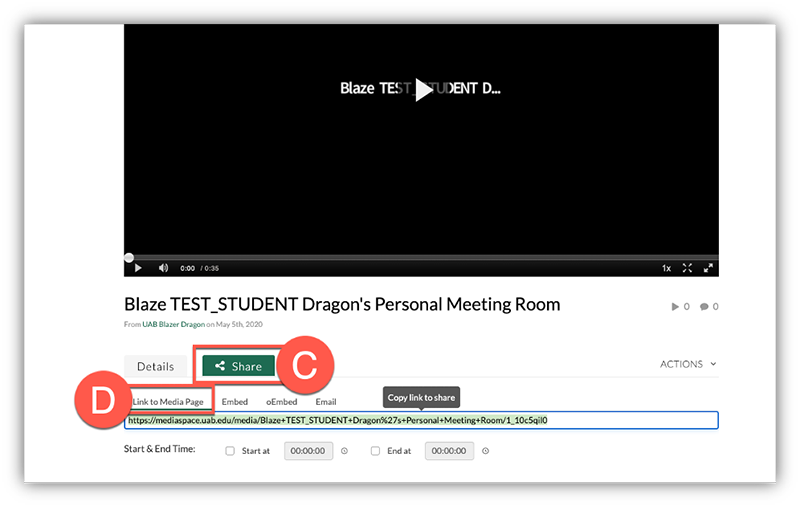
- Get shareable link to video: Go to My Media (A), click the title (B) of an unlisted or published video.

- Click Share (C), then click Link to Media Page (D). Copy this link and share in the desired location.
Record Locally
Users can set meetings to record automatically or manually start/stop recordings when in the meeting. See below for the three options to record your meeting locally to your computer/device.
- Option 1: Set Scheduled Meeting to Record Automatically to Local Device
- Option 2: Manually Record to Local Device during Zoom Meeting
- Option 3: Set all Future Meetings to be Recorded Locally
- Option 4: Give Participants Privilege to Record Locally
Option 1: Set Scheduled Meeting to Record Automatically to Local Device
When scheduling a Zoom meeting, check the box for Record the meeting automatically, then select In the cloud. When the meeting starts the recording will automatically start and when the meeting ends, it will automatically end.
Option 2: Manually Record to Local Device during Zoom Meeting
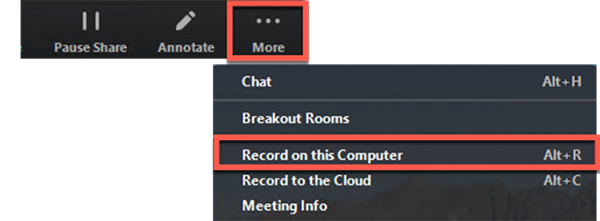
Once the meeting has begun, click Record on the Zoom toolbar, then click Record on this Computer. Note: Users with a basic account or participants in a meeting will only see the Record button. Clicking this button will start a local recording.
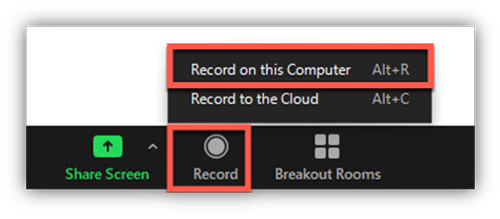
Note: Users must click More to see the option to Record on this Computer if they are sharing their screen or have smaller screen resolution.
Option 3: Set all Future Meetings to be Recorded Locally
Users can change their account settings so that all meetings will be recorded automatically.
- Login to Zoom at uab.zoom.us.
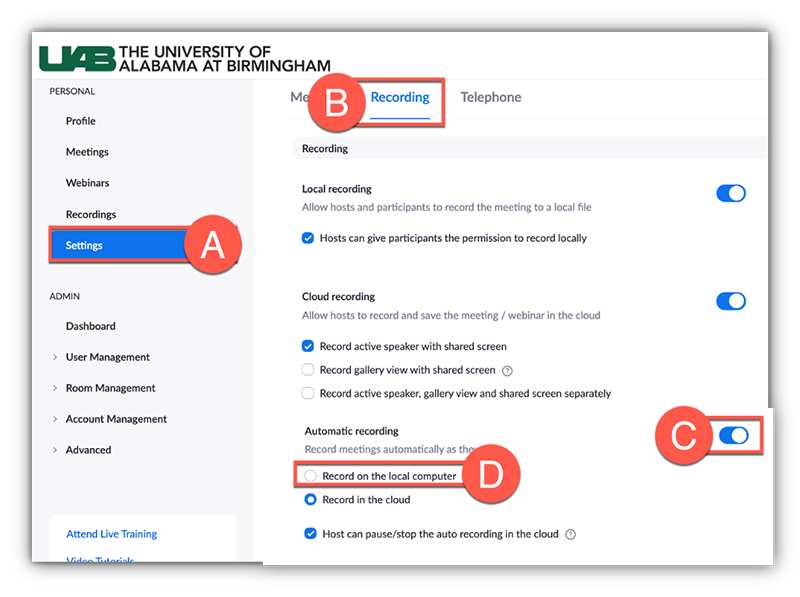
- Click Settings on the left hand side.
- Click Recording at the top.
- Scroll down and click the toggle to turn on Automatic Recording for all meetings.
- Choose Record on the local computer.
Option 4: Give Participant(s) Privilege to Record Locally
- In a Zoom Meeting click on Manage Participants on the Zoom Toolbar.
- In the Participants menu navigate to the participant who will be granted recording privileges. Click More next to their name.

- Select the option to Allow Record.

The participant will receive the following notification:
- When a participant is recording, the participant menu will display a recording icon next to the participant's name.

- To disable the participant's ability to record, click More next to the name, then click Forbid Record.

The participant will receive the following notification:
- After the meeting has ended, Zoom will convert the recording so you can access the files.

- Once the conversion process is complete, the folder containing the recording files will open. Note: By default, the audio/video file (MP4) will be named Zoom_0.mp4. The audio only file (M4A) is named audio_only.m4a.
- This file can be shared through any desired method. Some options include:
- Upload and share from UAB Box.
- Add to My Media and Share in Canvas or outside of Canvas.
- Students can submit these files into Canvas or GoReact for Assignments as well.