Instructors can use the Zoom Web Conferencing tool within Canvas to provide a virtual classroom experience, record lectures, host virtual office hours and more. Instructors simply schedule meetings in the desired Canvas course and students enrolled in the course can join without needing to create an account. Instructors can then see attendance reports and share meeting recordings with students. Click the buttons below to navigate this guide.
Note for users of screen readers: letters in parentheses in the instructions below refer to corresponding areas on example images. If you have any questions about these instructions, contact eLearning for assistance.
Schedule a New Meeting for Canvas Course
- To access Zoom in Canvas, click the desired Canvas Course (A), then click the Zoom (B) link in the course navigation. Use this Canvas guide to enable Zoom if you do not see it in your Course.
- Click Schedule a New Meeting (C) at the top right to schedule a Zoom meeting with the people in the course.

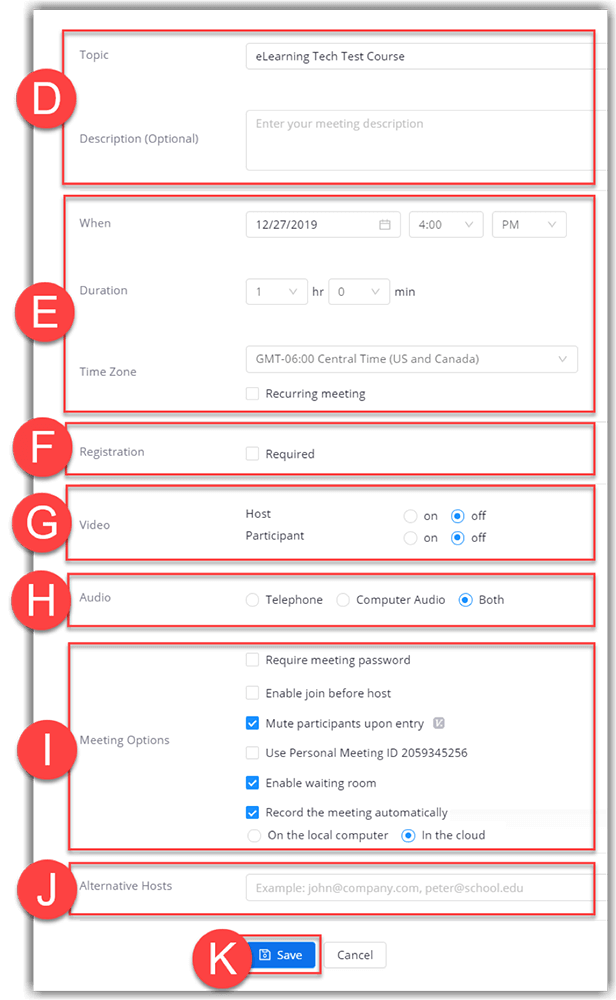
- Enter or modify the Topic and Description (D) for the meeting. Only the topic will be visible to all attendees.
- Choose When, Duration, and Time Zone (E) for the meeting.
Note: Check the Reoccurring Meeting checkbox to open more options on scheduling daily, weekly, or monthly meetings for your course. - Choose if attendees will have to Register (F) in order to attend the meeting. Please note that once registration is enabled, instructors have to go to uab.zoom.us to edit or access and registration information. [Not usually needed]
- Choose if the Host and Participants’ Video (G) will be on or off by default when they join the meeting. [Off is recommended]
- Choose how attendees can join the meeting’s Audio (H). [Both is recommended]
- Choose any advanced Meeting Options (I) desired for this meeting.
- Require a meeting password if you want to increase security
- Join before host allows the first person to click join to start the meeting. [Useful if you want the meeting to begin without you]
- Mute participants upon entry can reduce distracting noise as attendees join.
- Ensure 'Use personal meeting ID' is not checked so a unique meeting ID is generated. Do not use the personal meeting ID assigned to your profile.
- Waiting rooms ensure that no one joins the meeting without the host admitting them either individually or batch.
- Recording automatically will start recording as soon as the meeting begins and stop when the meeting ends. [Choose “In the cloud” if you want to publish your meeting through Zoom or Kaltura to students]
- List the emails of people that can start and Alternatively Host (J) the meeting if you are unable to attend. [They must have a Zoom account at UAB through uab.zoom.us]
- Click Save (K) to save your meeting settings. The meeting will now be shown under upcoming meeting for all users in course and will also be posted to the Canvas course calendar.

Start a Scheduled Zoom Meeting
- To access Zoom in Canvas, click the desired Canvas Course (A), then click the Zoom (B) link in the course navigation. Use this Canvas guide to enable Zoom if you do not see it in your Course.
- The Zoom interface in Canvas shows all Upcoming meetings (C) scheduled in that Canvas course by default.
- Click the Show my course meetings only (D) checkbox to only show meetings that you have scheduled in this course.
- Click All My Zoom Meetings/Recordings (E) to see all Zoom meetings including meetings scheduled outside of this course.
- Click the Pencil icon (F) to select which Time Zone to show the meeting times in.
- Click the Meeting Topic link (G) to see or edit the meeting details.
- Locate the desired meeting and click Start (H).

- Zoom will automatically launch if it is already installed.
- Users may have click Open Zoom Meetings in a dialog box.
- If nothing happens, click download & run Zoom (I).

Visit our guide on Managing Participants in a Zoom meeting to learn more.
For information on Host Controls and Zoom settings, visit the Zoom Help Center.
Access Attendance Report
Instructors can access an attendance report that shows who all joined their Zoom meetings.
- To access Zoom in Canvas, click the desired Canvas Course (A), then click the Zoom (B) link in the course navigation. Use this Canvas guide to enable Zoom if you do not see it in your Course.
- Click Previous Meetings (C).
- Find the desired meeting and click Report (D).

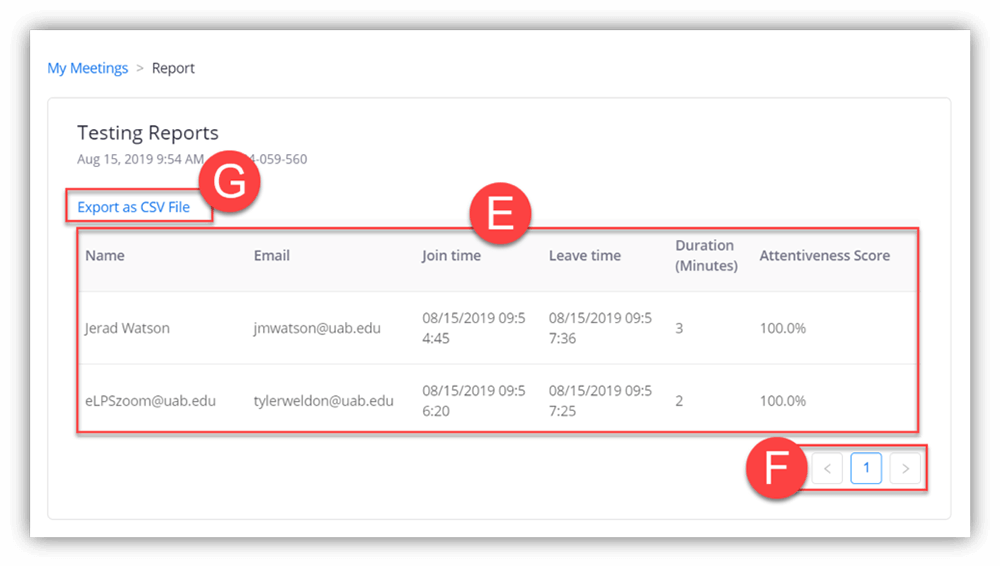
- The Attendance Report (E) includes a list of students that attended the Zoom meeting, their email address, join/leave time, duration of time in meeting, and attentiveness score.
- Users can select other pages (F) of the report or Export (G) the report to CSV worksheet.

Share Cloud Recordings
Instructors can record Zoom meetings to the cloud and share with others once the video has been processed. Videos can be shared through Kaltura or Zoom. Videos are deleted from Zoom after 30 days, but can be found in Kaltura (My Media) where there is unlimited space and no expiration date. Follow the directions below for your desired method.
Method 1: Share Zoom Recordings through Kaltura
Zoom meetings recorded to the cloud are automatically sent to the user’s My Media account in Kaltura. The video is private to you at first but can be shared by publishing to the course Media Gallery or embedding somewhere in Canvas.
Publish to Course Media Gallery
Instructors can publish videos to the course Media Gallery where anyone enrolled in the course can access, search, filter, and watch videos.
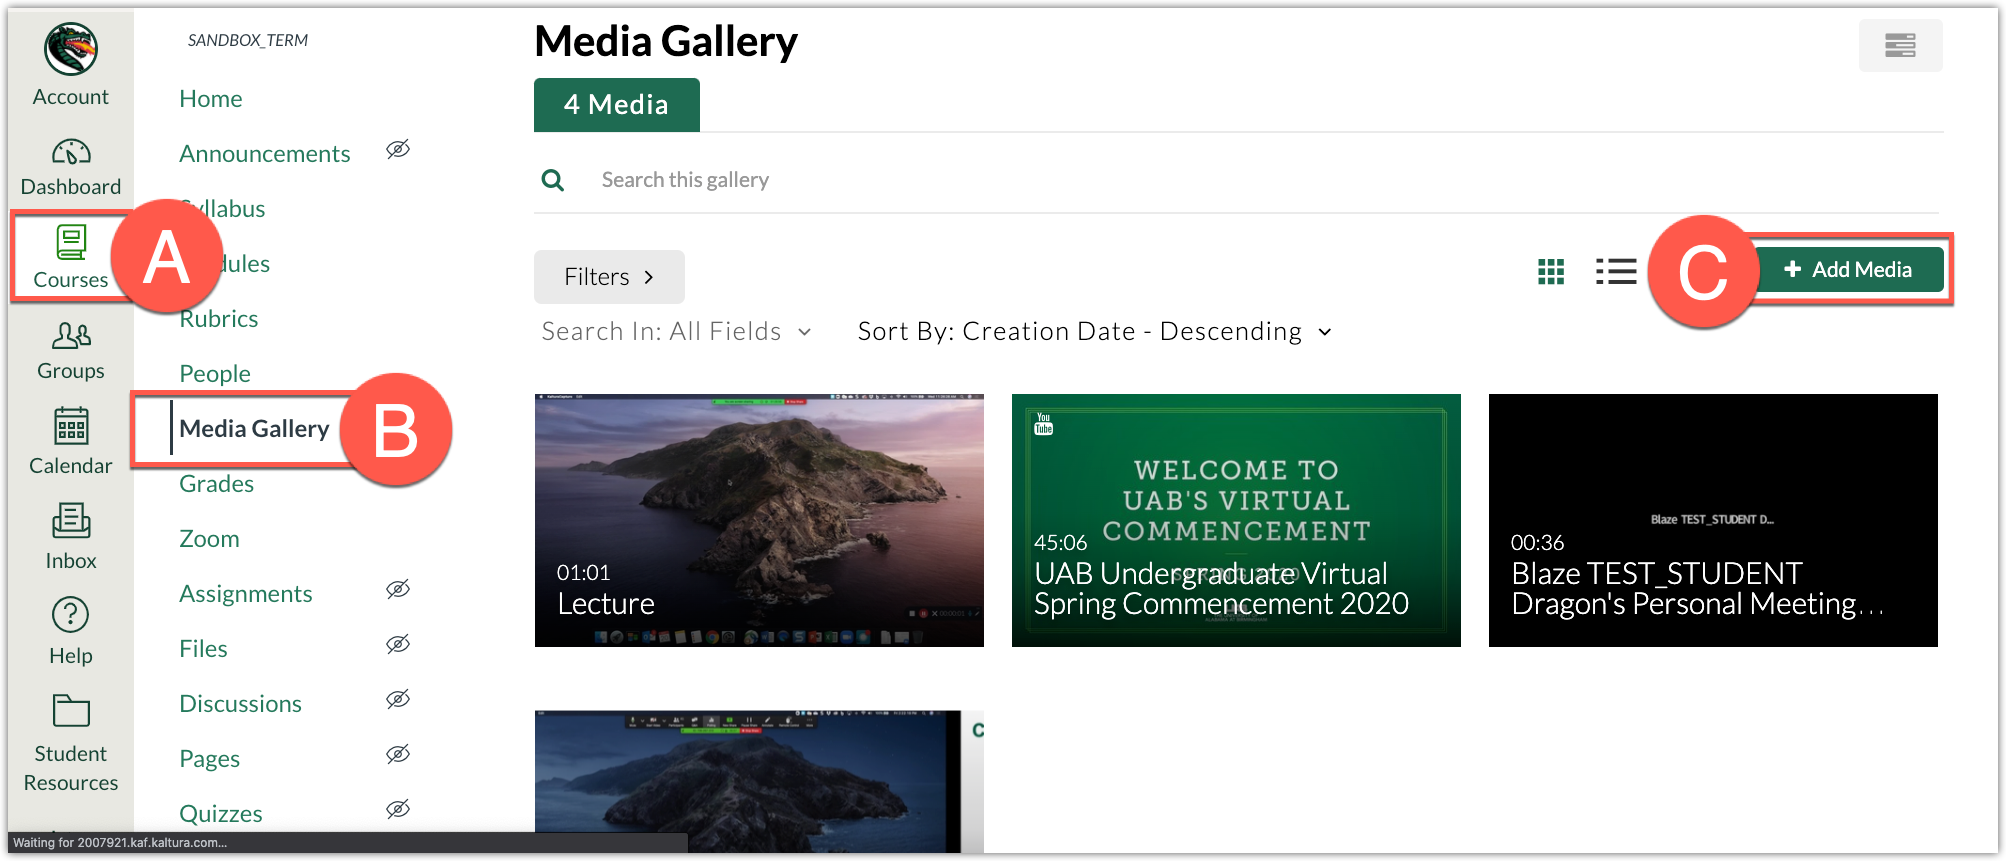
- Login to Canvas, click Courses (A), choose a desired course, and click Media Gallery (B) in the course navigation. [Use this guide to enable 'Media Gallery' if it is not already enabled in your Canvas course]
- Click + Add Media (C).

- Check the box(es) (D) to the left of the video(s) you would like to publish and then click Publish (E) at the top right.

- Media can be accessed by all users in the course by clicking Media Gallery in the course navigation of the course you published the video to. Repeat these steps for each desired course.
See how to create playlists to help organize videos in the Media Gallery.
Embed in Context in Canvas
Instructors can also embed videos in context of other items such as text, image, and files in Canvas.
- Navigate to desired location in Canvas (page, assignment, discussion, announcement, or quiz.) and put the cursor in the desired location (A).
- Click the Apps (B) plug-in icon.
Note: Depending on the resolution of your screen, you may have to click the vertical 3 dots at the far right of the toolbar in order to see the apps icon.
- Click the logo beside Embed Kaltura Media (C).

- Locate the desired Zoom meeting, and click Embed (D) or click the settings gear (E) for more embed options.

See more informatation on embeding videos from Kaltura into Canvas.
Method 2: Share Zoom Recordings through Zoom
With this method, instructors can publish Zoom meetings for students to view within the Zoom tab in Canvas.
- To access Zoom in Canvas, click the desired Canvas Course (A), then click the Zoom (B) link in the course navigation. Use this Canvas guide to enable Zoom if you do not see it in your Course.
- Click the Cloud Recordings tab (C) at the top.
- Recordings can be Searched (D) and filtered by date.
- Click the desired Meeting Topic (E) to watch the Meeting Recording.
- Click Publish (F) to make this recording available to students in the Zoom tab in Canvas.
- Click the File (G) link to download files associated with that recording. Available files to download include: Video, Audio, Chat text file (if enabled), and Transcript (if enabled).

Personal Meeting Room
Personal Meeting Rooms are assigned to you automatically as a permanent virtual room. This Meeting can be started at any time or scheduled for future meetings. Once a participant has the link to your PMR, they can join it at any time the meeting is in use, unless you lock the meeting or use the Waiting Room feature to admit participants individually.
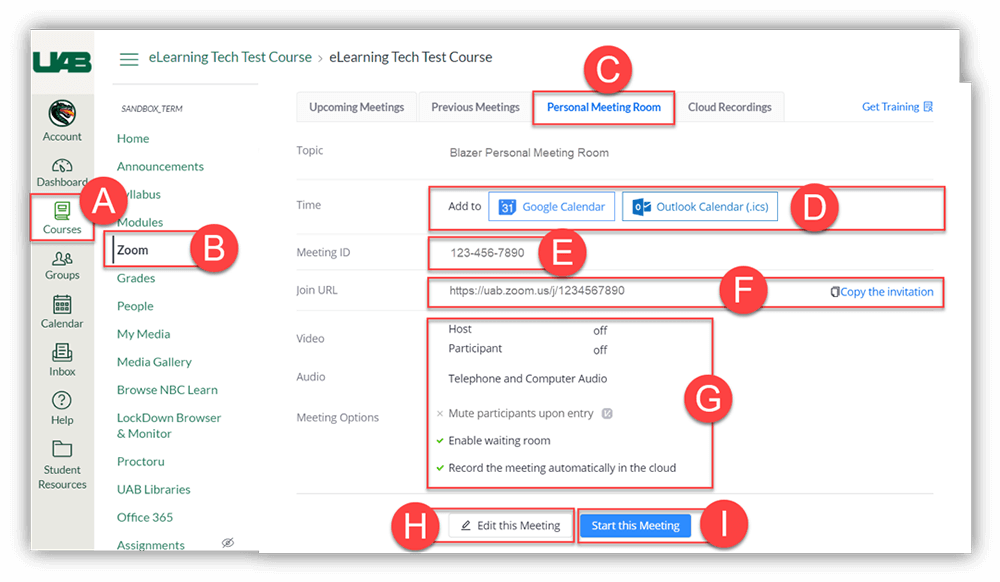
- To access Zoom in Canvas, click the desired Canvas Course (A), then click the Zoom (B) link in the course navigation. Use this Canvas guide to enable Zoom if you do not see it in your Course.
- Click the Personal Meeting Room tab (C) at the top.
- Click on a Time option (D) to schedule a meeting in your Personal Meeting Room at a later time using the desired calendar.
- The Meeting ID (E) can be used to join the meeting through the Zoom Desktop app, mobile app, or website.
- The Join URL (F) can be shared with desired attendees. You can copy and paste the entire invitation in an email to give access to attendees. This URL can be customized.
- A summary of the Settings (G) for your Personal Meeting Room is listed here. Click Edit this Meeting (H) to change the settings.
- Click Start this Meeting (H) to start a meeting immediately in your Personal Meeting Room.
