These increased security measures along with the knowledge on how to manage participants in Zoom meetings will provide a more secure and positive environment. Watch the video above for a quick demo of the account changes and Zoom features. Below is a list of features and tips that can help the host and co-host manage participants and prevent unwanted users from disrupting Zoom meetings.
- In-meeting Host Tools Icon
- Waiting Room
- Limit Screen Sharing
- Disable Participant Annotation on Shared Content
- Mute Particpants
- Turn Off Webcam Feed
- Limit Chat
- Remove Participant
- Lock Meeting
- Force Authentication
In-meeting Host Tools Icon
Users with Zoom client 4.6.10 or higher now have the ability to access many of Zoom’s security features in one place. Learn how to update or download the most recent version of Zoom.
-
Instructions
- Start a Zoom meeting.
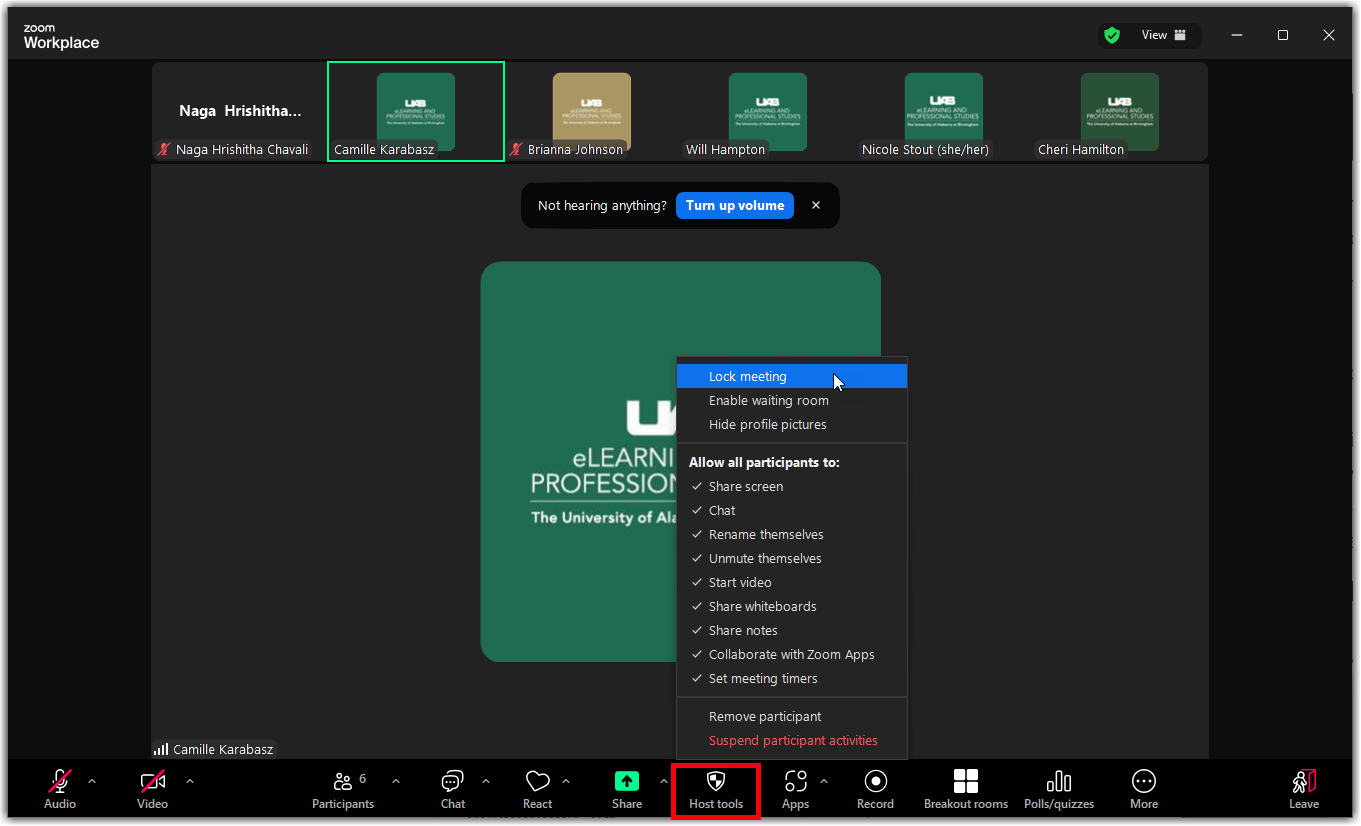
- Click the Host tools icon on the Zoom toolbar.

- The following settings can be enabled from the menu:
- Lock Meeting: Locks the meeting, keeping new participants from joining the meeting.
- Enable Waiting Room: Enables Waiting Room for incoming new participants or to move current participants into the Waiting Room.
- Hide profile pictures: All profile pictures will be hidden.
- Allow participants to:
- Share Screen: Allows participants to start Screen Shares
- Chat: Allows participants to use the chat function.
- Rename Themselves: Allows participants to rename themselves from the Participants panel.
- Unmute Themselves: Allows participants to unmute themselves without the host’s permission.
- Start video: Allows participants to start their video in the meeting.
- Share whiteboards: Allows participants to open and share a Zoom Whiteboard.
- Share notes: Allows participants to open and share Zoom Notes.
- Collaborate with Zoom Apps: Allows participants to view and work collaboratively with a Zoom App.
- Set meeting timers: Allows participants to set a meeting timer.
- Annotate on Shared Content: Allows participants to annotate over content shared during the meeting. The host can enable or disable annotation when the host is sharing.
- Remove Participant: Allows the removal of a participant from a meeting. The participant cannot rejoin.
- Suspend participant activities: This feature turns off all participants' video, audio, Zoom Apps, and ability to share their screen. Also locks the meeting to prevent participants from joining. This will apply to all participants, including those joined using a Zoom Room.

Use the Waiting room
The waiting room feature will be turned on by default for all meetings and participants. It will notify host/co-hosts that someone has entered the waiting room. Only let users in that you recognize. You may want to instruct your students to only type in their real name when joining your meetings.
-
Admitting participants during a meeting
- As the meeting host, click Participants.

- Click Admit to have the participant join the meeting.

- As the meeting host, click Participants.
-
Admit all participants from the Waiting Room
- As the meeting host, click Participants.

- Click Admit all.

- As the meeting host, click Participants.
-
Sending participants to the Waiting Room during a meeting
- As the meeting host, click Participants.

- Click More next to the participant's name and choose Put in Waiting Room.

- As the meeting host, click Participants.
-
Enable/Disable Waiting Room during a meeting
There are two places hosts/co-hosts can enable/disable the waiting room in a meeting.
From Host Tools Icon
- Click the Host tools icon on the Zoom toolbar.

- Check Enable Waiting Room to enable and uncheck to disable.

From Participants
- As the meeting host, click Participants.

- Click More and choose Enable Waiting Room on Entry to enable or disable the feature.

- Click the Host tools icon on the Zoom toolbar.
Limit Screen Sharing
By default all participants can share their screen in your meeting. You can remove this capability from participants so that only the host can share the screen.
-
Prevent participants from screen sharing
There are two places hosts/co-hosts can enable/disable the waiting room in a meeting.
From Host Tools Icon
- Click the Host tools icon on the Zoom toolbar.

- Uncheck Share Screen to disable, check to enable

From Advanced Sharing Options
- In the host controls, click the arrow next to Share Screen.

- Click Advanced Sharing Options.

- Under " Who can share?" choose Only Host.

- Close the window.
- Click the Host tools icon on the Zoom toolbar.
-
Set account to not allow meeting participants to share their screen by default for all future meetings
- Log in to Zoom at uab.zoom.us.
- Click Settings on the left side of the screen.
- Click In Meeting (Basic).
- Scroll down and select Host Only under Screen sharing.

Disable Participant Annotation on Shared Content
By default, participants can annotate (draw on, highlight, insert shapes, etc.) on content being shared by someone. The person sharing content can turn off the ability for participants to annotate.
-
Instructions
- Share Content during Zoom meeting.
- Click More (3 dots).
- Click Disable annotation for others.

Mute Participants
Participants can unmute themselves in your meeting. Hosts/co-hosts can mute individuals or everyone in the room and can even remove the ability for participants to talk entirely.
-
Mute an individual
- Click Participants in the host controls to display the participants list.

- Hover over a participant and click Mute.

- Click Participants in the host controls to display the participants list.
-
Mute all participants
- Click Participants in the host controls to display the participants list.

- Click Mute All at the bottom of the Participants Window.

- If you want to remove the ability for participants to unmute themselves, uncheck the box. Click Yes to apply this setting.

- Click Participants in the host controls to display the participants list.
Turn off Camera/Webcam Feed
By default, Zoom allows all participants to turn on their webcam. There is not a setting to prevent all users from turning on the video, but you can stop participant's video feed one at a time. This also prevents those particular participants from starting their video again in that meeting unless requested by the host/co-host.
-
Stop Video of Participant
- Click Participants in the host controls to display the participants list.

- Hover over a participant, click More, then click Stop Video.

- Click Participants in the host controls to display the participants list.
Limit Chat
By default users can send chat messages that can be seen by everyone in the Zoom meeting. Host/co-hosts can limit the chat to only be seen by the host or turn off participant chat all together.
-
Change who participants can chat with
- While in a meeting, click Chat in the meeting controls.
- Click More button at the top to display in-meeting chat settings.
- Choose who attendees can chat with (No one or Host only).

-
Turn on/off participant chat
Host/co-hosts can toggle the ability for participants to be able to chat.
- Click the Host tools icon on the Zoom toolbar.

- Uncheck Chat to disable, check to enable

- Click the Host tools icon on the Zoom toolbar.
Remove Participant(s) From Meeting
Hosts can remove an unwanted user from a meeting so that they can no longer disrupt the meeting.
-
Remove individual participant
- Click Participants in the host controls to display the participants list.

- Hover over a participant, click More, then click Remove.

NOTE: Users removed from a meeting CANNOT rejoin that same meeting or future meetings with the same meeting ID. If you are wanting to remove someone that is not a threat, you can choose to move them into the waiting room instead. - Click Participants in the host controls to display the participants list.
-
Remove one or more individuals
Hosts/co-hosts can remove one or multiple individuals through the security icon.
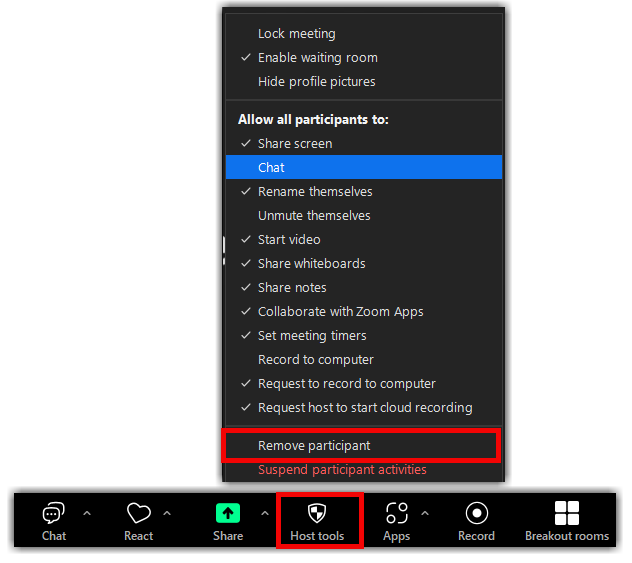
- Click the Host tools Icon on the Zoom toolbar.

- Click Remove Participant.

- Click remove beside the name of each person to remove them.

- Click the Host tools Icon on the Zoom toolbar.
Lock Meeting
Hosts can lock a meeting to keep further users from joining the meeting. Once the meeting is locked, no one can join even if they have the link and/or password.
-
Instructions
- Click Participants in the host controls to display the participants list.

- Click More at the bottom of the Participants window, and click Lock meeting.

Alternatively, users can lock the meeting from the Host tools Icon.
- Click the Host tools Icon icon on the Zoom toolbar.

- Click Lock Meeting.

- Click Participants in the host controls to display the participants list.
Force Authentication
By default, anyone with the link can join meetings as a guest. You can force users to authenticate before being allowed to join your meeting. When scheduling a meeting, you can decide if it will require authentication and can limit it to users a with a Zoom account or users with a Zoom account at UAB.
-
Instructions
- When scheduling a meeting, click the check box beside Only authenticated users can join.
- Choose the desired authentication you will allow for this meeting. (only one can be chosen)
- Sign in to Zoom: requires users to sign into a Zoom account. This allows anyone with a Zoom account to join your meeting.
- Sign in with UAB Email Address/SSO: requires users to sign in to a Zoom account with their @uab.edu or @uabmc.edu email. Users with UAB eLearning account will need to sign in with SSO.

If a participant tries to join the meeting or webinar and is not logged into Zoom, or logging in with the specified email domain, they will receive one of the following messages:
If they are not logged into Zoom:

If they are logged in with the wrong email domain:

Students will need to sign in with SSO while anyone that has an account outside of UAB eLearning (free, UA system, HIPAA) will need to login with their Zoom email and password.
Faculty, staff, and students who do not have an account can click Sign in with SSO, type UAB in the domain field, and provide their BlazerID and password. They will be provisioned a Zoom account and let in to the meeting.

Basic Security Tips
- Do not post the join link to your Zoom meetings on public facing websites or social media.
- If you are hosting a public event, you should use Registration and enable manual approval so that users can be identified before being allowed access to join.
- Course meetings should be scheduled using the Zoom tab within Canvas so that the join link is only available once authenticated in Canvas.
- External guests can be invited by personal email initiations.
- Do not post your personal meeting (PMI) room id or link publicly.
- Keep an eye on the participants in your meeting and act swiftly if you see an unwanted user.
- Report any unwanted users to Zoom and UAB eLearning. Please provide the Meeting ID and date of the incident.
Still Have Questions?
- Attend our Zoom Security Webinar on April 6, 9am
- Watch our most recent Zoom training
- Visit the UAB eLearning Zoom webpage
- Ask your question using the academic technology support form
- More information on annotations in zoom