Respondus Guides
How to format existing test and quiz documents for easy import using Respondus 4.0 to Canvas.
It is easy to import the tests and quizzes you have used before into Canvas. You will need to install the Respondus 4.0 software and use the Respondus 4.0 software to import your existing test/quiz files into Canvas. The existing files may need a small amount of reformatting to import into Canvas using Respondus 4.0. This document will show you how to format your documents for Respondus 4.0 import.
Note for users of screen readers: letters in parentheses in the instructions below refer to corresponding areas on example images. If you have any questions about these instructions, contact eLearning for assistance.
Formatting Existing Tests for Import to Canvas with Respondus 4.0
Import works with Word documents (docx), older Microsoft Word documents (doc, pre-Office 2007, and plain text documents. The formatting of the questions needs to be in a format that Respondus 4.0 can understand for multiple choice, true/false, short answer, matching, fill-in-the-blank, and multiple response questions. The Respondus Standard format has Required and Optional elements that are described below. Images can be imported as well. Images pasted into a word document will import smoothly and easily. Once the import file is formatted to the specifications below in Microsoft Word, it should be saved as a .docx file, which is the MS Word default. The document is then ready to be imported by Respondus.
Multiple Choice Questions
Each Question must begin with a question number, followed by either a period . or a parenthesis ) and a space.
Example: 3)
Example: 3.
The Question wording must follow the Question Number. (Note: at least one space should be between the question number and the question wording.)
Example: 3) Who determined the exact speed of light?
Example: 3. Who determined the exact speed of light?
Each Answer must begin with a letter (A-Z) followed by a period . or a parenthesis ) or a space, then the Answer Wording.
Example: 3) Who determined the exact speed of light?
- Albert Einstein
- Albert Michelson
- Thomas Edison
- Guglielmo Marconi
A Title can be imported with each question. If a title is not provided for a question, the first 20 characters of the question’s wording will be used as the question title. Titles must be placed at the beginning of a question and begin with Title: followed by the actual text for the title. If the title exceeds 20 characters, the remaining characters will be dropped during the import.
Example: Title: Speed of Light
3) Who determined the exact speed of light?
- Albert Einstein
- Albert Michelson
- Thomas Edison
- Guglielmo Marconi
Correct Answers are indicated by placing an asterisk * directly in front of the Answer Choice. There should not be a space between the asterisk and the Answer Choice.
Example: Title: Speed of Light
3) Who determined the exact speed of light?
a. Albert Einstein
*b. Albert Michelson
c. Thomas Edison
d. Guglielmo Marconi
Feedback can be imported by placing the tilde ~ symbol in front of the feedback for a correct answer. The @ symbol can be used to indicate the feedback for incorrect answers. There must be at least one space to the right of the ~ and @ symbols and the text you want displayed for the feedback. The feedback must appear before the Answer Choice.
Example: Title: Speed of Light
3) Who determined the exact speed of light?
~ Yes. Albert Michelson won the Nobel Prize for Physics for determining the exact speed of light.
@ No. The correct answer is Albert Michelson, who won the 1907 Nobel Prize for Physics for determining the exact speed of light.
a. Albert Einstein
*b. Albert Michelson
c. Thomas Edison
d. Guglielmo Marconi
To import feedback for individual answer choices of multiple-choice questions, place the feedback immediately after the Answer Choice and begin the line with the @ symbol. There must be at least one space between the @ symbol and the feedback text. Feedback is not required.
Example: Title: Speed of Light
3) Who determined the exact speed of light?
a. Albert Einstein
@ No. Albert Michelson determined the exact speed of light.
*b. Albert Michelson
@ Yes. Albert Michelson won the Nobel Prize for Physics for determining the exact speed of light.
c. Thomas Edison
@ No, Thomas Edison did not determine the exact speed of light.
d. Guglielmo Marconi
@ No. Marconi did not discover the exact speed of light, but he did win the Nobel Prize for Physics for his work with radio waves.
Point Values can be set for each question or for a group of questions. Points Values are set by adding “Points:”, a space, then the numeric point value. The point value is used for the next question and all following questions until a new point value is set. In the example, question 3 and 4 will have the same point value.
Example: Points: 2.5
3. Who determined the exact speed of light?
4. Who determined the exact speed of sound?
True or False Questions
To format True or False Questions for import, each question must begin with a question number, followed by either a period . or a parenthesis ) and a space. The correct answer must be marked with an asterisk *. Respondus requires that True and False be in the order shown below to be read properly.
Example: 3) Albert Michelson determined the exact speed of light?
*a) True
b) False
Example: 3) Albert Michelson determined the exact speed of light?
*a) T
b) F
A Title can be imported with each question. If a title is not provided for a question, the first 20 characters of the question’s wording will be used as the question title. Titles must be placed at the beginning of a question and begin with Title: followed by the actual text for the title. If the title exceeds 20 characters, the remaining characters will be dropped during the import.
Example: Title: Light speed
1. Albert Michelson determined the exact speed of light.
*a) True
b) False
To include Feedback for True or False questions, put an @ sign on the line below the Answer Choice the feedback is designed for. Place a space between the @ and the feedback for the student.
Example: Title: Light speed
1. Albert Michelson determined the exact speed of light.
*a) True
@ Yes. Albert Michelson won the Nobel Prize for Physics for determining the exact speed of light.
b) False
@ The correct answer is True. Albert Michelson determined the exact speed of light and won the 1907 Nobel Prize for Physics.
Essay Questions
Each Essay question must begin with a question number, followed by either a period . or a parenthesis ) and a space. The first line of the section with essay questions must begin with “Type: E”. This may be followed by Title: on the next line (no title is required, the first 20 characters of question will be the title if none is supplied), the Question Number, a space, and the Question Wording.
Example: Type: E
Title: Michelson-Morely experiment
- How is the Michelson-Morely experiment related to Albert Einstein’s theory of relativity?
To provide an Answer Choice, on the next line after the question begin the answer with a. or a) and a space, followed by the suggested answer wording.
Example: Type: E
Title: Michelson-Morely experiment
- How is the Michelson-Morely experiment related to Albert Einstein’s theory of relativity?
- In 1887, Albert Michelson and Edward Morely carried out experiments to detect the change in speed of light due to ether wind when the Earth moved around the sun. The result was negative. They found the speed of light is always the same regardless of Earth's motion around the sun. Scientists were puzzled with this negative result, and they didn't know how to explain it. Albert Einstein came up with the answer in his famous second postulate in theory of relativity: that the speed of light (in vacuum) is always constant and absolute, regardless of its source's motion and observer's movement.
Matching Questions
Each Answer Choice (which consists of both parts of a correct match) must begin with a letter (a-z) followed by a period . or a parenthesis ) and a space. The two parts of the Matching Question must be separated with an = symbol. There should not be any blank lines within either part of the answer. Spaces before or after the = symbol are optional, but it is important that an Answer Choice only uses the = symbol for the purpose of separating the two parts of the match.
Example: Type: MT
Title: Scientific discoveries
4) Match the correct name to the discovery or theory.
- Michelson-Morely = Speed of light
- Einstein = Theory of Relativity
- Marconi = Radio waves
Fill In the Blank Questions
Each Fill in the Blank question must begin with a Question Number, followed by either a period . or a parenthesis ) and a space. The first line of the section with Fill in the Blank questions must begin with Type: F on its own line. This is followed by the Title: (no title is required, the first 20 characters of question will be the title if none is supplied), the Question Number, a space, and the Question Wording.
Example: Type: F
Title: Who invented television?
5. Who is known as the "father of television”?
The Answer Choice should be supplied on the line below the Question Wording indicated by a. then a space before the Answer Choice. You can place multiple versions of the same answer by using the next letter in the alphabet. In the example, multiple versions of an inventor’s name would be counted as the correct answer.
Example: Type: F
Title: Who invented television?
5. Who is known as the "father of television”?
- Zworykin
- Vladimir Zworykin
- Vladimir Kosma Zworykin
Multiple Response Questions
Each Multiple Response Question must begin with a Question Number, followed by either a period . or a parenthesis ) and a space. The first line of the section with Multiple Response Question questions must begin with Type: MR or Type: MA as shown below. This is followed by the title (no title is required, the first 20 characters of question will be the title if none is supplied), the question number, a space, and the question wording.
Example: Type: MR
3) Which of the following individuals are credited with determining the exact speed of light?
a. Albert Einstein
*b. Albert Michelson
*c. Edward Williams Morley
d. Thomas Edison
Each set of possible answers must begin with a letter (a-z) followed by a period . or a parenthesis ) and a space. The correct responses should have an asterisk * in directly front of the letter without a space between the asterisk and the letter.
Example: Type: MR
3) Which of the following individuals are credited with determining the exact speed of light?
a. Albert Einstein
*b. Albert Michelson
*c. Edward Williams Morley
d. Thomas Edison
To include a Title or Feedback with the Multiple Response Questions, put an @ sign on the line below the Answer Choice the feedback is designed for. Place a space between the @ and the feedback for the student.
Example: Type: MR
Title: Determining Speed of Light
3) Which of the following individuals are credited with determining the exact speed of light?
@ Albert Michelson and Edward Williams Morley collaborated on a series of experiments that eventually led to the exact determination of the speed of light.
a) Albert Einstein
@ No. Albert Michelson and Edward Williams Morley collaborated on a series of experiments that eventually led to the exact determination of the speed of light.
*b) Albert Michelson
@ Yes. Albert Michelson is one of the two persons credited with determining the exact speed of light.
*c) Edward Williams Morley
@ Yes. Edward Williams Morley is one of the two persons credited with determining the exact speed of light.
- Details
How to Import documents into Canvas as Quizzes using Respondus.
Prerequisites
- Respondus Application is installed.
- A properly formatted word document. Formatting instructions are available in our Respondus Formatting Text guide.
Note for users of screen readers: letters in parentheses in the instructions below refer to corresponding areas on example images. If you have any questions about these instructions, contact eLearning for assistance.
Import Word Document into Respondus
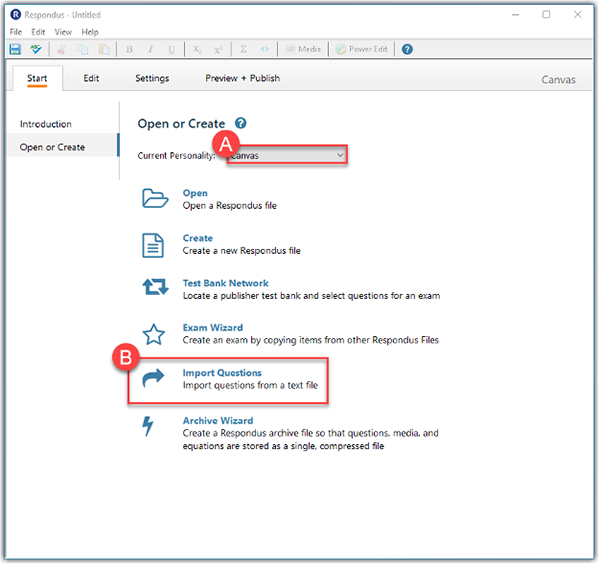
- Ensure that the Current Personality is set to Canvas (A).
- Select Import Questions (B).
- Change the drop down by Type of file (C) to Microsoft Word 2007 (DOCX).
- Browse (D) to the location of your Respondus 4 0 formatted Word Docx.
- Enter a name for the file that Respondus will create out of your Word Docx by Create a new document, named: (E).
- Click Preview (F). This will check for issues.

- The dialog box (G) should display “no warnings.”
Note: Warnings about question titles can be safely ignored. If there are issues other than a title warning, please check that your Word docx file is formatted correctly using our formatting guide or contact eLearning for assistance. - Check that the number of questions shown in the Preview Results (H) matches the number of questions in your guide.
Note: If your questions are of the matching type, there will only be one question for all matching questions. - When there are no errors and the number of questions is correct, the select Finish (I).

Preview and Publish
- An editable preview of your Respondus file will display after import. Editing here is not recommended as Canvas has better tools available. Click Preview + Publish (J) to move to the Preview + Publish tab.
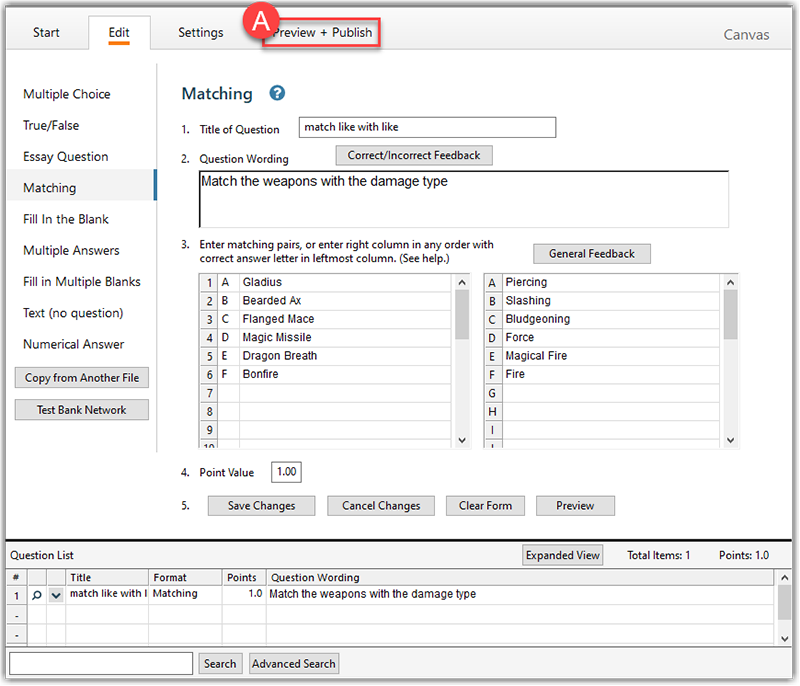
- In the Preview + Publish tab select Publish (K) then Publish Wizard (L).

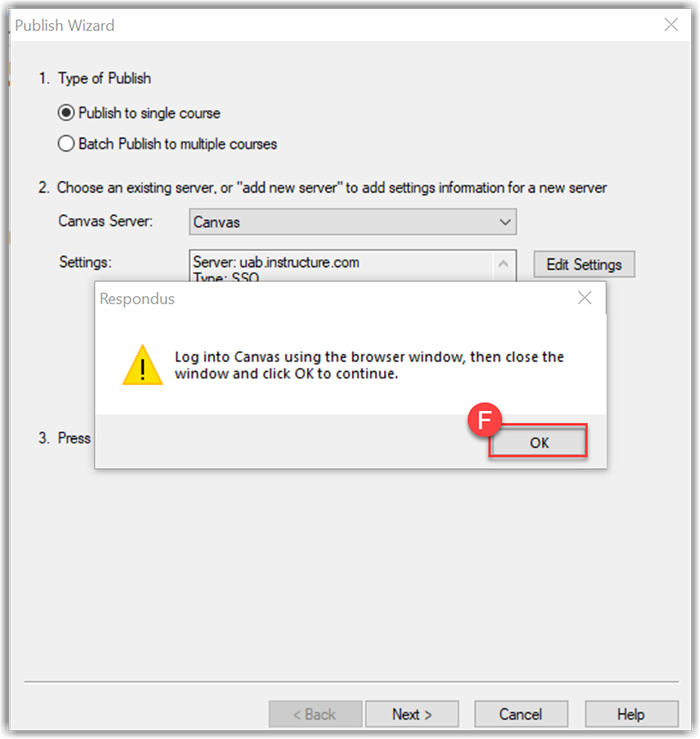
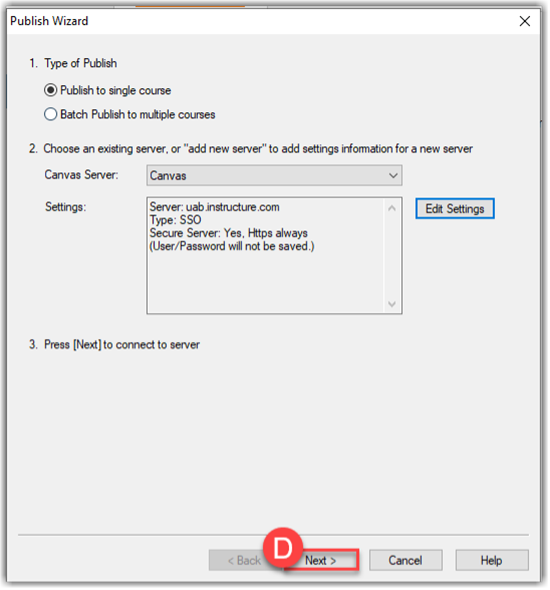
- The Publish Wizard should have the correct settings for the UAB Canvas server already in place. Select Next (M).
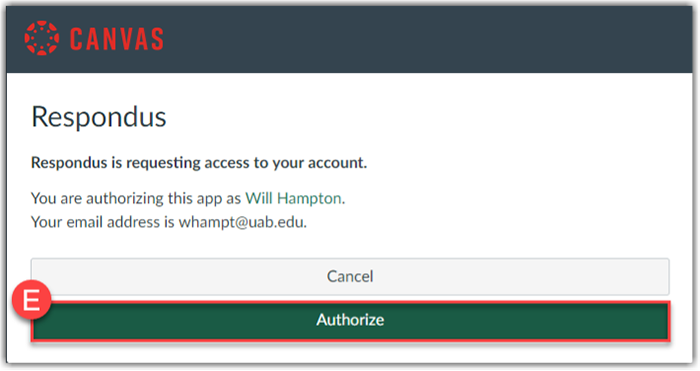
- There will be a dialog box informing you that Respondus will open a browser window for you to login to Canvas using your BlazerID and password. This browser window will display the usual UAB login screen. After you have successfully entered your credentials, Authorize (M) Respondus to access to your Canvas account. The window will close automatically.
- Back in the Respondus app, select OK (F).
- Under Select assessment Type select Graded Quiz (G).
- Under Specify server action and item name by Create (H), enter a new name or accept the Question Bank name that Canvas will use for your file. When satisfied, Next (I).

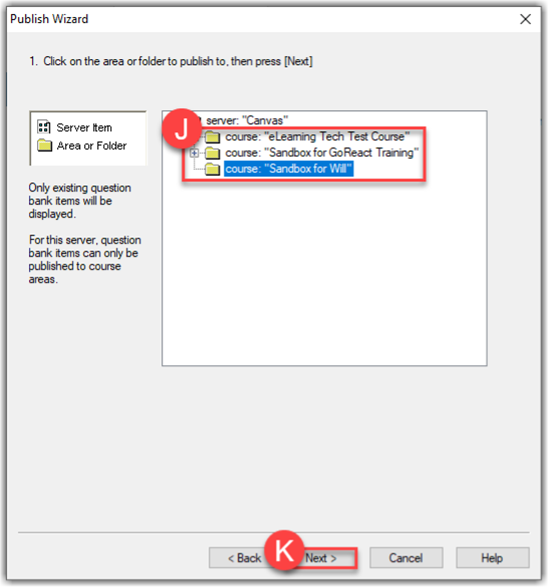
- Click on a course to publish to (J) then select Next (K).
- Wait until the status window says Publish Completed Successfully (T) to press Next (U). Congratulations! Your existing quiz/test/exam has been imported into Canvas as an unpublished Quiz.

Respondus Connection Guide
- Respondus should connect to Canvas automatically with no issues. During the Publishing Wizard if you have difficulties connecting, first check for a separate window with an authorization prompt (A).
Note: This window may ask for your UAB credentials if you are not already logged in to Canvas.
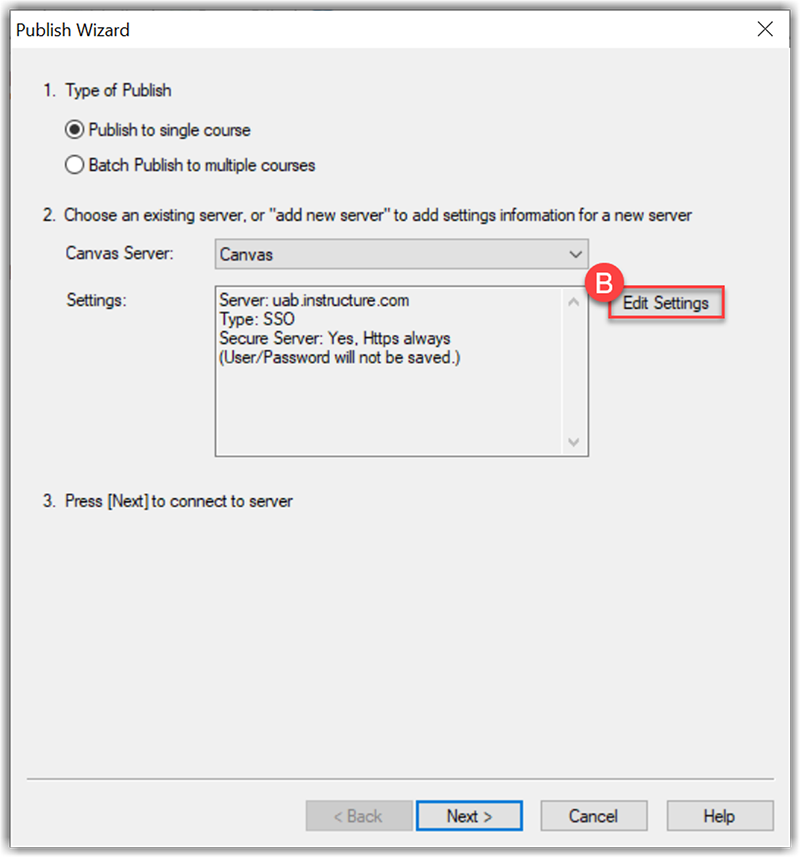
- If there is no Authorization window click Edit Settings (B).
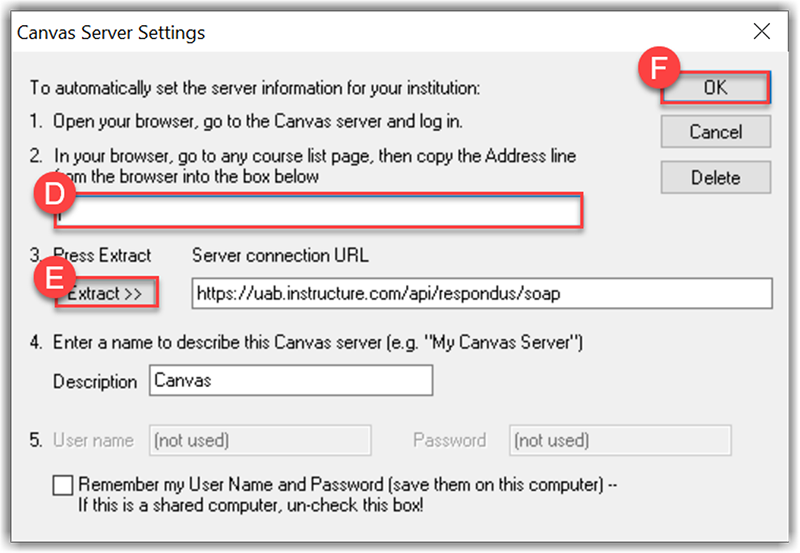
- The Canvas Server Settings window requests that you open a browser, then “go to any course list page, then copy the Address line from the browser into the box below.” To do so, login to Canvas from your preferred browser, and open any course you have access to. Then highlight and copy the URL as shown (C).
pic - Back in the Respondus Canvas Server Settings window, paste the URL into the box (D), press Extract (E), then OK (F). The publish wizard should pick up where you left off.
- Details
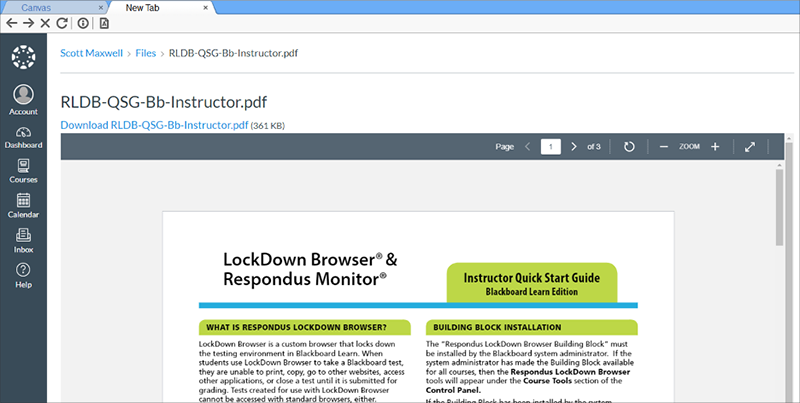
Respondus LockDown Browser (RLDB) is a custom browser that secures the testing environment in Canvas. It prevents printing, copying, accessing other applications, and closing a quiz until it is submitted for grading. Quizzes created for use with RLDB cannot be accessed with standard browsers such as Chrome or Firefox. Users must access the exam using RLDB.
Installing the LockDown Browser
If Respondus LockDown Browser (RLDB) has already been installed skip to the next section. If not, LockDown Browser must be installed to any computer (or iPad)/Chromebook if allowed by the instructor) being used to take a test. A link to download RLDB is provided on the quiz page. Additionally, students can download Respondus Lockdown Browser here.
Please note: If downloading for a PC, Mac, or Chromebook, students should use the UAB specific link to download RLDB found in the Canvas course or UAB eLearning website provided above. If downloading for iPad, simply search for Respondus LockDown Browser on the App store.
Testing with LockDown Browser (LDB)
- Close all programs, unless one is used to connect you to the internet.
-
Locate the “LockDown Browser” shortcut on the desktop and double-click it. (For Mac users, launch “LockDown Browser” from the applications folder).

- If prompted to close a blocked program (e.g. screen capture, instant messaging) choose Yes or Close Application when prompted.
- LockDown Browser (LDB) may require you to manually close applications/tasks and then restart the process by re-opening LDB again.
- Login to your Canvas course.
- Navigate to the quiz and select the Take the Quiz (A) link.

Testing with LockDown Browser (LDB) + Webcam
You may also be required to use a webcam with Respondus LockDown Browser (RLDB), which will record you during an online, non-proctored exam. (The webcam feature is referred to as “Respondus Monitor”.)
Requirements for Using LockDown Browser + Webcam to Take a Test:
- Access Exam with LockDown Browser
- Integrated or USB Webcam
- Integrated or USB Microphone
- Broadband Internet Connection
Startup Sequence
If an exam requires LockDown Browser and a Webcam, the ‘Startup Sequence’ begins after clicking ‘Take the Quiz’. Note this time is not being counted against your test duration.
- First, review and agree to the Terms of Use.
- The Webcam Check will confirm that your webcam and microphone are working properly. The first time the Webcam Check is performed on a computer, Adobe Flash Player may require you to select Allow and Remember.
- Click the Yes (A) button to continue if your webcam is working properly and you can see your image in the window. Click the No (B) button to adjust your webcam and try again.

- LockDown Browser will also check your microphone by recording a video. Click on the Record Five Second Video (C) button to begin recording. This recording will be discarded when the Webcam Check is complete. The video will playback for your review. Click Continue if you can clearly hear your voice and see your image in the playback video.
- Click Close to finish the Webcam Check and continue the Startup Sequence.

- The remaining steps of the Startup Sequence will depend on the settings chosen by your instructor. Follow the instructions and note your progress along the top of the screen. If you encounter a problem, select the It’s not working link for troubleshooting.
- Your exam may require a Student Photo. The Student Photo will be used by LockDown Browser to identify you during the Your photo should be taken in a well-lit area and clearly identify your face. Click on Take Picture (D) to take your photo. Click Continue (E) if the photo sufficiently identifies you. If you need to retake your photo, LockDown Browser will allow you to do so. Click Try Again (F) to retake your photo.


- Your exam may require you to provide a Photo ID. Hold your identification to the camera and select Take Picture (G). Only use the type of identification approved by your institution. Refer to the complete list of approved documents.
- Your Instructor may require you to complete an Environment Check to make sure your working area is clear of any unapproved resources such as papers, books, phones etc. Click Start Recording (H) and slowly tilt/pan your webcam or laptop so a brief video can be made of the area around your computer. Click Stop Recording (I) when finished.


-
Your exam may require a Facial Detection Check. Your face needs to be well-positioned in the window and clearly visible during the entire exam. You may proceed once facial detection is successful. Click Continue (J) when LockDown Browser displays a green thumbs-up icon (K), representing successful facial recognition.

Your exam will begin after the Startup Sequence is complete. You cannot exit LockDown Browser until the test is submitted for grading.
For any issues during this process, contact Respondus Support.
- Details
See the instructions below for enabling LockDown Browser(LDB) or Monitor.
Please note:
- Only Canvas Classic/New Quizzes are supported with LockDown Browser/Monitor. Canvas online assignments or discussions cannot be used with Respondus LDB/Monitor.
- Only users with Teacher access to a Canvas course can enable LDB or Monitor. TA’s or Designers cannot access the Respondus LDB & Monitor Dashboard in Canvas to enable or review settings.
- Respondus Monitor can only be turned on in addition to Respondus LockDown Browser (LDB) as it is a companion feature that is built on using LDB.
Enable LockDown Browser
Instructors have to enable Respondus LockDown Browser inside Canvas in order for it to be enabled for a Canvas Quiz.
- Create the quiz in Canvas Quizzes.[See Canvas guides on creating Quizzes]
- Select LockDown Browser (A) from the Course navigation in Canvas. Use this guide to enable Respondus LockDown Browser if you do not see it in your course navigation.
- A list of quizzes in the course will be displayed. Quizzes are labeled as Required/Not Required for both Respondus LockDown Browser and Monitor (webcam).
- Click the Downwards Arrow (B) to access the drop-down menu, then select Settings (C).

- Select Require Respondus LockDown Browser for this exam (D).
- If you have a passcode for your Canvas quiz, ensure Password settings (E) is open, then type that into the access code (F) field. LockDown Browser will prompt students to enter the instructor-provided code before proceeding with the quiz.
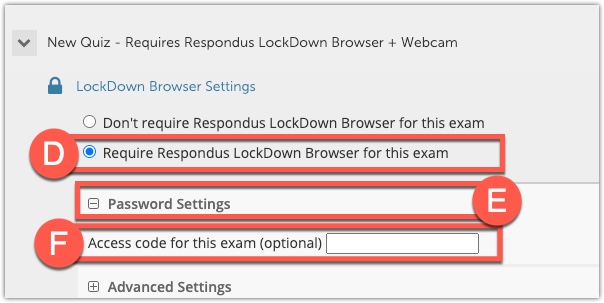
- Click Advanced Settings (G) to expand further options:
- The checkbox to Require LockDown Browser to view feedback and results (H) is checked by default. This will require students to use the LockDown browser when viewing their quiz results. It prevents the student from copying and pasting or taking screenshots.
- The Lock students into the browser until exam is completed (I) setting will prevent students from exiting the browser until the exam is completed. (Only recommended in proctored environments)
Note: With this option (I) unchecked, students can exit the browser before submitting the exam but will have to provide an explanation, instructors will be able to review early exits. For more information about early exits, please visit the Respondus website.
- The Allow students to take this exam with an iPad (using “LockDown Browser” app from iTunes) (J) setting will allow students to take the exam with an iPad, using the free LockDown Browser app.
- The Allow access to specific external web domains (L) setting will allow students to access a list of specified web domains during the test.
Note: Instructors must provide link(s) to the site(s) in the Canvas Quiz Instructions or question prompt area in addition to allowing the domain(s) in these settings. Please visit the Respondus Guide for using external links and files to learn more about allowing students to access specific external web domains.
- The Enable Calculator on the toolbar (M) and Enable Printing from the toolbar (N) settings allow instructors to provide students with a calculator or print function in the LockDown Browser toolbar.
- Click Save and Close (O) to apply your preferred settings or continue to the next section to learn how to turn on Respondus Monitor.

Enable Respondus Monitor
Follow the directions below to enable Monitor (web cam) on your Canvas Quiz.
- Set the exam so to require LockDown Browser then select Require Respondus Monitor for this exam (A) to require all students use a webcam during the exam.
- Now select/unselect the items to be included in the Startup Sequence (B), which includes the steps a student must complete prior to the start of an exam. Features may be enabled or disabled with the exception of Webcam Check and Facial Detection. Click Preview to see what your students will see.
- The Webcam Check (C) allows the application to check the student’s webcam to ensure it is working properly before they can begin the exam.
- The Additional Instructions (D) section displays basic instructions on taking an online exam. This section can be edited to include specific instructions about what is allowed or not allowed during the exam (no bathroom breaks, no one else in the room, or can use book but must be in the frame of the webcam, etc.).
- The Guidelines + Tips (E) feature will display guidelines and tips provided by Respondus Monitor prior to the exam (avoid rooms where children or other people are present, turn off televisions, radio, music, etc.)
- The Student Photo (F) feature will require the student to take a photo with their webcam for identification purposes.
- The Show ID (G) feature requires students to present their ID to their webcam for identification purposes. Respondus will list the UAB approved options for identification.
- The Environment Check (H) feature requires students to pan their webcam around their testing area, which ensures the area around their computer is clear of any unapproved resources such as papers, books, phones, etc. This field can also be edited by instructors to provide specific instructions of what you want the environment video to include (such as showing you placing your phone in a drawer or other location).
- The Facial Detection (I) section is mandatory as this is how the system flags suspicious behaviors.

- Click Facial Detection Options (J) to choose how Monitor will behave when a face cannot be detected.
- Checking the first box (K) will prevent students from starting the exam if their face is not detected during the Startup Sequence.
Note: Facial Recognition works best with a good internet connection, appropriate lighting in the room, and a high quality image resolution from the webcam. The wearing of a mask or other covering may impact this feature.
- Checking the second box (L) will notify students during the exam if their face cannot be detected and give them a chance to correct it.
Note: You may not want to enable this feature if you require students to record with a side camera, or if students are permitted to use textbooks or other resources during the exam (since this will result in students turning away from the webcam and receiving frequent notifications.
- Click the Advanced Settings (M) section to open up further option.
- Check the first option (N) if your exam has any component that would require access to the student’s microphone. This turns off the ambient noise recording portion of Respondus Monitor so that the microphone can be detected and used by Canvas Quiz media function.
- Check the second option (O) if you would like to make webcam videos additionally available for viewing on mobile devices.
- Click Save + Close (P) to save your preferences. The Quiz name will be updated to say “[Quiz Title]- Requires Respondus LockDown and Monitor”.

Student Experience
The following details the basic student experience. We advise instructors to send students the Student Quick Start guide and also schedule a practice quiz so that students can test their equipment and get familiar with the technology.
- Students download Respondus LockDown Browser. A UAB specific link is provided on the Canvas Quiz page and on the eLearning Respondus LockDown Browser & Monitor webpage. We recommend this be done at least several days in advance of taking the quiz.

- Students locate the “LockDown Browser” shortcut on their computer desktop or applications and double-click it (For Mac users, launch “LockDown Browser” from the Applications folder.). If prompted to close a blocked program (e.g. screen capture, instant messaging) choose Yes. If told to close a program, close that program and reopen LockDown Browser.
- Log into their Canvas course using a BlazerID and Strong Password, navigate to the quiz and click Take a Quiz.
- If the student is required to use a webcam to record themselves during a test, a Startup Sequence will guide the student through a webcam check and other items required by the instructor.
- If the settings for a quiz require that LockDown Browser be used, it cannot be accessed with a standard browser. As shown, a warning message will indicate that LockDown Browser is required for the quiz.
Review Webcam Videos
***Note that Respondus Monitor is intended to be a deterrent, it is the instructor’s responsibility to review videos.
- Access the LockDown Browser dashboard in the Canvas course. [See how to access Respondus Dashboard]
- Click the Downwards Arrow (A) to the left of the quiz title, then select Class Results (B).
- A roster of the students in the course is shown, along with the date, time, duration, review priority, and grade for the quiz. Click [ + ] (C) to expand the section for a student.
- When you have finished reviewing the video, click on the Circle (D) to mark the video as reviewed.
- Any instructor notes will be display in the Notes (E) column.
- Details of the startup sequence and the exam sessions are shown in thumbnails. Click a thumbnail to view the video for the time indicated.

- Details
When embedding files like PDFs and Word documents into an exam, students can click the magnifying glass icon beside them to preview them — but if clicked, it will open a blank tab. To properly embed files that open successfully in another tab, follow the instructions below. Please note, spreadsheet files automatically open in another tab and do not require any further action.
Note for users of screen readers: letters in parentheses in the instructions below refer to corresponding areas on example images. If you have any questions about these instructions, contact eLearning for assistance.
Step 1: Embed File into Quiz Question or Quiz Instructions
- Type and select the desired text (A).
- Click Documents (B) icon in the Rich Content Editor and choose a location or upload new document.
- Select the desired File (C).

Step 2: Edit file URL
Canvas adds text to the end of the File URL that tells your computer browser to download the file. Respondus LockDown Browser does not allow this since it blocks downloads and other applications. To fix this, we need to remove the text (syntax) that tells it to download
- Highlight the File URL again and click Options (D) that appears under the link.
- Remove [delete] the download/preview syntax (E) at the end of or the file URL. You can delete all content after the numbers that come after /files/ (ex. 'uab.instructure.com/courses/123456/files/223344/download-wrap?1', the '/download-wrap?1' would be deleted.)
- Click Done (F).

Step 3: Test it in Respondus LockDown Browser
Assuming all has been done correctly, clicking the link should now open the PDF in a second tab, with the quiz remaining in the first tab.
We recommend creating a practice quiz that includes all the elements (links, files, etc.) you plan to use so that you and your students can make sure things are working correctly.

- Details